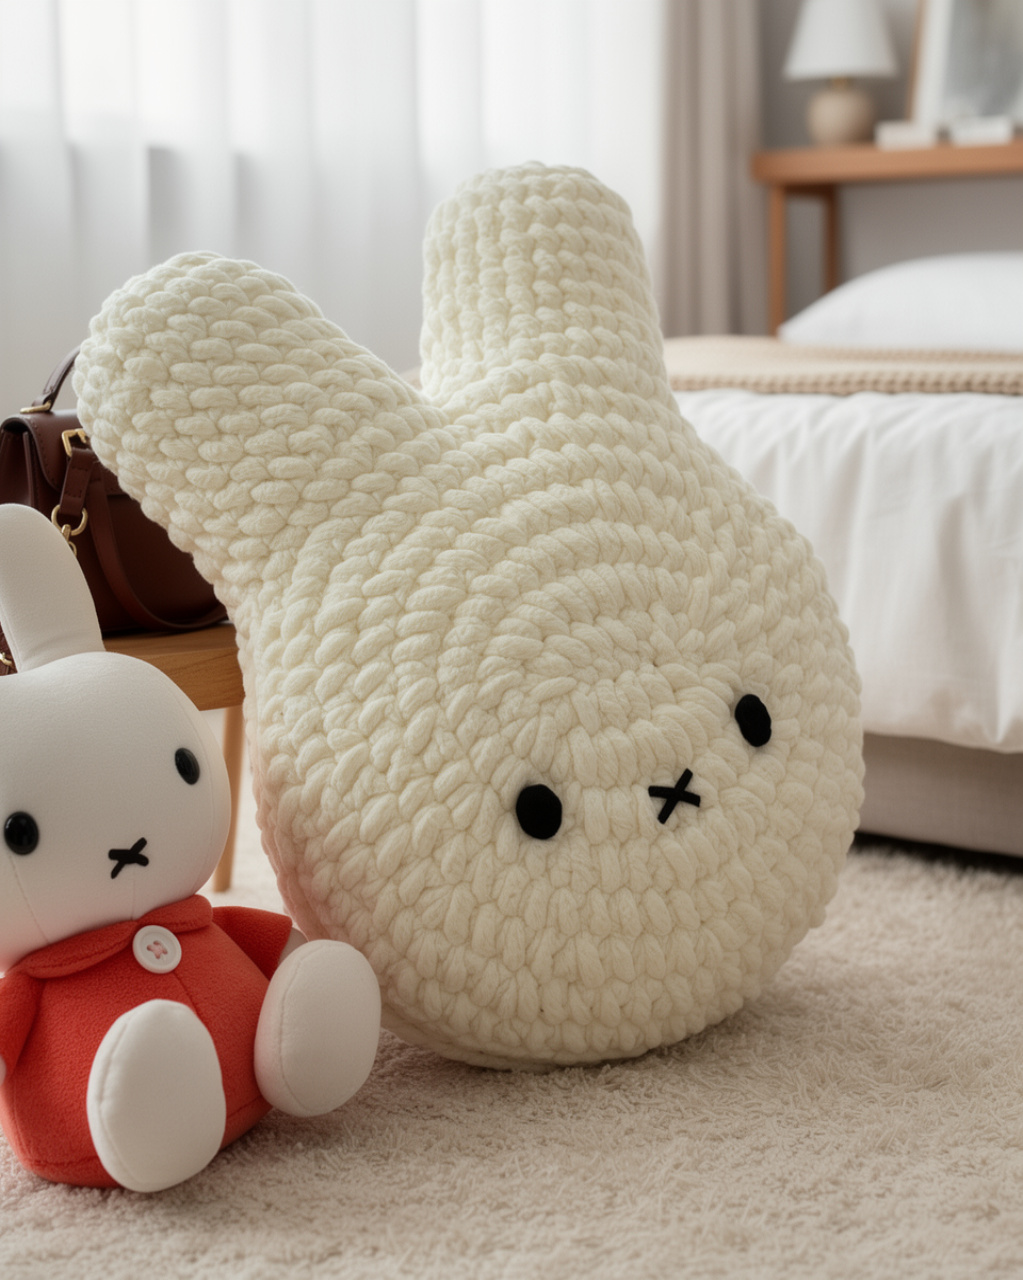
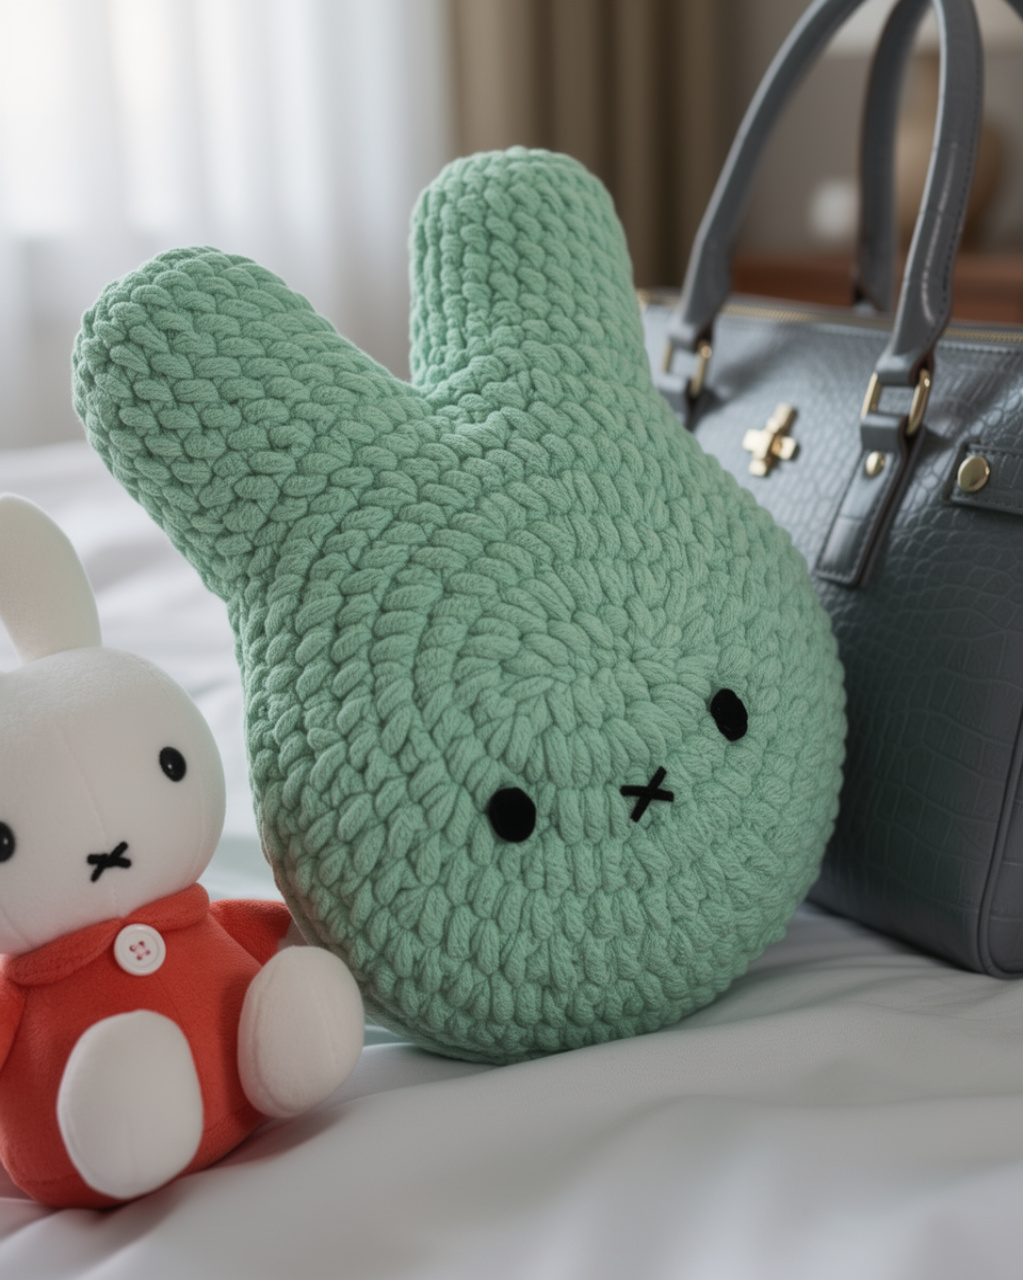
If you’ve been hunting for a soft, squishy bunny cushion with that clean, iconic face, this Miffy Pillow Crochet Pattern is exactly that: a round, plush pillow with upright ears and a simple stitched expression you can finish in an afternoon or two.
Behind the Pattern
I wanted this pillow to feel like a little piece of cozy decor that still looks crisp and intentional, not fussy. The finished look is a creamy off-white bunny with a rounded head-and-body shape, two ears standing straight up, and a minimal face: two small black oval eyes and that tiny black “X” for the mouth and nose.
The texture is the part I keep touching, I’m not even kidding. It’s chunky and bumpy in the best way, so it reads as plush from across the room, but it’s also just a nice, steady make while you’re watching something in the background (or ignoring your laundry, no judgment). It’s a Level 2 easy project, so you get that satisfying “I made a whole cute thing” feeling without a bunch of complicated steps.
Why You’ll Want to Make This
You’ll end up with a cuddly bunny pillow that looks clean and modern.
- Simple, iconic face: The tiny eyes and stitched “X” give it that Miffy look without extra fuss.
- Big plush texture: The chunky stitch pattern makes the whole pillow feel extra soft and substantial.
- Easy home-decor win: It’s the kind of piece that sits nicely on a bed or sofa and just works.
Materials You’ll Need
You will use two hook sizes here, plus a chunky chenille for the pillow and a small bit of black for the face.
- 6 Super Bulky chenille yarn: For this project I reach for a thick chenille because it builds a soft, squishy pillow fast and the fabric feels plush right away. You want something that is velvety and springy, not stiff, so the panels sit smooth once they are stuffed. Plan on about 300 g of white chunky chenille (around 7 mm thick) for the two circle panels and the main body, plus a small amount of black cotton or acrylic yarn for the eyes.
- 6 mm crochet hook; 2.5 mm crochet hook: I use the 6 mm with the chenille so the stitches stay full without turning into a tight brick, and the 2.5 mm for the black yarn so the eye details stay neat and don’t look oversized.
- Stuffing materials: Use enough to fill it firmly without stretching the stitches, and stuff as you go before the opening gets annoying to work into.
- Black felt cloth: This is handy for simple facial details like the mouth if you’d rather cut and glue than embroider.
- Glue: I like glue for attaching felt cleanly, especially on chenille where sewing can sink in and disappear.
- Also needed: stitch markers, darning needle, scissors
Yarn Substitutes
Chenille is a little fussy sometimes, so it helps to know what else works if you want a different texture or easier stitch definition.
- 6 Super Bulky blanket-style polyester: Look for balls in the 200 to 300 g range and grab enough to total about 300 g in white. It stays plush like chenille but usually shows stitches a bit more, so shaping is easier to see.
- 2 strands of bulky acrylic held together: Two 5 Bulky balls around 100 g each usually get you close to the thickness you need, and you can aim for about 300 g total in white. It is not as velvety, but it is sturdy, easy to frog, and the surface is smoother for sewing on face pieces.
Key Information
Here’s the quick-reference stuff you’ll want before you start.
| Skill Level | Level 2 — Easy |
| Pattern Gauge | Gauge is not critical for this project. Use a hook size that creates a dense fabric appropriate for a pillow cover so stuffing does not show through and the circles hold their shape. |
| Finished Size | Approx. 30 cm (12 in) diameter pillow (based on 84-st circle in super bulky chenille with 6 mm hook) |
| Yarn Weight | 6 Super Bulky |
| Fiber | Chenille (fiber content not specified); Cotton or acrylic (black yarn for eyes) |
| Terminology | US |
Stitch Guide & Abbreviations
Keep this list nearby while you crochet.
- BLO = back loop only
- ch = chain
- dec = decrease
- FLO = front loop only
- inc = increase
- R = round
- sc = single crochet
- sl st = slip stitch
- st = stitch
- * = repeat
- [ ] = total stitch count at end of round
The Critical Details
This is a no-sew build, and you do not need a magic ring, so there’s that. Each circle panel is worked in joined rounds, not spirals. At the end of every round, slip stitch into the first stitch to join, then start the next round with chain 1. The chain 1 and the joining slip stitch do not count as stitches, so your stitch counts are based on the actual single crochet stitches in the round.
Miffy Pillow Crochet Pattern Instructions
Work through each section in order, and you’ll have all the parts ready to assemble your pillow face.
Circle Panels (Make 2)
These are the two main circles that get joined to form the base. Use white yarn (or any color you prefer) and start with a slip knot. You’ll be working in joined rounds, so keep an eye on where each round begins and ends.
Round 1: Ch 7, starting from 2nd ch from hook, inc, 4 sc, 4 sc all into last ch, working into lower parts of ch, 4 sc, inc, sl st into 1st sc to join. [16] Take your time on the “working into lower parts of ch” part. That’s the underside of the starting chain, and it’s what gives you stitches on both sides of the foundation chain.
Round 2: Ch 1, 16 inc, sl st to join. [32] If your slip stitch join starts to feel tight, loosen it a touch. You’ll be joining through loops later, so you don’t want a rock-hard seam.
Round 3: Ch 1, (7 sc, inc) *4, sl st to join. [36]
Round 4: Ch 1, (sc, inc, sc) *12, sl st to join. [48] This round can be where stitch markers pay off. Mark the first stitch of the round if you tend to lose it after the join.
Round 5: Ch 1, 48 sc, sl st to join. [48]
Round 6: Ch 1, (3 sc, inc) *12, sl st to join. [60]
Round 7: Ch 1, (2 sc, inc, 2 sc) *12, sl st to join. [72]
Round 8: Ch 1, (5 sc, inc) *12, sl st to join. [84]
Cut yarn and make another circle.
Marker Setup for Joining
This is the quiet, fussy part that makes the joining clean later. You’re placing markers on both circles so the join happens in the same spots on each piece.
Take one circle and find the last stitch. Count backwards, starting from this last stitch as 1, and count to the 9th stitch. Place a stitch marker in the 9th stitch. Starting from the stitch next to the first marker, count forward to the 25th stitch and place a second marker there. You will have 24 stitches between the markers (not counting the marked stitches). Take the other circle and place the markers the same way. Count carefully and don’t guess. Being off by one here will show up later, so there’s that.
Continue to joining the circles.
Join the Two Circles
Now you’ll connect the circles together by crocheting through specific loops. Place the two circles together with right sides facing each other and wrong sides facing you. Align the stitch markers so each pair of markers is directly opposite the other. When joining, insert hook through FLO of the top circle and BLO of the bottom circle for each stitch.
Begin joining at any pair of stitch markers. Starting in the marked stitch, sc all the way around, working through the specified loops, until you reach the second pair of stitch markers. You should have a total of 60 sc from joining. At the end, ch 1 and cut yarn. Keep your hook placement consistent. If you accidentally grab both loops on one circle for a few stitches, it’ll change the edge and you’ll feel it when you sew and tidy later.
Fasten off, weave in ends.
Ears (Make 2)
These are worked after the circles are joined, using the remaining unjoined stitches. After the circles are joined, you should have 24 sc remaining on each circle. Locate the 12th stitch on each circle (on opposite sides) and place a stitch marker in each. These stitches should be directly across from each other.
Round 1: Starting from the marked stitch on the front circle, 12 sc along the front circle, sc into the connecting stitch (from the joined circles), 12 sc along the lower circle. [25] That “connecting stitch” is the stitch right at the join between circles. It’s easy to skip because it sits at the transition, so pause and find it on purpose.
Round 2: 25 sc. [25]
Round 3: 25 sc. [25]
Round 4: 25 sc. [25]
Round 5: 25 sc. [25]
Round 6: 25 sc. [25]
Round 7: 25 sc. [25]
Round 8: (3 sc, dec) *5. [20] Try to keep your decreases in the same style throughout (invisible dec, or your usual). Mixing decrease styles can change how the stitches sit.
Round 9: 10 dec. [10]
Cut yarn and close the ear.
Eyes (Make 2)
Make the eyes as small separate pieces, then attach them later. Use black yarn (milk cotton or acrylic) with a 2.5 mm hook. Start with a slip knot and ch 3.
Round 1: Starting from 2nd ch from hook, inc, 3 sc all into last ch, working into lower part of ch, sc. [6] This is another “work into the lower part of ch” moment. It’s the same idea as the circle start, just on a tiny scale.
Cut yarn, leaving a long tail if sewing onto the face. If gluing, weave in the ends.
Face Details and Small Closing
This last bit is where you use tails and small pieces to finish the face. Nothing complicated, just a few deliberate placements.
Close the gap between the two ears with the yarn tail left. Sew or glue the eyes on Round 3 of any circle you like, with 8 sc between the two eyes. Use black felt cloth to make the mouth, or embroider using black yarn. If you’re sewing the eyes, thread the tail onto a needle and take a couple of passes through the same spots so they don’t swivel later.
Fasten off, weave in ends.
Final Touches
Place the two circles together with right sides facing each other and wrong sides facing you, then align the stitch markers so each pair of markers is directly opposite the other. Join circles by single crocheting through FLO of the top circle and BLO of the bottom circle for each stitch until reaching the second pair of stitch markers (60 sc total from joining). Close the gap between the two ears with the yarn tail left at the beginning of the 2nd ear. Sew or glue the eyes on Round 3 of any circle you like, with 8 sc between the two eyes. Make the mouth from black felt cloth or embroider using black yarn. When you’re weaving in ends, run the tail through several stitch paths and change direction once. That’s the simple way to keep ends from working loose over time.
Baby & Child Safety Notes
If this is for a baby or young child, skip glued pieces. Sew the eyes on very securely instead, or embroider them with black yarn. Weave in ends with extra care and don’t leave any long tails inside where they could be pulled out.
Frequently Asked Questions
Mine comes out at about 30 cm (12 in) across. That size is based on an 84-stitch circle in super bulky chenille with a 6 mm hook, so if you change yarn or hook size, expect the diameter to shift.
I use the 6 mm hook for the main pillow pieces in super bulky yarn. The 2.5 mm hook is for the smaller details, and it helps keep those parts tighter and more controlled so they don’t look floppy.
Yes. The easiest way is to change yarn and hook size, since the sample size is tied to super bulky chenille and a 6 mm hook. You can also stop the circle earlier for a smaller pillow, or keep going past 84 stitches for a bigger one, but then your final diameter won’t match the 30 cm (12 in) note, so there’s that.
It’s Level 2. Easy. If you can crochet a steady circle and keep your stitch count consistent, you’re fine. The only part that tends to slow people down is the small-detail work with the 2.5 mm hook because it feels fiddly.
I reach for 6 super bulky chenille for that squishy pillow feel, and I stick with the 6 mm hook for the main circle. If you swap to a different yarn weight, the fabric changes fast, and the finished pillow size changes too. Not wrong, just different.
Now It’s Your Turn!
If you make this Miffy Pillow, I want to see it. Save the pattern to your Pinterest board so you can find it again when you’re in a home-decor mood, then come back and tell me what size yours turned out and whether you stuck with the super bulky chenille. I love seeing the little differences people end up with, by any means.