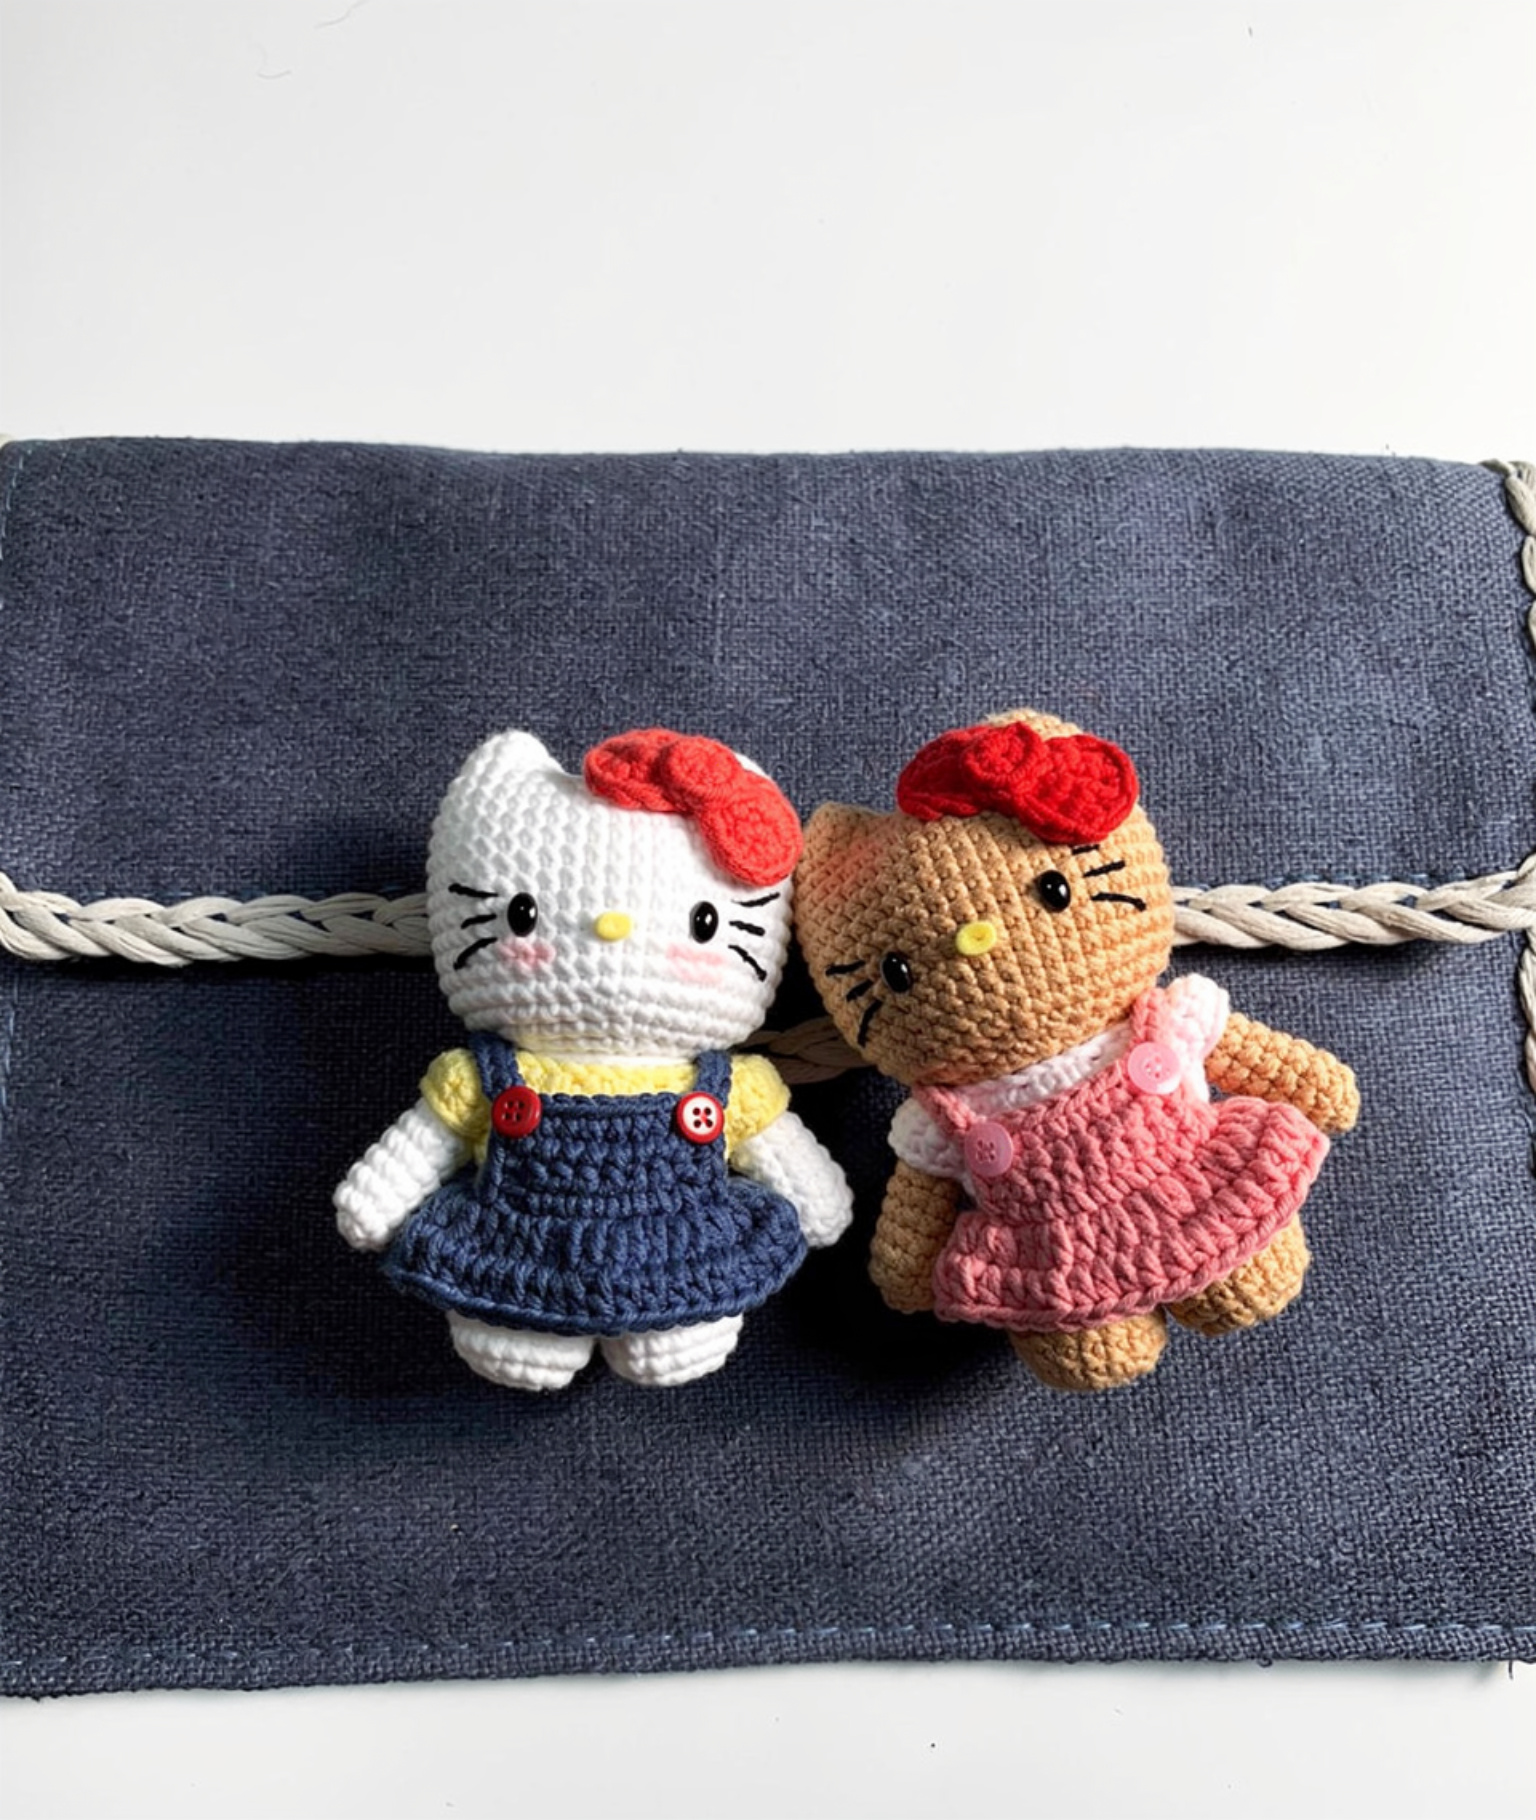
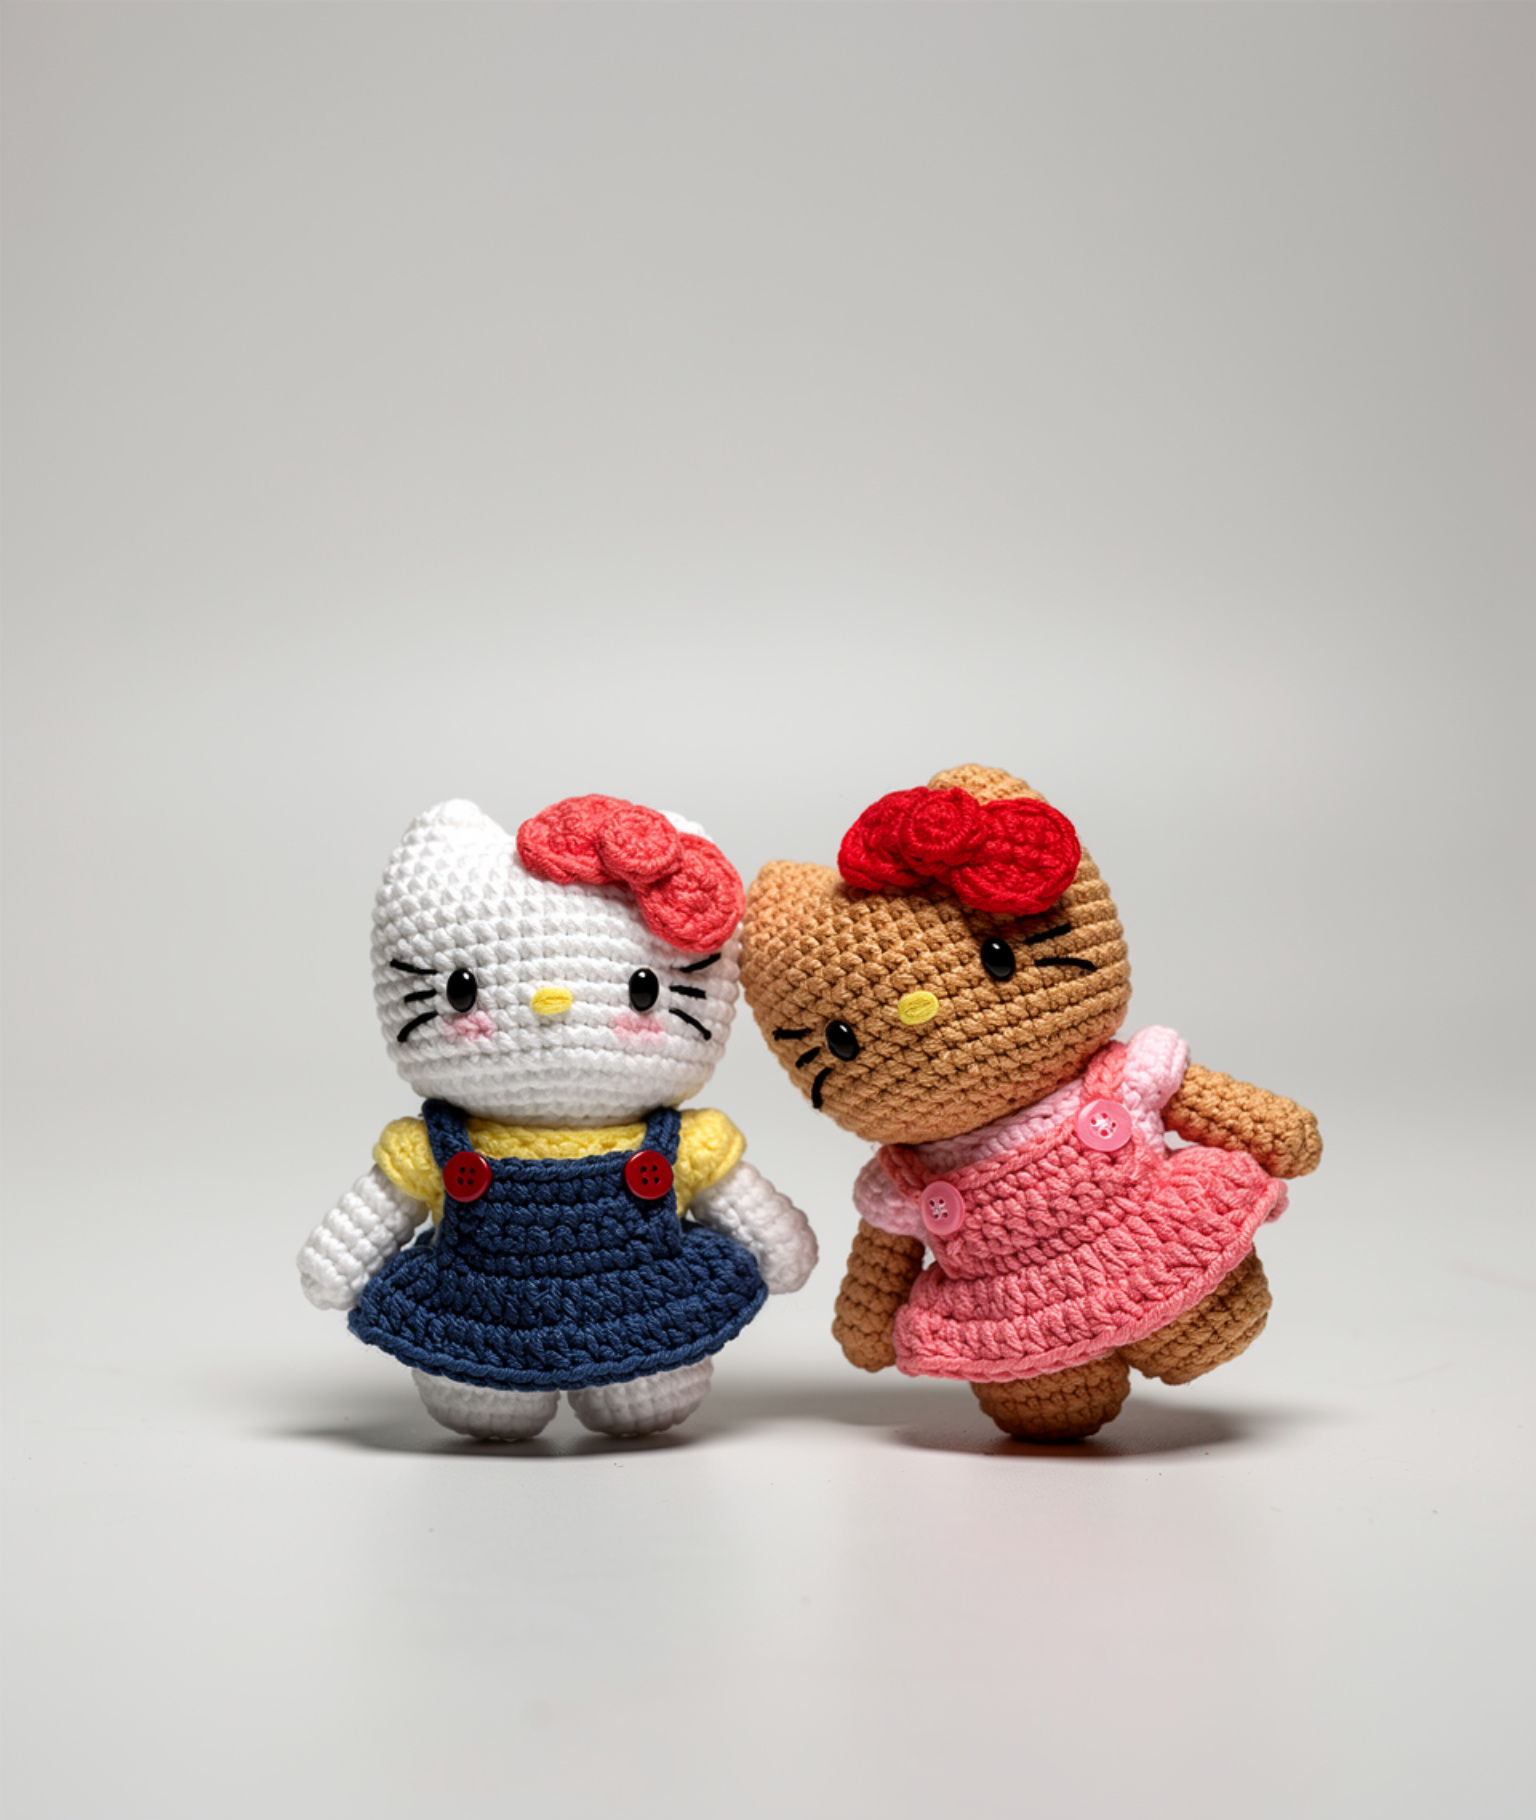
If you’ve been hunting for a cute, classic Hello Kitty Crochet Pattern, this one gives you a small amigurumi doll with that instantly recognizable kitty face and outfit details you can actually see from across the room.
The Inspiration
I wanted this design to feel like the kind of Hello Kitty-style plush you’d keep on a shelf, but still soft and simple enough to make in one sitting if you’ve got the time. The finished look is all about that rounded head, tiny triangle ears, and the sweet little face: black bead eyes, a yellow nose, and embroidered whiskers. And yes, the bow is non-negotiable.
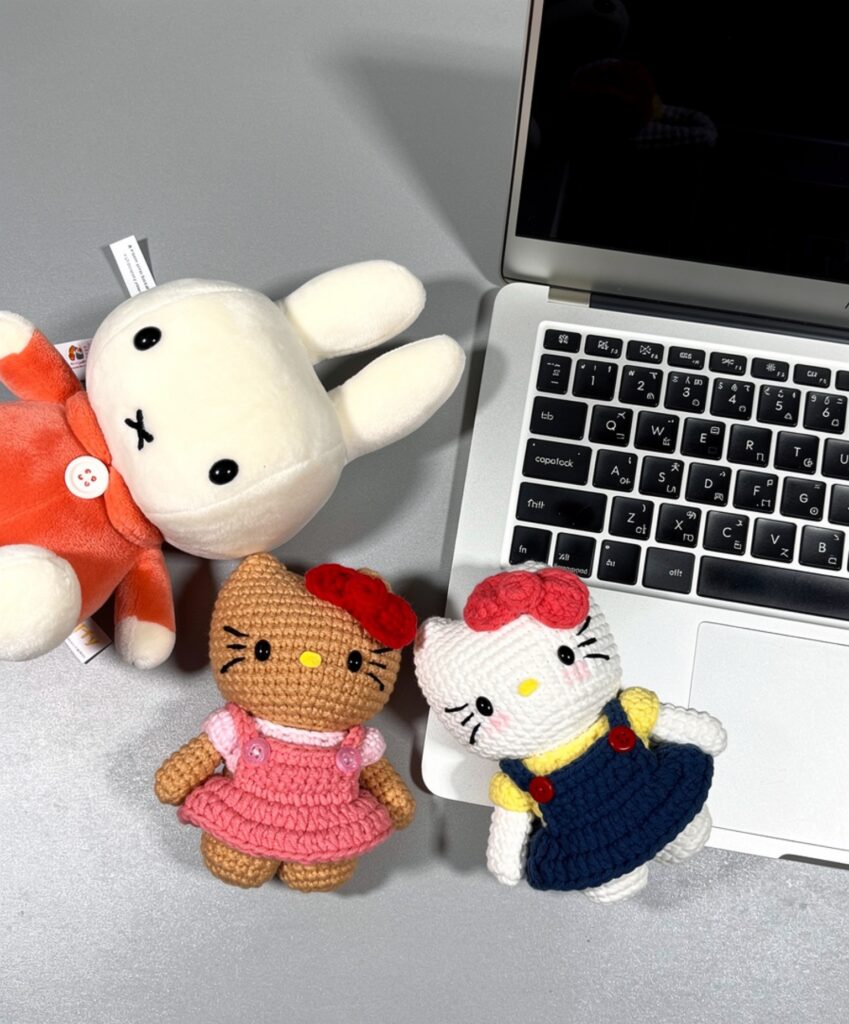
The photo shows two versions, and I love that you can pick your vibe. One is white with a red bow, wearing a blue overall-style dress with red buttons over a yellow shirt. The other is tan and brown with a red bow, in a pink dress with a bit of texture and those pink button details. It’s Level 2 easy, so it’s friendly if you’ve made a couple small amigurumi before, but it still feels like a real finished character when you’re done (and that’s the whole point, I think).
Why You’ll Want to Make This
You’ll end up with a recognizable, giftable kitty doll that looks finished and polished.
- Clear character details: The bow, whiskers, and outfit pieces read as “Hello Kitty” right away.
- Two outfit options: Make the blue overall dress or the pink dress, depending on your mood.
- Small and display-friendly: It’s a compact amigurumi that’s easy to tuck on a desk or shelf.
Gather Your Supplies
This one uses sport weight yarn and a few accent colors, plus felt details and 7 mm safety eyes for the face.
- 2 Fine / Sport yarn in cotton (5-ply), acrylic, or sport yarn: For this project I reach for a smooth sport weight yarn because it gives you tight, tidy stitches without feeling stiff. Cotton (5-ply) holds shape really well for small parts, and sport acrylic is a little softer and still behaves nicely when you keep your tension snug. Yardage is not stated for light brown (main body/head), light pink (accents), rosy pink (accents), red (bow and/or dress elements), black (felt and/or yarn details), or yellow (felt).
- 3 mm crochet hook: This size pairs well with sport yarn for amigurumi, since it helps keep the fabric dense so stuffing does not peek through.
- 7 mm oval plastic safety eyes: These are the eyes size used here, and oval eyes change the whole expression so it is worth sticking with this shape.
- Stuffing: You do not need a huge amount, but you will want to stuff as you go so the shaping stays even before openings get too small.
- Black felt: I like felt for face details when I want crisp edges without fussing with tiny embroidery stitches.
- Yellow felt: This is for the small facial bits, and it reads cleanly even at a small scale.
- Fabric glue: Glue keeps the felt pieces flat and neat, and it is faster than sewing for these little shapes.
- Also needed: stitch markers, darning needle, scissors
Color Sequence & Yarn Changes
Light brown carries most of the work, then you can add light pink, rosy pink, and red wherever you want the outfit and bow details. For clean changes, I switch colors on the last yarn over of the stitch before the new color, then leave a long tail to weave in later.
Key Information
Here’s the quick stuff you’ll want in front of you before you start.
| Skill Level | Level 2 — Easy |
| Pattern Gauge | Gauge is not critical for this project. Use a hook size that creates a tight, firm fabric so stuffing does not show through. |
| Finished Size | Approx. 6 in (15 cm) tall (estimated based on sport yarn and 3 mm hook for a small amigurumi doll). |
| Yarn Weight | 2 Fine / Sport |
| Fiber | Cotton (5-ply), acrylic, or sport yarn |
| Terminology | US |
Stitch Guide & Abbreviations
Keep this list nearby while you crochet.
- BLO = back loop only
- ch = chain
- dec = decrease (sc2tog)
- FLO = front loop only
- hdc = half double crochet
- inc = increase (2 sc in same st)
- MR = magic ring
- sc = single crochet
- sk = skip
- sl st = slip stitch
- st(s) = stitch(es)
- tog = together
Before You Begin
This is an amigurumi project worked in continuous rounds unless the instructions tell you otherwise. Ears are made first and joined with chains to begin the head, so don’t skip ahead and wonder where the ear pieces went. Insert eyes at Rounds 11–12, 7 stitches apart. Stuff as indicated in the instructions. A tight, firm fabric matters more than hitting a specific gauge, by any means.
The Pattern
Work through each piece in order, then bring everything together in the finishing steps at the end.
Ear 1
This is the first ear, worked in rounds. You’ll make two ears, then connect them before moving into the head.
Round 1: 6 sc in MR [6]
Round 2: (1 sc, inc) x 3 [9]
Cut yarn after first ear.
Ear 2 (and Connection)
Make the second ear the same way. Do not cut yarn after second ear. On second ear, ch 4 and sl st into last st of first ear. This chain is the bridge you’ll crochet across in the next round to join the ears into one continuous start.
Round 1: 6 sc in MR [6]
Round 2: (1 sc, inc) x 3 [9]
Continue directly into Head (continuing from Ear 2).
Head (continuing from Ear 2)
Keep working in rounds, starting right where you left off on Ear 2. You’ll crochet around the ear, across the chain bridge, around the other ear, then back across the chain again to close the joined shape.
Round 3: (2 sc, inc) x 3, 4 sc along ch, (2 sc, inc) x 3, 4 sc along ch [24] Work into the chain stitches cleanly and consistently. If you tend to split chain loops, use the back bumps for a tidier edge, but don’t overthink it.
Round 4: (3 sc, inc) x 8 [32]
Round 5: (7 sc, inc) x 5 [40]
Round 6: 45 sc [45]
Round 7: 45 sc [45]
Round 8: 45 sc [45]
Round 9: 45 sc [45]
Round 10: 45 sc [45]
Round 11: 45 sc [45]
Insert eyes at Rounds 11–12, 7 stitches apart.
Round 12: 45 sc [45]
Insert eyes at Rounds 11–12, 7 stitches apart.
Round 13: 45 sc [45]
Round 14: 45 sc [45]
Round 15: 45 sc [45]
Round 16: (3 sc, dec) x 9 (begin stuffing) [36] Start stuffing now, before the opening gets small. Add a little at a time and push it into place as you go.
Begin stuffing.
Round 17: (4 sc, dec) x 6 [30]
Round 18: (3 sc, dec) x 6 [24]
Cut yarn and stuff head completely.
Fasten off, weave in ends
Arms (make 2)
Make 2. These are worked in rounds and finished by closing the opening with stitches through opposite sides, so keep the last round easy to flatten.
Round 1: 7 sc in MR [7]
Round 2: 2 sc, inc, 3 sc, inc [9]
Round 3: 9 sc [9]
Round 4: 9 sc [9]
Round 5: 9 sc [9]
Round 6: 9 sc [9]
Round 7: 9 sc [9]
Round 8: 9 sc [9]
Round 9: 9 sc [9]
Stuff lightly and close by crocheting opposite stitches together with 4 sc.
Fasten off, weave in ends
Leg 1
This is the first leg, worked in rounds. You’ll make the second leg next, then join them together to start the body.
Round 1: 8 sc in MR [8]
Round 2: 8 inc [16]
Round 3: (3 sc, inc) x 4 [20]
Round 4: 20 sc [20]
Round 5: 20 sc [20]
Fasten off, leave a tail for joining (as needed)
Leg 2 and Join (legs & body)
Make second leg; do not cut yarn. Connect to first leg at last st of Round 5. Work 16 sc around both legs, leaving 4 sts unworked on each side. That “leave unworked” part is easy to miss, so pause and count before you commit.
Round 6: 16 sc around [16] This round is the join. Use the tail from Leg 1 later to close any gap where the legs meet.
Round 7: 32 sc [32]
Round 8: 32 sc [32]
Round 9: 32 sc [32]
Round 10: 32 sc [32]
Round 11: 32 sc [32]
Round 12: 32 sc [32]
Round 13: (3 sc, dec, 3 sc) x 4 (begin stuffing) [28] Get stuffing started here so you’re not trying to force it through a tight opening later.
Begin stuffing.
Round 14: 28 sc [28]
Round 15: (5 sc, dec) x 4 [24]
Round 16: 4 sc, 4 sc joining first arm, 8 sc, 4 sc joining second arm, 4 sc [24] When you “join” an arm, you’re crocheting through the body stitch and the arm stitch at the same time. Line the arm up first so it doesn’t twist.
Join Arms at Round 16.
Round 17: 24 sc [24]
Stuff body firmly. Cut yarn, leaving long tail.
Fasten off, leave a long tail for sewing
T-Shirt Panel
Ch 27. This piece is worked in rows and you’ll leave a long tail for sewing it closed on the doll later, so don’t trim it short.
Row 1: Starting in 2nd ch from hook, (2 sc, inc) x 8, 2 sc [34] Watch your starting chain tension. If it’s tight, go up a hook size just for the chain.
Row 2: Ch 1, turn, (3 sc, inc) x 8, 2 sc [42]
Row 3: Ch 1, turn, 42 sc [42]
Row 4: Ch 1, turn, 6 sc, (ch 1, sk 8), 14 sc, (ch 1, sk 8), 6 sc [26 sc] [26] Those skipped sections create openings. Keep the ch-1 relaxed so it doesn’t pucker when you dress the doll.
Cut yarn, leaving long tail.
Dress Base
Ch 32. This dress section is worked in rows in hdc. You’ll use the upper edge to locate the center stitches for the bodice placement.
Row 1: Starting in 3rd ch from hook, (1 hdc, hdc inc) x 15 [45]
Row 2: 45 hdc [45]
Cut yarn. Find center 8 sts on upper edge.
Upper Bodice
This part is worked in rounds over the center stitches you identified on the dress upper edge. Take a second to place a marker at each end of those 8 stitches so you don’t drift.
Round 1: 8 sc [8]
Round 2: 8 sc [8]
Round 3: 8 sc [8]
Fasten off, weave in ends
Edging and Straps
Crochet around three sides and add straps. This section is worked as one continuous pass, so plan your strap chains before you start and keep your slip stitches steady so the straps don’t get tight.
Work: 3 sc on first side, (strap: ch 19, sl st in each ch back = 18 sl st), 8 sc on second side, (strap: ch 18, sl st in each ch back = 18 sl st), 3 sc on third side. When you slip stitch back down the chain, use the back bumps if you like a cleaner edge, but the main thing is consistent tension.
Fasten off, weave in ends
Bow (Rectangle)
Ch 7. This is the bow’s main rectangle, worked in rows. Keep your edges neat since you’ll be working an edging around it next.
Row 1: Starting in 2nd ch from hook, inc, 4 sc, inc [8]
Row 2: 8 sc [8]
Row 3: 8 sc [8]
Row 4: dec, 4 sc, dec [6]
Fasten off, weave in ends
Bow Edging (Perimeter)
This edging is worked continuously around the rectangle. Use the corners as your anchor points and try not to accidentally add extra stitches at the turns.
Work: 4 sc, 6 sc, 4 sc, 6 sc. If you’re unsure where to start, pick a corner and commit. You’ll be gathering it later anyway.
Fasten off, weave in ends
Bow Center Circle
This small circle wraps the center of the bow and gets sewn on, so leave yourself a usable tail.
Round 1: 10 sc in MR [10]
Fasten off, leave a tail for sewing
Final Touches
Use yarn to gather rectangle into bow shape, wrap circle around center, and sew to top of head. Run your yarn tail in and out across the middle a few times, pull to cinch, then wrap the circle around and stitch it down on the back where it won’t show much. Sew head to body. Use the long tail from the body and stitch through a full round of head stitches and body stitches, then go around again for strength. Insert eyes at Rounds 11–12, 7 stitches apart. If you haven’t done it yet, place them first, check spacing, then secure the backs before you close things up. Dress doll in shirt, sew back closed. Use the long tail and whipstitch or mattress stitch the back edges together, catching stitches neatly so the seam doesn’t gap. Add dress overalls, secure straps at back. Stitch the strap ends down with a few passes and knot on the inside, then weave the tail into the fabric so it doesn’t work loose.
Blocking
For the shirt and dress pieces, a light steam block helps the rows settle and makes sewing cleaner. Lay the pieces flat, shape the edges with your hands, then hover steam above the fabric without pressing hard. Let them cool fully before you move them.
Baby & Child Safety Notes
If this toy is for a child under 3, skip plastic safety eyes and embroider the eyes instead. Stitch down the bow and straps firmly, and weave in every end with multiple direction changes so nothing can be pulled out.
Frequently Asked Questions
Mine comes out around 6 in (15 cm) tall when I use sport weight (2 Fine) yarn with a 3 mm hook. If your tension runs tighter or looser, you might land a bit under or over that, so there’s that.
Use a different hook if you need to, but know it will change the size. I stick with 3 mm because it matches the sport yarn scale and keeps the doll at that small, about-6-inch range.
I use 2 Fine / Sport for this one. If you swap to a thicker yarn, you’re making a bigger kitty, and if you go thinner, you’re making a smaller one. It’s not complicated, just different.
This is Level 2 easy, so I wouldn’t hand it to someone on their very first day, but it’s not a stress project either. If you’ve made one small amigurumi before, you’ll feel at home.
Match the yarn weight and hook size first: sport yarn and a 3 mm hook. After that, it’s mostly your tension. If you crochet super tight, it’ll shrink a bit. If you crochet loose, it’ll grow, and the shape can look a little softer too.
Final Thoughts
If you make this Hello Kitty amigurumi, I’d love to know how yours turned out size-wise with your own tension. Mine lands right around 6 inches with sport yarn and a 3 mm hook, and I always find it interesting when someone else’s comes out a smidge taller or shorter. Save this pattern somewhere you’ll actually find it again (I lose things CONSTANTLY), and if you share a photo, tag me so I can see your finished kitty.