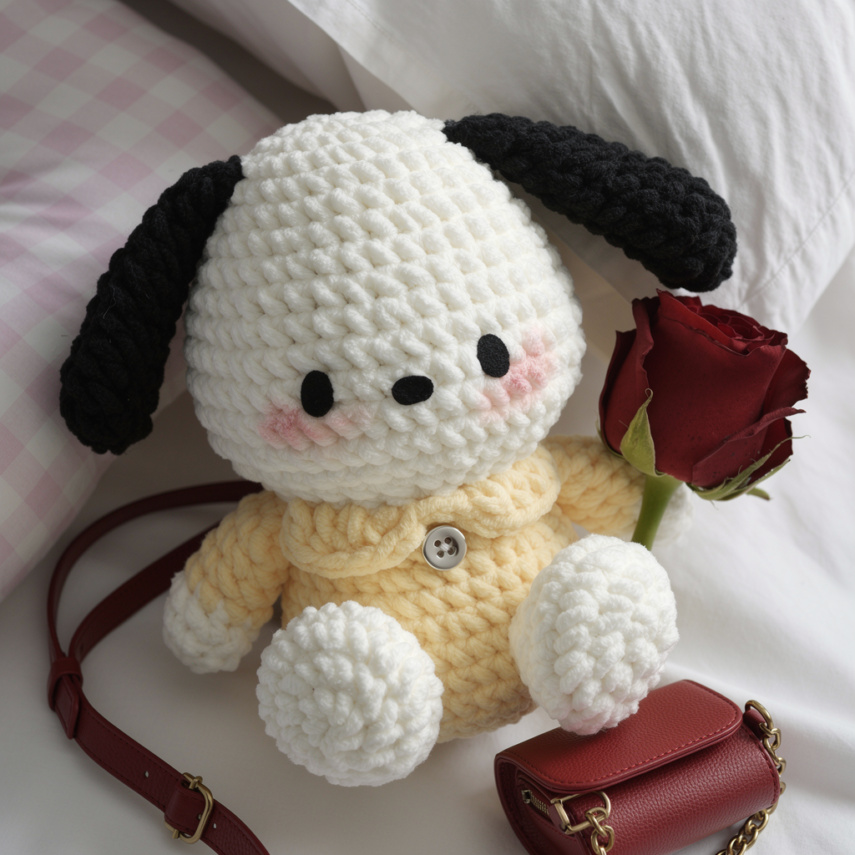
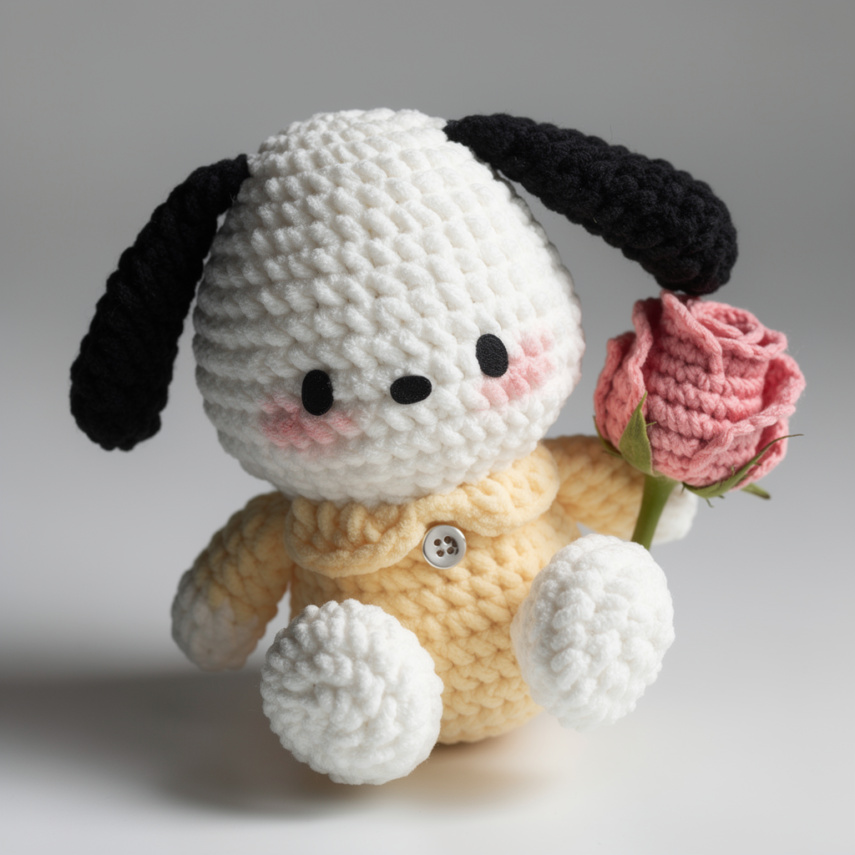
If you’ve been looking for a sweet little toy project you can finish without a ton of fuss, this Comfort Plushie Crochet Pattern walks you through making a soft, floppy-eared stuffed animal doll with a cozy outfit and simple stitched-on features.
Behind the Pattern
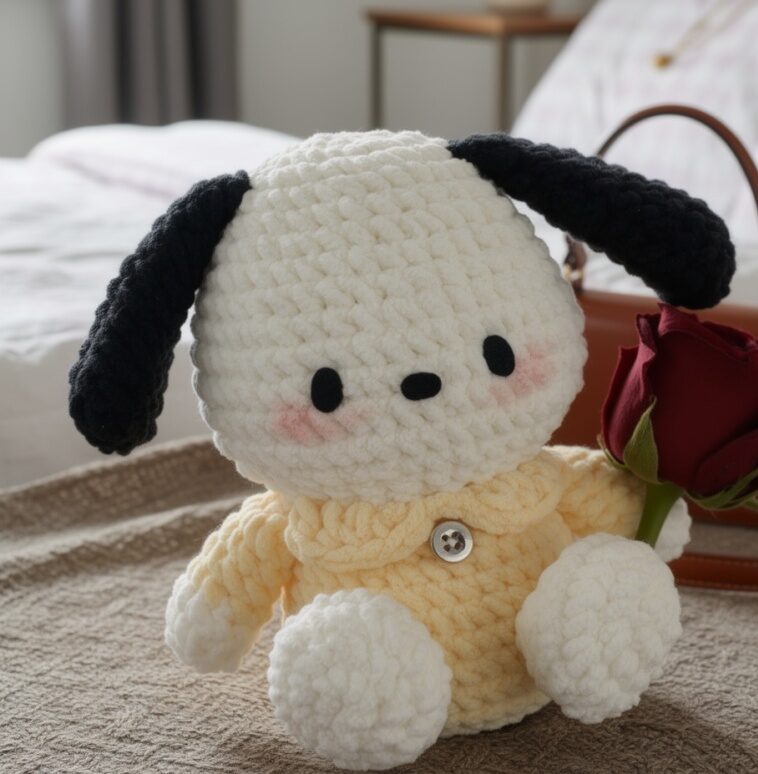
I wanted this plushie to feel calm and classic, like the kind of little buddy you’d spot on a shelf and instantly want to pick up. The finished doll has a round white head, long black floppy ears, and the simplest face: black oval eyes, a tiny black nose, and those pink blush cheeks that make it look quietly happy.
The outfit is part of the whole vibe for me. It’s pale yellow with a chunky texture, a ruffled collar, and one gray button right on the front, so it reads like a tiny comfy romper. The feet are those white plush-looking paws made as separate rounded pieces, and they give it that extra squishy, huggable look, I think.
Why You’ll Love This Pattern
You’ll end up with a cuddly plushie that looks polished without feeling complicated.
- Simple features: The clean eyes, nose, and blush keep the face cute and stress-free.
- Outfit built for charm: The ruffled collar and single button add personality fast.
- Floppy-ear payoff: Those long black ears make the whole doll feel extra snuggly.
Gather Your Supplies
You will juggle a few quick color changes across the limbs and body, plus felt details, so keep those bits close by.
- 6 Super Bulky yarn (fiber not specified, check the yarn label): For this project I reach for a smooth, springy super bulky so the stitches stack up fast and the shape stays firm. You want something that does not split easily and feels a little squishy in your hands, not drapey. Yardage is not specified for white, yellow, black, or the shirt color, but you only need small amounts of each.
- 4mm or 4.5mm crochet hook: This size keeps the fabric tight with super bulky yarn, so stuffing stays inside and the pieces hold their shape.
- Black felt cloth: I like felt here because it gives you crisp little eye and nose details without fighting tiny crochet stitches.
- Glue: Any craft glue that plays nicely with felt works, and it is handy for keeping those small details from shifting.
- Stuffing materials: You do not need a ton, just enough to fill the head and body firmly, and it helps to stuff as you go before openings get small.
- Also needed: stitch markers, darning needle, scissors
Color Sequence & Yarn Changes
White starts the arms and the main head and body, then you switch to yellow for the rest of the arms, the upper body, and the collar. Black is just for the ears and felt details, and the shirt can be any color you prefer, so keep that one flexible and use what you have.
Key Information
Here’s the quick stuff you’ll want in front of you before you start.
| Skill Level | Level 2 — Easy |
| Pattern Gauge | Gauge is not critical for this project. Use a hook size that creates a tight, firm fabric so stuffing does not show through |
| Finished Size | Approx. 18 cm tall (estimated) |
| Yarn Weight | 6 Super Bulky |
| Fiber | Not specified — check the yarn label |
| Terminology | US |
Abbreviations & Stitches Used
Keep this list close. You’ll use it a lot.
- BLO = back loop only
- ch = chain
- dec = decrease
- FLO = front loop only
- hdc = half double crochet
- inc = increase
- mr = magic ring
- R = round
- sc = single crochet
- sk = skip
- sl st = slip stitch
- st = stitch
- * = repeat
Pattern Notes
This is a toy worked in rounds using US crochet terminology. Unless the instructions say otherwise, you’ll keep crocheting in a continuous spiral, so use a stitch marker to track the first stitch of each round. Change to Yellow yarn at the end of Round 3 for Arms. Stuff Head nice and tight before changing to Yellow at the end of Round 17. Collar is crocheted directly on FLO of Round 18, so don’t miss that front loop when you get there. Stuff Body nice and tight before Round 31. Do not stuff Ears.
The Pattern
Work each piece, then sew everything on in the Final Touches section.
Arms (Make 2)
Start with a magic ring in White yarn. Change to Yellow yarn at the end of Round 3. These are worked in rounds and you’ll close them at the end before sewing them on.
Round 1: 8 sc in mr. [8]
Round 2: (3 sc, 1 inc) *2. [10]
Round 3: 10 sc. [10]
Change to Yellow yarn at the end of Round 3.
Round 4: In Yellow, 10 sc. [10]
Round 5: 10 sc. [10]
Round 6: 10 sc. [10]
Round 7: 10 sc. [10]
Stuff the arms lightly and crochet the opposite stitches together to get 4 sc.
Cut the yarn leaving a long tail for sewing
Head and Body (One Piece)
Start with a magic ring in White yarn. You’ll crochet the head first, then continue straight into the body, with a color change to Yellow at the end of Round 17.
Round 1: 8 sc in mr. [8]
Round 2: 8 inc. [16]
Round 3: (1 sc, 1 inc) *8. [24]
Round 4: (1 sc, 1 inc, 1 sc) *8. [32]
Round 5: 32 sc. [32]
Round 6: 32 sc. [32]
Round 7: (3 sc, 1 inc) *8. [40]
Round 8: 40 sc. [40]
Round 9: 40 sc. [40]
Round 10: (2 sc, 1 inc, 2 sc) *8. [48]
Round 11: 48 sc. [48]
Round 12: 48 sc. [48]
Round 13: 48 sc. [48]
Round 14: 48 sc. [48]
Round 15: (2 sc, 1 dec) *12. [36]
Round 16: (2 sc, 1 dec, 2 sc) *6. [30]
Round 17: (3 sc, 1 dec) *6. [24]
Stuff the head nice and tight. Change to Yellow yarn at the end of Round 17.
Round 18: In Yellow, BLO 24 sc. [24]
Round 19: (3 sc, 1 inc) *6. [30]
Round 20: 30 sc. [30]
Round 21: (2 sc, 1 inc, 2 sc) *6. [36]
Round 22: 36 sc. [36]
Round 23: (5 sc, 1 inc) *6. [42]
Round 24: 42 sc. [42]
Round 25: 42 sc. [42]
Round 26: 42 sc. [42]
Round 27: (4 sc, 1 dec) *7. [35]
Round 28: (3 sc, 1 dec) *7. [28]
Round 29: (2 sc, 1 dec) *7. [21]
Round 30: (1 sc, 1 dec) *7. [14]
Stuff the body nice and tight.
Round 31: 7 dec. [7]
Stuff a bit more and close the body.
Fasten off, weave in ends
Legs (Make 2)
Start with a magic ring in White yarn. These are worked in rounds, then you’ll stuff them and leave a long tail so you can sew them to the body later.
Round 1: 8 sc in mr. [8]
Round 2: 8 inc. [16]
Round 3: (1 sc, 1 inc) *8. [24]
Round 4: 24 sc. [24]
Round 5: 4 sc, 8 dec, 4 sc. [16]
Round 6: (2 sc, 1 dec) *4. [12]
Stuff the legs and cut the yarn leaving a long tail.
Fasten off, weave in ends
Ears (Make 2)
Start with a magic ring in Black yarn. Do not stuff the ears. You’ll flatten and close them at the end, then sew them onto the head.
Round 1: 8 sc in mr. [8]
Round 2: (1 sc, 1 inc) *4. [12]
Round 3: 12 sc. [12]
Round 4: 12 sc. [12]
Round 5: 12 sc. [12]
Round 6: 12 sc. [12]
Round 7: 12 sc. [12]
Round 8: 12 sc. [12]
Round 9: (4 sc, 1 dec) *2. [10]
Round 10: 10 sc. [10]
Round 11: (3 sc, 1 dec) *2. [8]
Round 12: 8 sc. [8]
Crochet the opposite stitches together to get 4 sc.
Fasten off, weave in ends
Collar (Crochet Directly onto the Body)
Mark a center point of the body and take 4 stitches to the left and 4 stitches to the right of that point (9 stitches total in the center). Crochet the collar directly on FLO of Round 18. You’re working into the front loops you left free when you did the BLO round, so take a second to find that round before you start.
With your yarn joined to the FLO of Round 18 at the marked area, work: (2 ch, 1 hdc), 2 hdc, (1 hdc, ch 1, 1 sl st), 1 sl st, (1 sl st, ch 1, 1 hdc), 2 hdc, (1 hdc, 2 ch, 1 sl st). Try not to pull tight on the slip stitches. They like to cinch up if your tension runs firm, so there’s that.
Fasten off, weave in ends
Final Touches
Sew the arms next to each collar in between Round 18 and Round 19. Use the long tails you left, and take your time catching sturdy stitches on the body so the arms don’t wobble. Sew the legs on Round 24 to Round 26 with about 5 stitches apart between two legs. Pin them first if you’re picky about placement, then stitch through both the leg and the body fabric in small, even passes. Sew the ears in between Round 4 and Round 5 with about 5.5 cm apart between two ears. Since the ears aren’t stuffed and you closed them to 4 sc, you can sew along that closed edge and then tack down a couple of spots up the sides if you want them to sit where you put them. Attach the eyes and nose on Round 12, with 6 sc apart between two eyes and the nose in the middle. If you’re using safety eyes, install them before you fully close up the head, but if you already finished the head, you can still embroider eyes and a nose instead. (Optional) Sew a button in the center of the collars to make it look more charming. After everything’s on, weave in any remaining ends and give each seam a firm tug check once. One good check is enough.
Baby & Child Safety Notes
If this Comfort Plushie Crochet Pattern is going to a baby or young child, skip hard eyes and buttons and embroider the features instead. Stitch down the ears, arms, and legs securely with tight, repeated passes, then weave the tails in through multiple directions and bury them inside the body. Small parts come loose when they’re only caught in a couple of stitches, so don’t do that.
Frequently Asked Questions
Mine comes out around 18 cm tall, give or take. Super bulky yarn can vary a lot, so if yours looks a bit taller or squishier, that tracks.
I grab the 4mm when I want a firmer plushie shape, and I use 4.5mm when I want it a little softer and looser. If you tend to crochet tight, the 4.5mm usually feels better in my hands.
You can, but the size will change, by a lot sometimes. I stick with weight 6 super bulky when I want that classic plushie look and the approx. 18 cm height.
This is Level 2 Easy, and that feels right to me. If you can keep your stitch count steady and you do not mind slowing down a bit with super bulky yarn, you will be fine.
Hook size is the easiest lever here: 4mm tightens things up, 4.5mm opens it up. Yarn choice matters too, even within super bulky, so two ‘weight 6’ skeins can behave totally differently, so there’s that.
Final Thoughts
That’s it for my Comfort Plushie Crochet Pattern. I love how quickly a toy works up in super bulky yarn, and I like that I can nudge the feel a bit just by grabbing the 4mm or the 4.5mm hook. If you make one, tell me what height yours lands at and what hook you used, because I’m nosy like that. Save it to Pinterest if you’re not starting today, because I never remember where I put patterns later, and then I get annoyed with myself.