
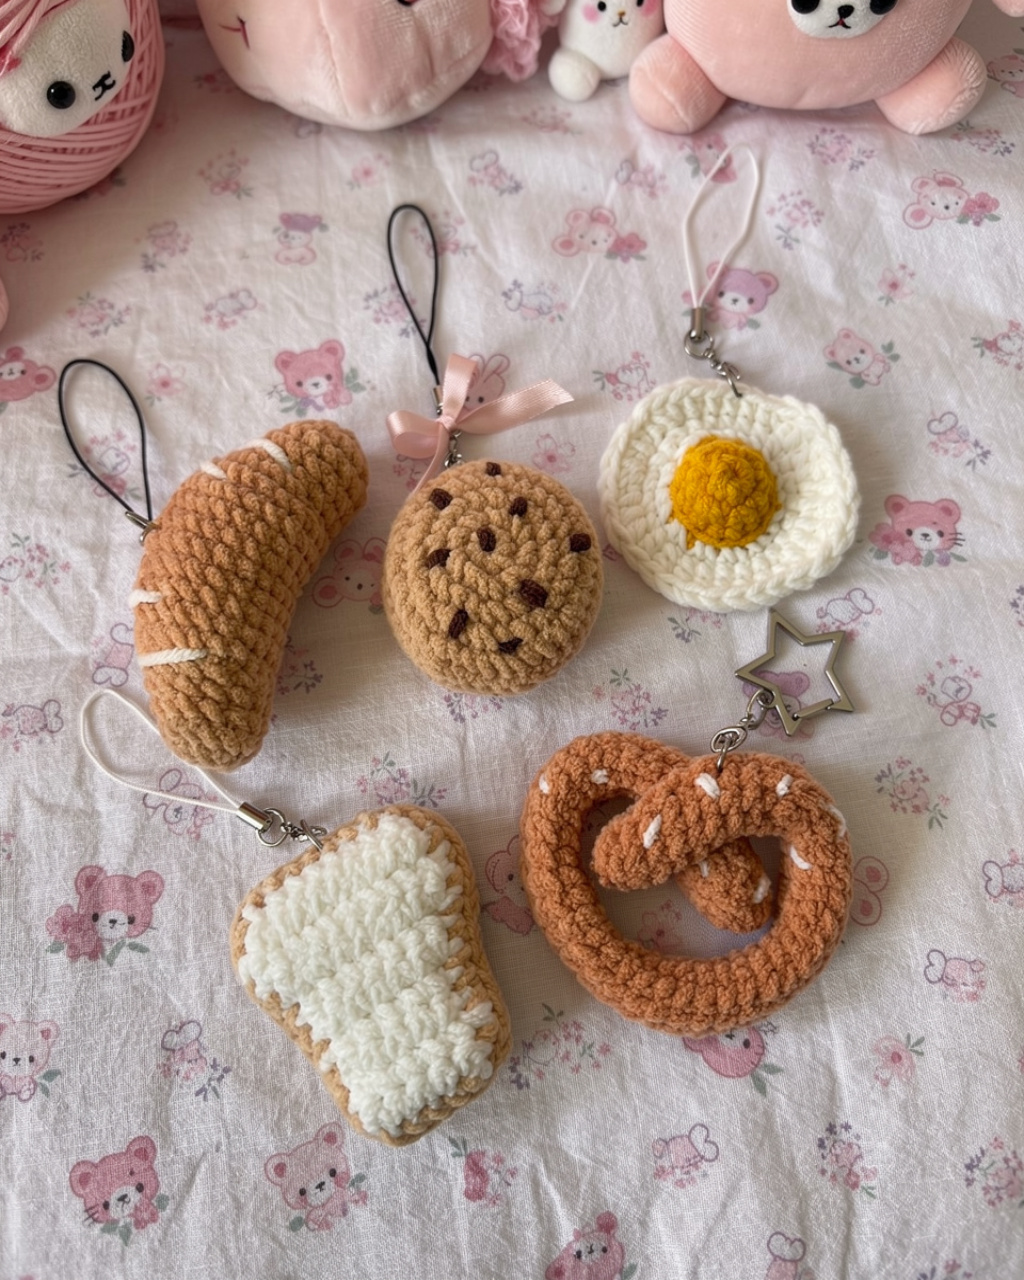
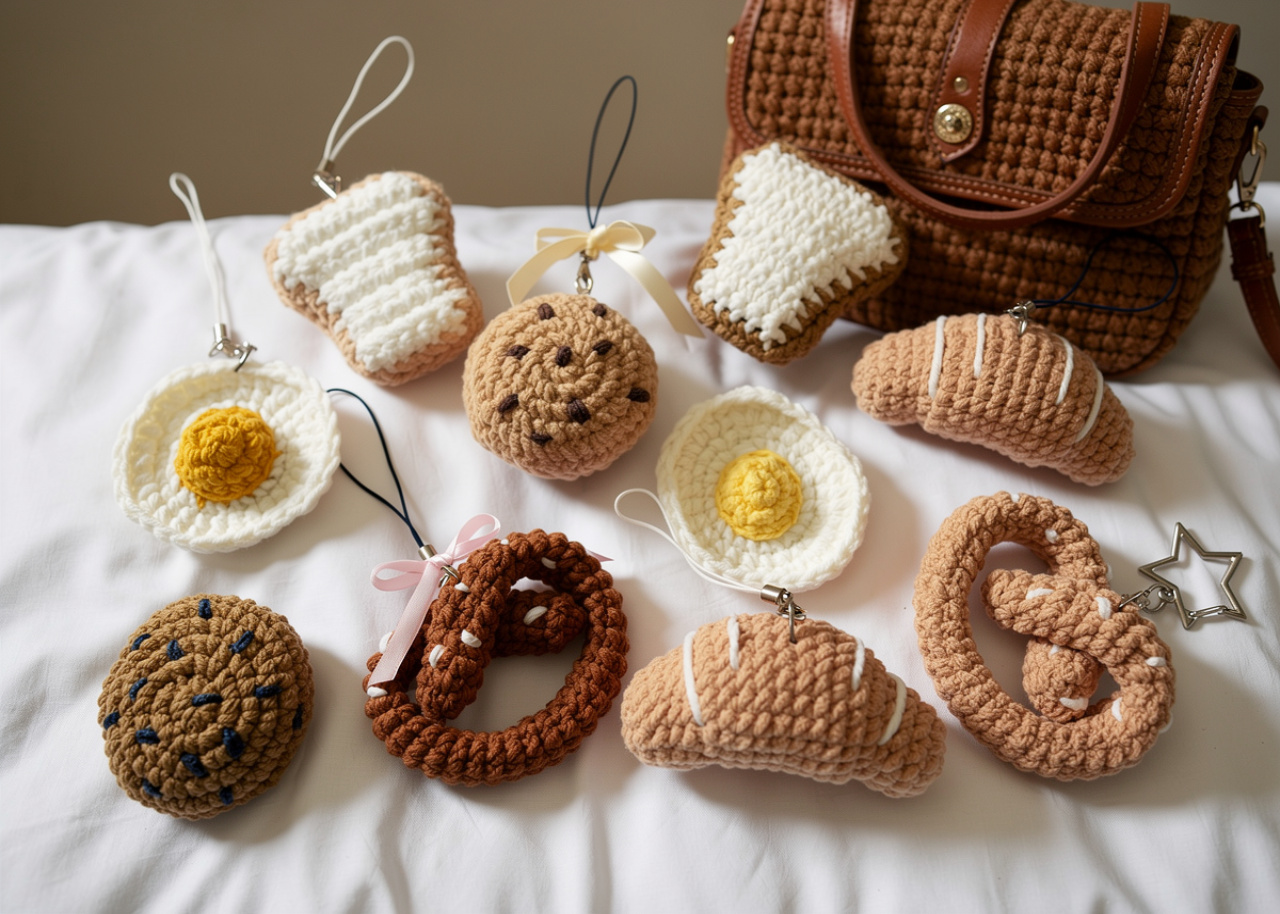
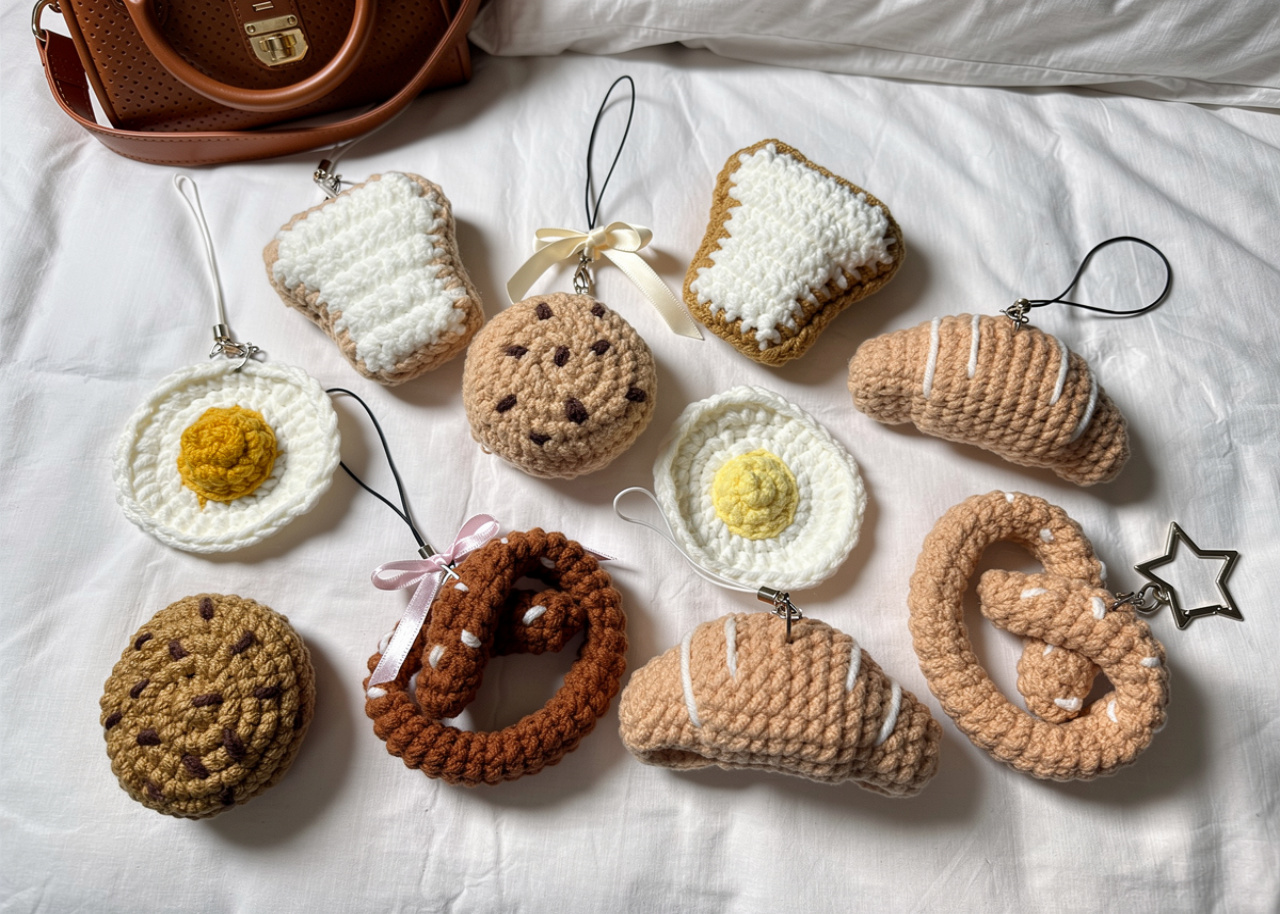
If you want a quick set of soft, food-themed bag charms, this Breakfast Mini Keychains Crochet Pattern walks you through making a croissant, cookie, fried egg, bread slice, and pretzel, all sized for keyrings and little clips.
Behind the Pattern
I’ve been on a tiny-things kick lately, and these breakfast keychains really do scratch that itch. The whole set leans cute and squishy, like little plush snacks you can toss on your keys without thinking too hard about it.
You’ll end up with a tan croissant with a simple white stripe detail, a round tan cookie dotted with dark brown “chip” stitches, and a white fried egg with a raised yellow yolk that pops. There’s also a bread slice with a tan crust and white center, plus a brown pretzel with little white salt-like stitches and a star-shaped metal connector. It’s Level 2 easy, so it’s very much a relax-and-make-something kind of project (and yes, they’re as fun to fidget with as you’d expect).
Why You Need This on Your Hook
You can make a whole mini breakfast lineup in one sitting.
- Fast finishes: Each piece is small, so you get that done-and-cute payoff quickly.
- Mix-and-match set: Pick your favorites or make the full batch for a matching bundle.
- Instant personality: These little snacks make keys and bags look way more fun.
Your Supply List
This set uses five colors in small bits for breakfast shapes, so you can mix leftovers without worrying about exact yardage.
- 2 Fine / Sport yarn in cotton (5ply), acrylic, sport, or thin chenille: For this project I reach for a 2 Fine / Sport yarn because the stitches stay neat and the little food edges keep their shape. Cotton gives you crisp definition, acrylic stays light and forgiving, and thin chenille turns everything into a softer, puffier look with less stitch detail. You will need small amounts of white, light brown, dark brown, yellow, and brown, and the yardage is not specified for each.
- 3 mm crochet hook: This size pairs well with sport yarn for tight fabric, so stuffing does not peek through.
- Stuffing material: You only need a small handful, and I like to stuff as I go before the openings get too fiddly.
- Brown eyeshadow (optional): This is for quick shading on the croissant, and you can skip it or use any dry brown pigment you already have.
- Also needed: stitch markers, darning needle, scissors
Color Sequence & Yarn Changes
Most pieces are worked in one main color, then you pop on small accents like the egg yolk or embroidery details at the end. For clean edges, I cut yarn between colors instead of carrying it, since the color jumps are small but noticeable on food shapes.
Key Information
Here’s the quick setup so you can get crocheting.
| Skill Level | Level 2 — Easy |
| Pattern Gauge | Gauge is not critical for this project. Use a hook size that creates a tight, firm fabric so stuffing does not show through. |
| Finished Size | Approx. 2–3 in (5–7.5 cm) each keychain piece (varies by item and yarn used) |
| Yarn Weight | 2 Fine / Sport |
| Fiber | Cotton (5ply), acrylic, sport, or thin chenille yarn |
| Terminology | US |
Stitches & Abbreviations
Keep this list open while you work.
- BLO = back loop only
- ch = chain
- dc = double crochet
- dec = decrease
- FLO = front loop only
- hdc = half double crochet
- inc = increase
- mr = magic ring
- R = round/row
- sc = single crochet
- sl st = slip stitch
- st = stitch
- * = repeat
- [ ] = total stitch count in each round/row
Read Before Starting
Abbreviations are in US terminology. Stuff as instructed. Color changes are made as noted in the instructions. Most pieces like this are worked in rounds, so keep an eye on whether you’re joining with a sl st or working continuously, since the instructions will call it out. Tight stitches matter here, by any means, because you don’t want the stuffing peeking through.
The Pattern
Work each breakfast piece as written below, then you’ll assemble and add details at the end.
Croissant
This one’s worked in rounds. Start with a magic ring using light brown yarn. Keep your stitch marker handy if you like, since there are a lot of same-count rounds in the middle.
Round 1: 7 sc in mr, sl st into 1st sc. [7]
Round 2: ch 1, 7 inc, sl st. [14]
Round 3: ch 1, 14 sc, sl st. [14]
Round 4: ch 1, 14 sc, sl st. [14]
Round 5: ch 1, 14 sc, sl st. [14]
Round 6: ch 1, 4 inc, 6 sl st, 4 inc, sl st. [22]
Those slip stitches in the middle are easy to accidentally tighten down too hard. Try to keep them relaxed so you can find the next round’s stitches without fighting your hook.
Round 7: ch 1, 8 sc, FLO 6 sc, 8 sc, sl st. [22]
When you hit the FLO section, pause and make sure you’re only catching the front loop for those 6 stitches. It’s the kind of spot where you can drift back into both loops without noticing.
Round 8: ch 1, 22 sc, sl st. [22]
Round 9: ch 1, 22 sc, sl st. [22]
Round 10: ch 1, 22 sc, sl st. [22]
Round 11: ch 1, 22 sc, sl st. [22]
Round 12: ch 1, 22 sc, sl st. [22]
Round 13: ch 1, 22 sc, sl st. [22]
Round 14: ch 1, 22 sc, sl st. [22]
Round 15: ch 1, 8 sc, 6 sl st, 8 sc, sl st. [22]
Round 16: ch 1, 4 dec, FLO 6 sc, 4 dec, sl st. [15]
This is another place to watch your loops. The FLO 6 sc should land where the pattern tells you, even if the slip stitches make the fabric feel a little unusual to read.
Round 17: ch 1, 14 sc, sl st. [14]
Start stuffing. Stuff the top part more to make it round and curvy, leaving the bottom flatter for a natural croissant shape. Continue stuffing after each following round.
Round 18: ch 1, 14 sc, sl st. [14]
Round 19: ch 1, 14 sc, sl st. [14]
Round 20: ch 1, 7 dec. [7]
Cut yarn leaving a long tail and close the croissant. (Recommended) Using light and dark brown eyeshadow, paint the croissant to make it look more realistic.
Fried Egg
This one’s worked in rounds. Using yellow yarn, start with a magic ring. Switch to white yarn in the last sc of Round 3 and continue using white until the end. If you do the yarn change right on that last stitch, you won’t get a little jog of yellow showing later.
Round 1: 6 sc in mr, sl st. [6]
Round 2: ch 1, 6 inc, sl st. [12]
Round 3: ch 1, 12 sc, sl st. [12]
Switch to white yarn in the last sc of Round 3 and continue using white until the end.
Round 4: BLO ch 1, 12 inc, sl st. [24]
Make sure you’re in the back loop only for the whole round, including the chain 1 placement. It’s easy to do the first few stitches correctly and then drift back to both loops.
Round 5: ch 1, 24 sc, sl st. [24]
Round 6: ch 1, (1 hdc, 1 hdc inc) *2, 8 sc, (1 dc, 1 dc inc) *3, 4 sc, 1 hdc, 1 hdc inc, sl st. [30]
Cut yarn and weave in ends.
Pretzel
This one’s worked in rounds. Start with a magic ring using dark brown yarn. It’s a long tube, so if you tend to lose track, jot down round numbers as you go. One reassurance: if you’re off by a round or two, it’s usually not a crisis for assembly.
Round 1: 6 sc in mr. [6]
Round 2: (2 sc, 1 inc) *2. [8]
Round 3: 8 sc. [8]
Round 4: 8 sc. [8]
Round 5: 8 sc. [8]
Round 6: 8 sc. [8]
Round 7: 8 sc. [8]
Round 8: 8 sc. [8]
Round 9: 8 sc. [8]
Round 10: 8 sc. [8]
Round 11: 8 sc. [8]
Round 12: 8 sc. [8]
Round 13: 8 sc. [8]
Round 14: 8 sc. [8]
Round 15: 8 sc. [8]
Round 16: 8 sc. [8]
Round 17: 8 sc. [8]
Round 18: 8 sc. [8]
Round 19: 8 sc. [8]
Round 20: 8 sc. [8]
Round 21: 8 sc. [8]
Round 22: 8 sc. [8]
Round 23: 8 sc. [8]
Round 24: 8 sc. [8]
Round 25: 8 sc. [8]
Round 26: 8 sc. [8]
Round 27: 8 sc. [8]
Round 28: 8 sc. [8]
Round 29: 8 sc. [8]
Round 30: 8 sc. [8]
Round 31: 8 sc. [8]
Round 32: 8 sc. [8]
Round 33: 8 sc. [8]
Round 34: 8 sc. [8]
Round 35: 8 sc. [8]
Round 36: 8 sc. [8]
Round 37: 8 sc. [8]
Round 38: 8 sc. [8]
Round 39: 8 sc. [8]
Round 40: 8 sc. [8]
Round 41: 8 sc. [8]
Round 42: 8 sc. [8]
Round 43: 8 sc. [8]
Round 44: 8 sc. [8]
Round 45: 8 sc. [8]
Round 46: 8 sc. [8]
Round 47: 8 sc. [8]
Cut yarn and close the remaining hole.
Toast
This one’s worked in rows. Using white yarn, start with a slip knot. Switch to brown yarn in the last dec of Row 10. You’ll use that brown yarn to work the border later, so don’t cut it.
Row 1: ch 7, starting from 2nd ch from hook, 6 sc. [6]
Row 2: ch 1, turn, 6 sc. [6]
Row 3: ch 1, turn, 6 sc. [6]
Row 4: ch 1, turn, 6 sc. [6]
Row 5: ch 1, turn, 1 inc, 4 sc, 1 inc. [8]
Row 6: ch 1, turn, 8 sc. [8]
Row 7: ch 1, turn, 1 inc, 6 sc, 1 inc. [10]
Row 8: ch 1, turn, 1 inc, 8 sc, 1 inc. [12]
Row 9: ch 1, turn, 1 dec, 8 sc, 1 dec. [10]
Row 10: ch 1, turn, 1 dec, 6 sc, 1 dec. [8]
Switch to brown yarn in the last dec of Row 10.
Make 1 sl st into the 1st sc and cut yarn leaving a long tail of about 14 inches.
Chocolate Chip Cookie (Top Piece)
This cookie top is worked in rounds. Using brown yarn, start with a magic ring. Keep the long tail when you finish, since you’ll use it for sewing later.
Round 1: 8 sc in mr, sl st. [8]
Round 2: ch 1, 8 inc, sl st. [16]
Round 3: ch 1, (1 sc, 1 inc) *8, sl st. [24]
Round 4: ch 1, (1 sc, 1 inc, 1 sc) *8, sl st. [32]
Round 5: ch 1, (3 sc, 1 inc) *8, sl st. [40]
Round 6: ch 1, 40 sc, sl st. [40]
Round 7: ch 1, (3 sc, 1 dec) *8, sl st. [32]
Cut yarn leaving a long tail of about 14 inches.
Chocolate Chip Cookie (Base Piece)
This base is worked in rounds. Make another piece (the base) by repeating Rounds 1-4. When finished, cut yarn short. You’re basically making the back piece that gets sewn to the top.
Round 1: 8 sc in mr, sl st. [8]
Round 2: ch 1, 8 inc, sl st. [16]
Round 3: ch 1, (1 sc, 1 inc) *8, sl st. [24]
Round 4: ch 1, (1 sc, 1 inc, 1 sc) *8, sl st. [32]
Cut yarn short.
Putting It All Together
Croissant: Cut yarn leaving a long tail and close the croissant. Use the tail to weave through the remaining front loops and pull tight, then run the yarn through the center and out the side to hide the end before weaving in.
Croissant (optional): Using light and dark brown eyeshadow, paint the croissant to make it look more realistic. Use a small brush and build color slowly. If you go heavy right away, the powder can clump in the stitches, so there’s that.
Pretzel: Bend the ends and sew them together to form the pretzel shape. Pin or clip first if you want the twist to stay put while you stitch. Sew through multiple strands on both sides so the join doesn’t pop open when it’s handled.
Pretzel: Use white yarn to embroider the top for a sprinkled sugar effect. Keep the stitches shallow so the white sits on the surface instead of sinking in between rounds.
Toast: Using the brown yarn, crochet along all four sides to get a bread-like border. Crochet in anticlockwise direction: 10 sc on 1st side, 6 sc in the bottom (2nd side), 10 sc on 3rd side, 8 sc on the last row (4th side). Make another piece and cut yarn short. Sew the two pieces together using the long yarn tail and put some stuffing inside. When you work the border, aim for evenly spaced stitches along the row-edges. If you naturally crochet tight into side posts, loosen up a touch so the edge doesn’t ripple.
Cookies: Placing the right side facing towards you, sew the two pieces together using the long yarn tail and put some stuffing inside. Match up stitches as you go. I like to sew most of the way around, add stuffing, then finish the seam so I’m not trying to push fiberfill past my needle at the end.
Cookies: With a piece of dark brown yarn, embroider the chocolate chips on the surface. Knot and bury the ends between the layers so the back stays neat.
Baby & Child Safety Notes
If you’re turning these into toys for little kids, skip anything that can rub off or be picked off. Embroider details instead of using add-ons, and weave in ends extra securely. Small pieces and long tails are a problem if they come loose.
Frequently Asked Questions
Use a 3 mm hook if you want the keychain pieces to land in that 2 to 3 in range and feel nice and firm. If you size up, expect a slightly bigger, looser fabric. If you size down, it tightens up and can shrink the finished piece a bit, so there’s that.
I use 2 Fine (Sport) because it keeps these Breakfast Mini Keychains small and quick. If you swap yarn weight, the main thing that changes is size. Thicker yarn makes chunkier keychains. Thinner yarn makes tiny ones that can be fiddly.
Finished size varies by item and by yarn, and your personal tension matters too. Mine usually land around 2 to 3 inches, but if you crochet tighter or looser, it shifts. If you want to match mine more closely, stick with sport yarn and the 3 mm hook and try not to death-grip the yarn.
It sits at Level 2. Easy, but not the very first thing I would hand someone who has never held a hook. If you already feel okay keeping your stitches consistent, you’re good.
I treat this as a set of mini breakfast themed pieces, and each one ends up about 2 to 3 inches depending on the item and yarn. If you’re planning gifts, I usually make a few in a batch and stop when I’m tired of weaving in ends. That is the real limiter.
Happy Crocheting
If you make any of these Breakfast Mini Keychains, I want to see what you picked for your little breakfast lineup. Save this pattern somewhere you’ll actually find it again (future you will thank you), and drop a comment telling me which one you made first and about how big it turned out with your yarn and that 3 mm hook. I’m always curious because the 2 to 3 inch range is real, but it still surprises me.