If you’ve been wanting a cute way to corral the little stuff on your wall, this Home Decor Wall Hanger Crochet Pattern gives you a pocketed organizer with a sweet, springy vibe that still feels practical. The strawberries, bunny details, and leafy vine make it a really natural fit for Easter decorating, or just that whole “fresh for spring” mood.
Behind the Pattern
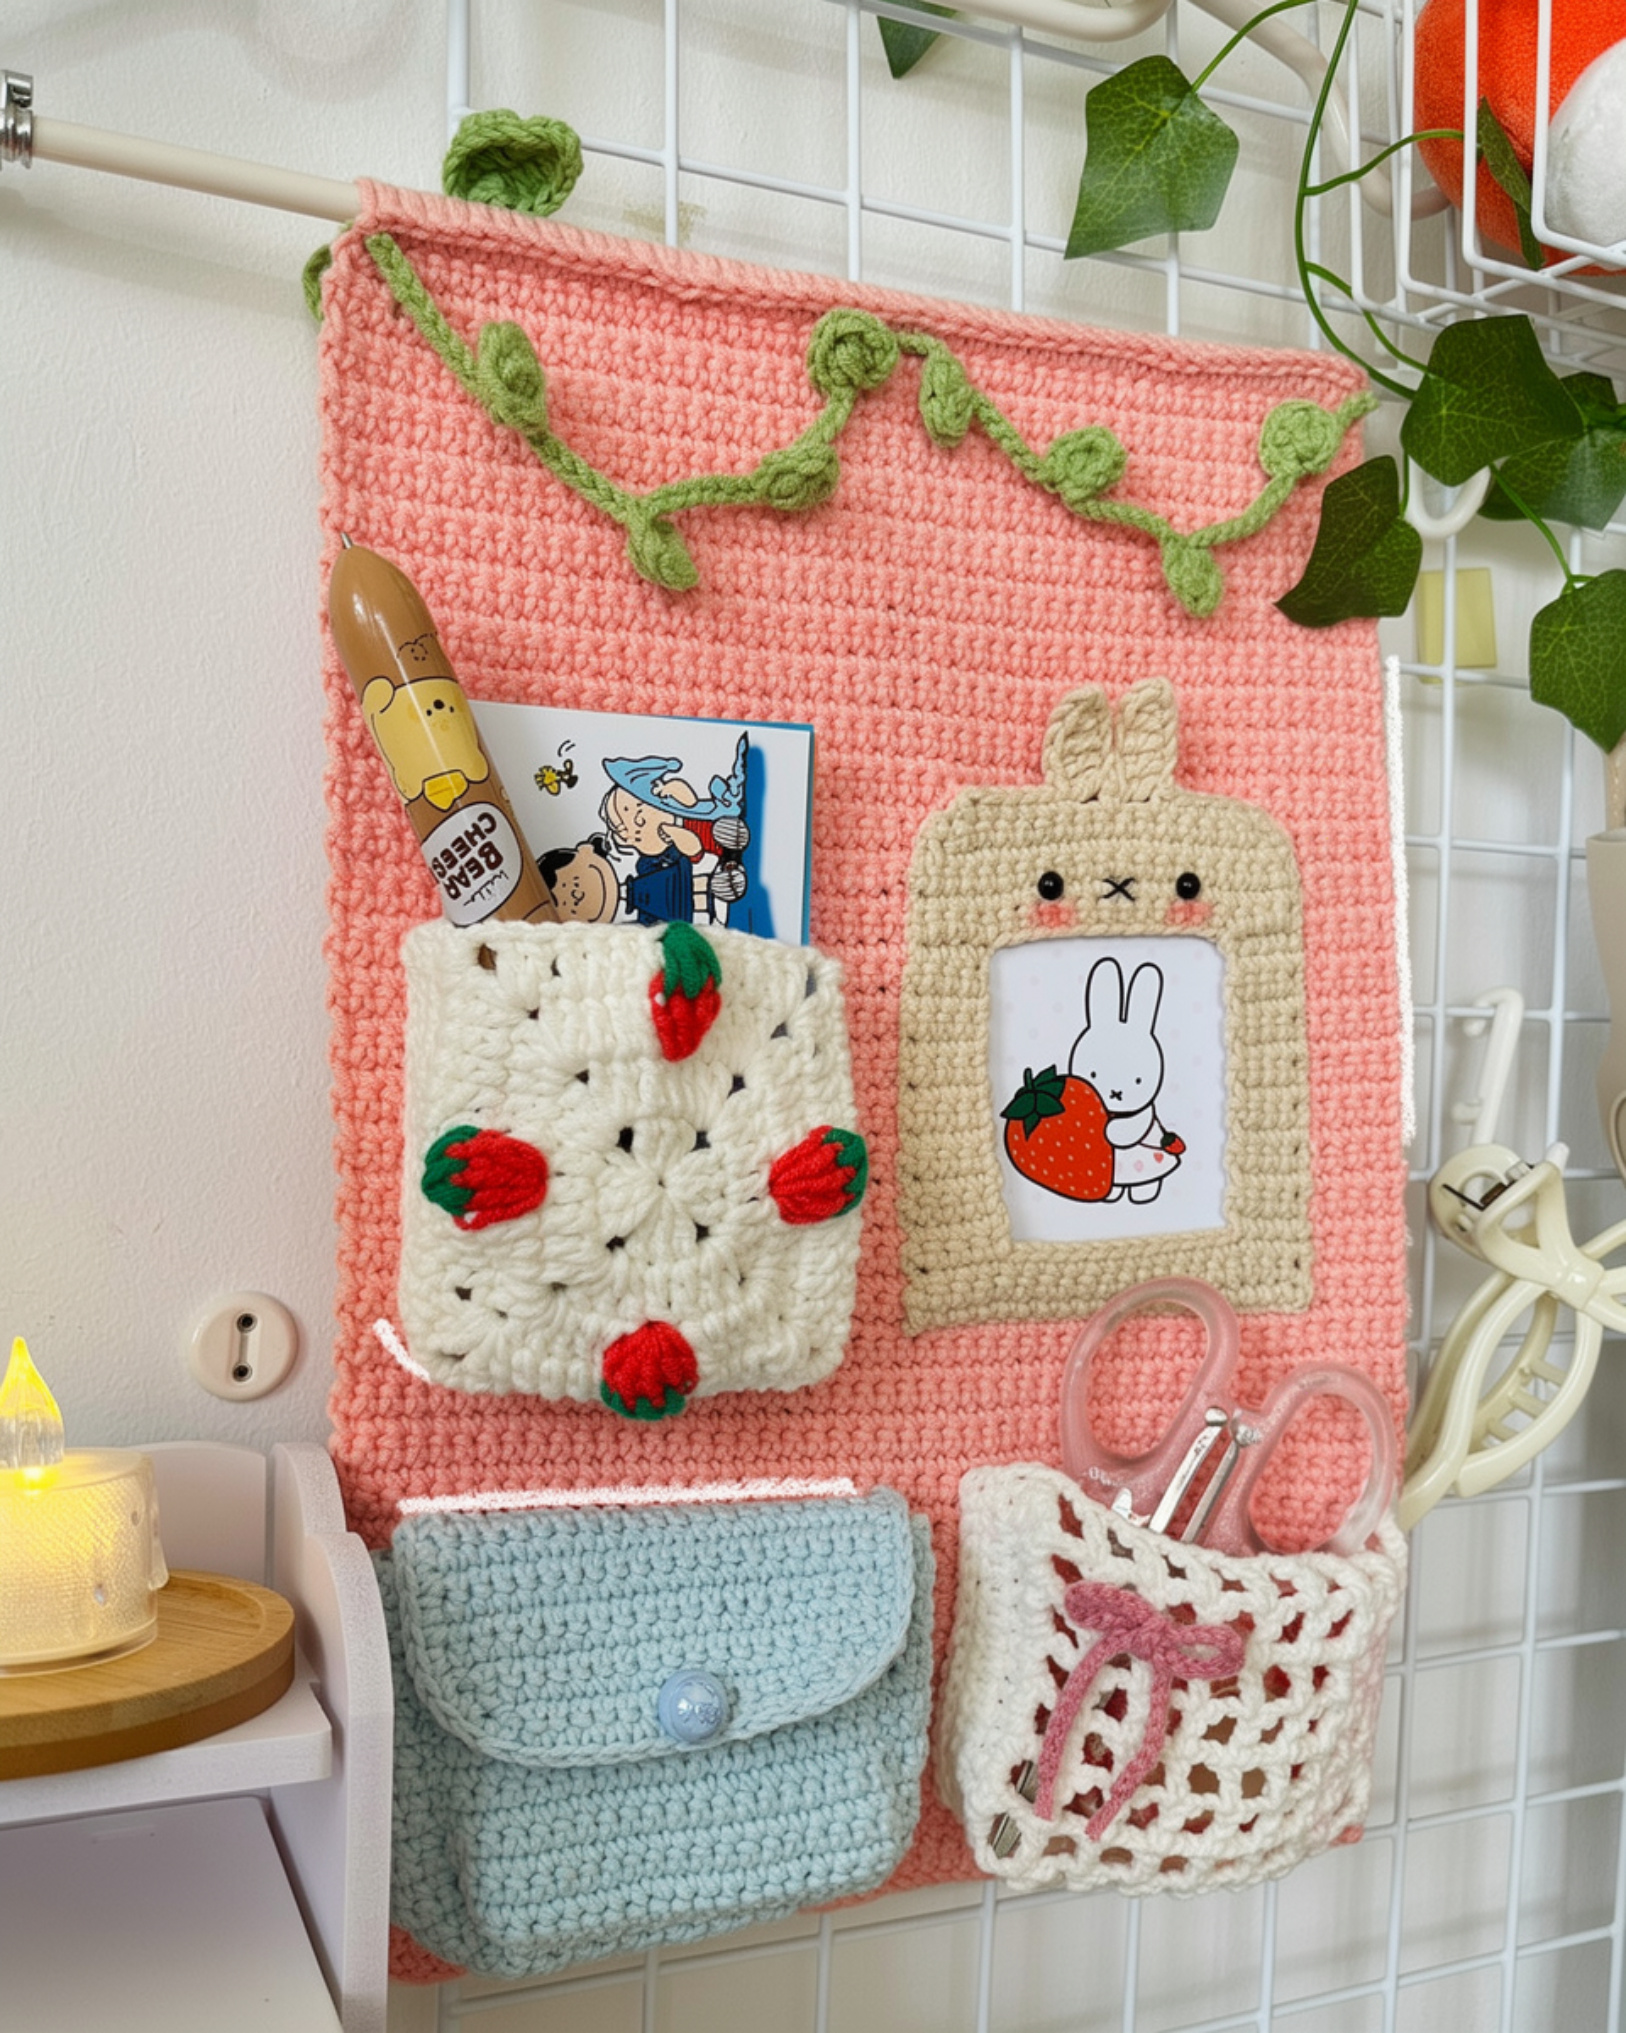
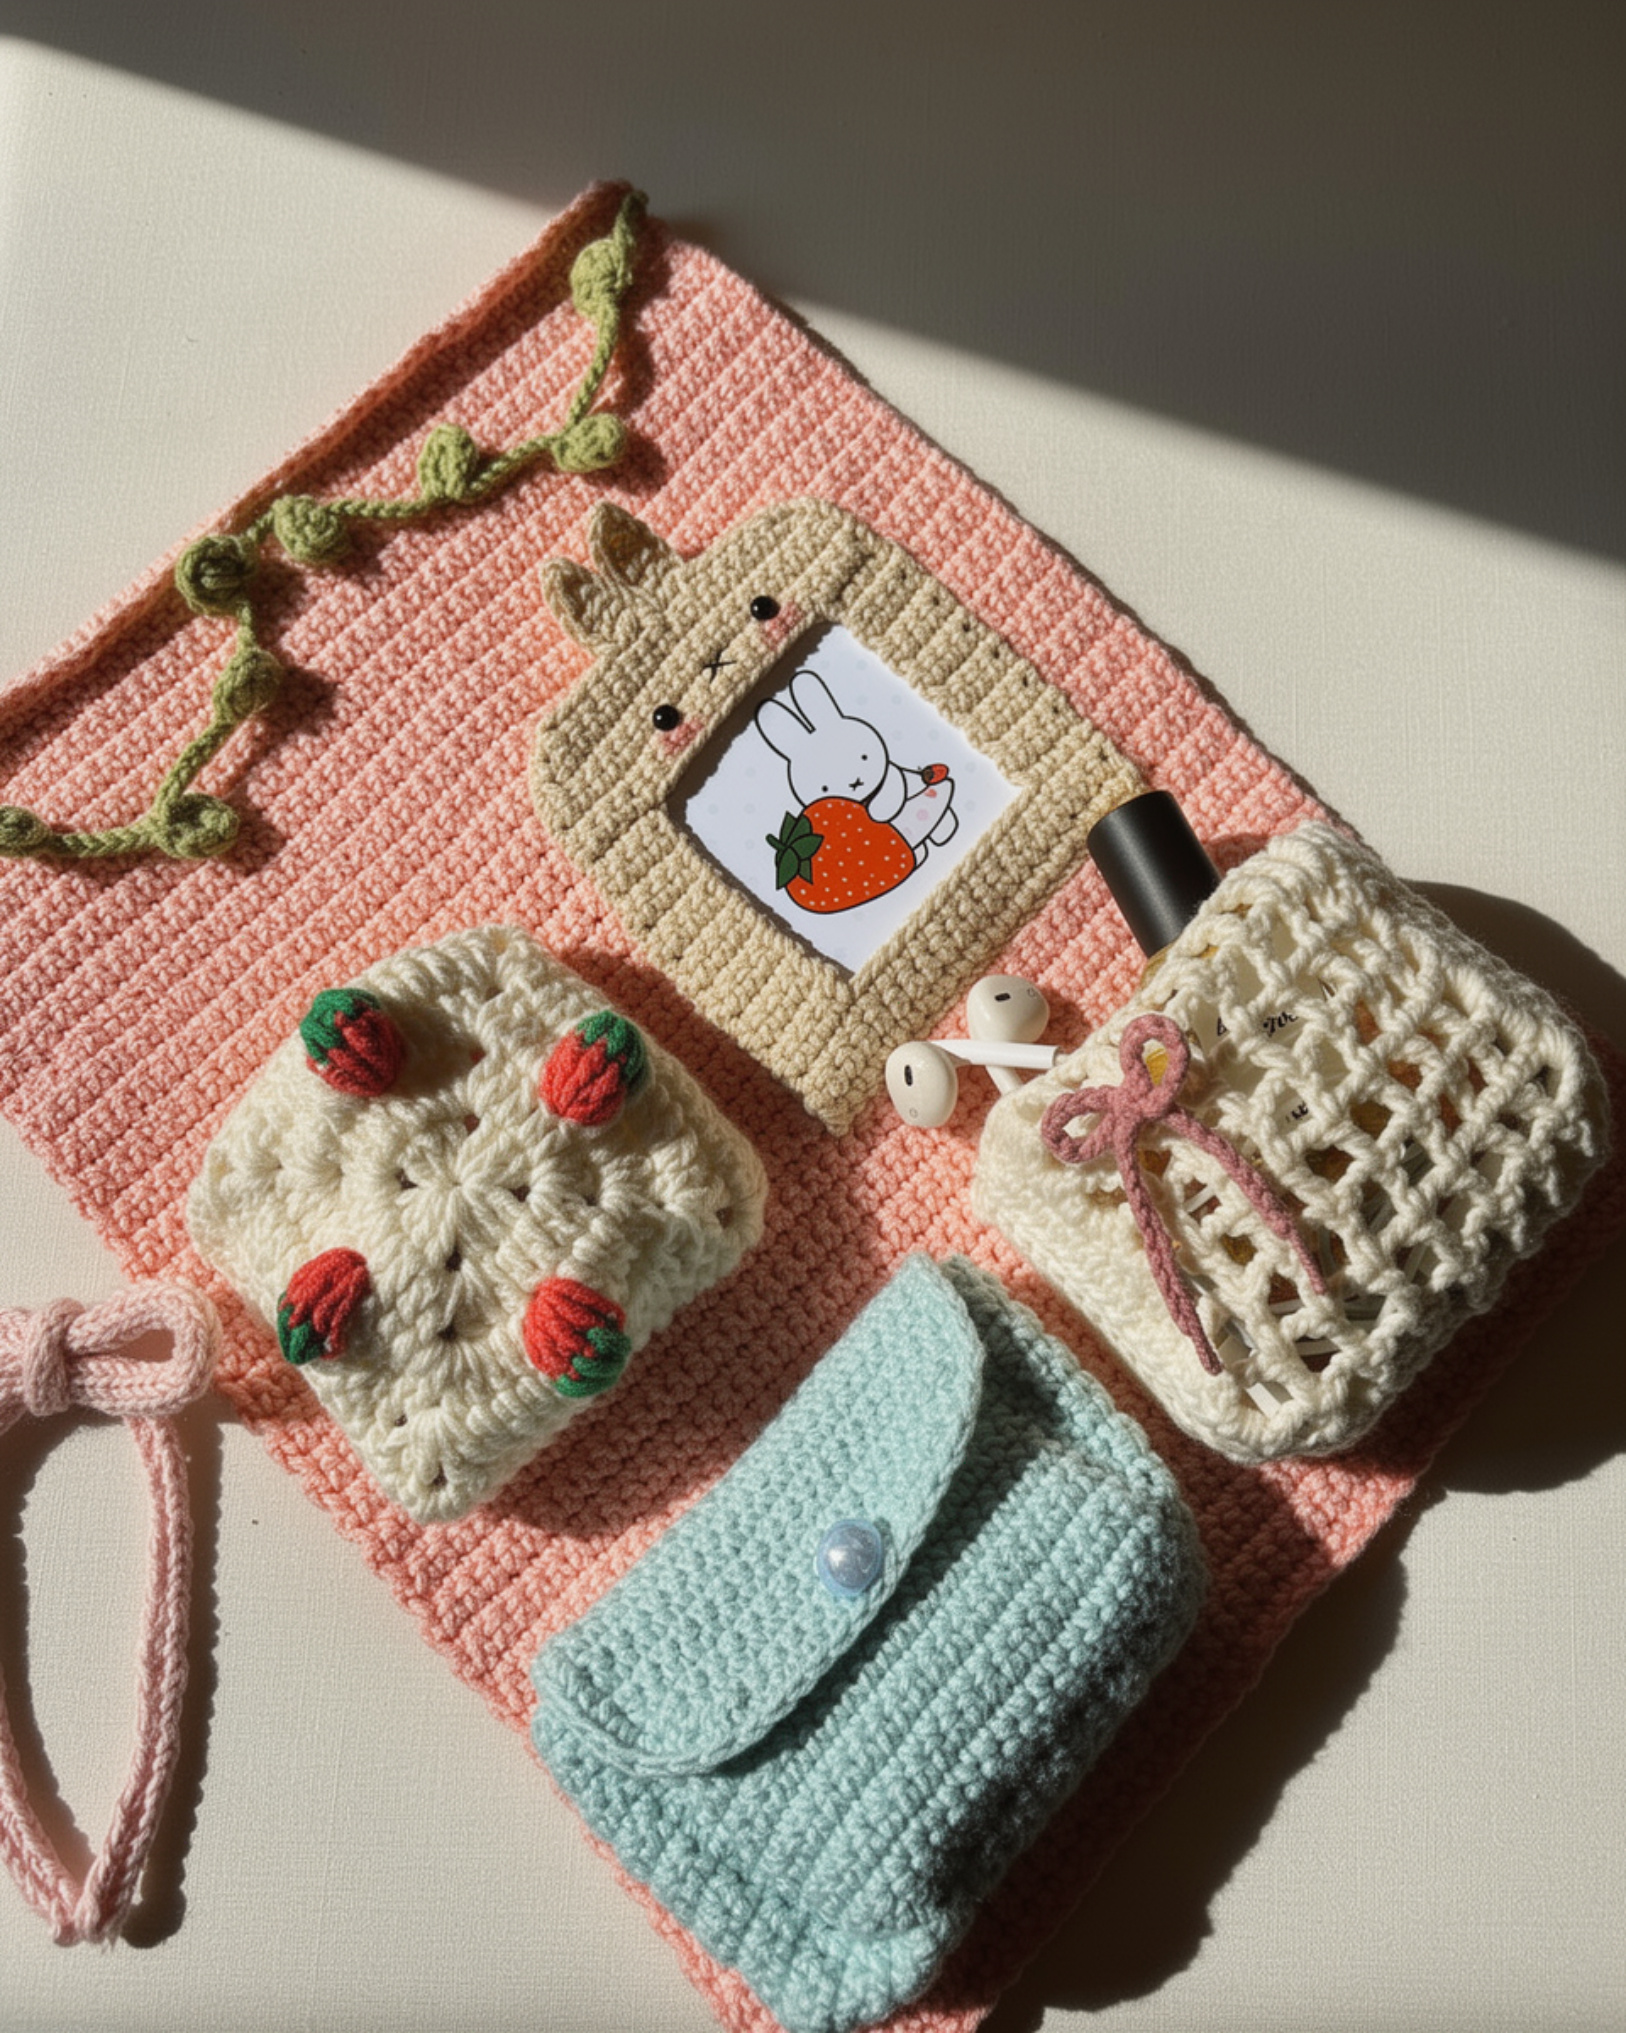
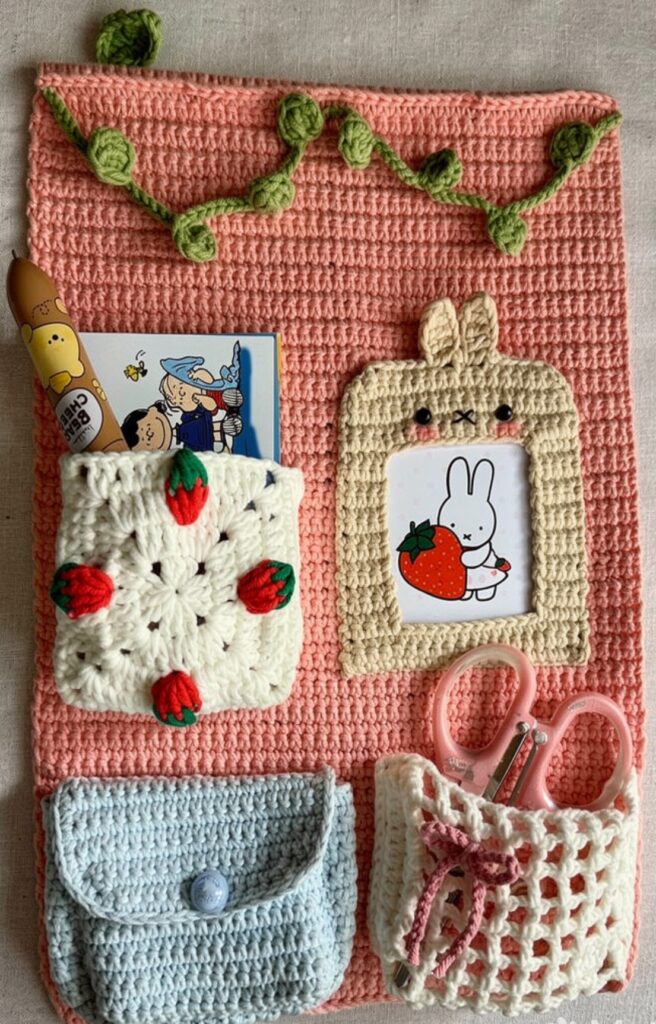
I wanted this one to feel like a little wall garden, but also, you know, actually hold things. The finished piece is a rectangular wall hanger in pink with multiple pockets attached across the front, so it reads like an organizer first, then you notice all the cute details.
Across the top there’s a green crocheted vine with small leaves draped over it, and it adds this soft, playful line that breaks up the rectangle in a nice way. One pocket is a white granny-square style pocket with red-and-green strawberry appliqués, and it’s hard not to stare at it for a second. Another pocket is beige with two upright bunny ears, tiny black bead eyes, a stitched little “X” mouth, and rosy cheeks around a clear window (that window is such a fun touch, by the way). At the bottom there’s a light blue flap pocket with a button, plus a white openwork pocket tied with a pink bow. It’s an intermediate project, mostly because there are a few different elements going on, not because any single part is wild.
What Makes This Pattern Special
You get a wall organizer that’s useful and still looks like decor.
- Multiple pockets with different styles: You can separate your little items instead of tossing everything into one spot.
- Playful spring details: The vine, strawberries, and bunny pocket make it feel cheerful without being over the top.
- A finished piece that looks “done” on the wall: It reads as intentional decor, even when it’s holding stuff.
What You’ll Need
This one uses two hook sizes and a handful of small color amounts for panels, pockets, and little strawberry details.
- 2 Fine / Sport (5-ply) acrylic/cotton blend yarn: For this project I reach for a sport weight acrylic/cotton blend because it holds its shape for pockets and panels without feeling stiff. You want something smooth with decent stitch definition so the mesh pocket and strawberry rounds look clean. Yardage is not stated for the colors, but you will need pink, white, red, green, blue, beige, and black in small to moderate amounts depending on how big you make your organizer.
- 3 mm hook; 4 mm hook: The 3 mm is great when you want tighter, neater fabric for details, and the 4 mm gives you a slightly quicker, more relaxed fabric for the larger pieces.
- Snap buttons (optional): Nice if you want the pouch flap to stay closed instead of just folding over and behaving itself.
- Wire or wooden clothes hanger: This is what the top edge gets built around, so pick one that feels sturdy and isn’t too bendy.
- Also needed: scissors, darning needle, stitch markers
Color Sequence & Yarn Changes
Pink is your main panel color and it also comes back for the finishing row that encases the hanger. White is used for the mesh pocket and the strawberry pocket base, then you pop in red and green for the strawberry accents and bobbles, with blue for the pouch pieces and beige for the photo card holder. If you hate weaving ends, you can carry yarn across short gaps on the wrong side, but I still cut and rejoin for the cleaner-looking sections.
Project Summary
This is the quick-reference stuff you’ll want before you start.
| Skill Level | Level 3 — Intermediate |
| Pattern Gauge | Gauge is not critical for this project. Use the stated hook sizes and adjust tension as needed so the fabric is neat and pockets lay flat; for pockets, avoid overly loose stitches so items don’t slip through. |
| Finished Size | Approx. 12 in wide x 17 in tall (based on 48-st main panel worked for 68 rows in sport weight yarn with a 4 mm hook). |
| Yarn Weight | 2 Fine / Sport (5-ply) |
| Fiber | Acrylic/cotton blend |
| Terminology | US |
Stitches & Abbreviations
Keep this list nearby while you work.
- beg = begin/beginning
- ch = chain
- dc = double crochet
- dec = decrease (as written in pattern)
- hdc = half double crochet
- MR = magic ring
- rep = repeat
- R = row/round
- sc = single crochet
- sk = skip
- sl st = slip stitch
- st(s) = stitch(es)
- tog = together
- tr = treble crochet (US)
- yo = yarn over
- sp = space
- sps = spaces
Special Stitches
- Bob (bobble stitch): *yo, insert hook in indicated st, yo and pull up a loop, yo and draw through 2 loops* rep 4 times in same st (5 loops on hook total), yo and draw through all loops on hook.
Before You Begin
The Main Panel is worked first, and you do not cut yarn after completing it. Just set it aside while you make the pockets. The Strawberry Pocket is worked in joined rounds. Slip stitch to the first stitch each round, and begin each round with ch 1. That ch 1 does not count as a stitch. When the pockets are done, arrange them on the main panel and mark placement with stitch markers. Sew three sides of each pocket, leaving the top open. For hanging, lay a wire or wooden clothes hanger across the top edge and encase it within stitches while working across. It sounds fussy, but it’s just crocheting over the hanger as you go.
How to Make the Home Decor Wall Hanger Crochet Pattern
Work each piece in order, then bring everything together in the finishing steps at the end.
Main Panel (Pink Base)
With pink yarn and 4 mm hook. Do not cut yarn; set aside while making pockets. This is the foundation panel everything gets sewn onto, so it’s worth keeping your edges tidy as you go.
Row 1: ch 49. [49]
Row 2: Row 1: Starting in 2nd ch from hook, sc in each ch. [48]
Row 3: Row 2–Row 68: Ch 1, turn, sc across. [48] Keep the same turning routine the whole way so your side edges stay consistent for sewing pockets later.
Do not fasten off; set aside with yarn attached
Mesh Pocket (White)
With white yarn and 3 mm hook. Add volume by crocheting around three sides after completing Row 8. You’ll make the mesh first in rows, then switch to working around it to give it depth.
Row 1: ch 29. [29]
Row 2: Row 1: Starting in 8th ch from hook, dc in next ch, (ch 2, sk 2 ch, dc in next ch) rep 7 times. [8] That long start chain sets up the first turning chain and the mesh spacing, so count those skipped chains carefully.
Row 3: Row 2–Row 8: Ch 5, turn, (dc in next dc, ch 2, sk 2) rep 7 times. [8] When you turn, aim your first dc into the next dc (not into the chain space) so the mesh columns stay lined up.
Row 4: Round 1 (new): Ch 2, (2 hdc in each dc space) rep 7 times, 4 hdc in corner, (2 hdc in each space) rep 6 times, 4 hdc in corner, (2 hdc in each space) rep 7 times. [] You’re no longer working back and forth here. Rotate the piece as you go, and treat each mesh opening as the “space” you’re working into.
Row 5: Round 2: Ch 2, turn, hdc in each st. [] Turning for this round helps keep the edging even. Don’t skip that turn.
Cut yarn, leaving a long tail
Strawberry Pocket (Joined Rounds)
Joined rounds. sl st to first stitch each round; begin new round with ch 1 (not counted). Start with white yarn and 3 mm hook. Color changes begin in Round 3. This pocket is worked as a joined-round motif first, then you’ll add the side depth in the next section.
Round 1: Round 1: Ch 1, (3 dc, ch 2) rep 4 times in MR, sl st to first dc. [12] Make the magic ring snug before you slip stitch closed so the center doesn’t loosen later.
Round 2: Round 2: Ch 1, (in ch-2 sps: 2 dc, ch 2, 2 dc) rep 4 times, sl st. [16] Each corner stays a ch-2 space in this round, so it’s easy to spot where the repeats belong.
Round 3: Round 3: White: dc in next st. Switch to red: 5 dc in next st. White: 3 dc, (in ch-2 sp: 2 dc, ch 2, 2 dc). Repeat {3 dc, red 5 dc, 3 dc, corner} around. [60] For clean color changes, switch colors on the last yarn-over of the stitch before the new color starts.
Cut red.
Round 4: Round 4: From any ch-2 corner with white: (in ch-2 sp: 2 dc, ch 3, 2 dc), sk 1 dc, 4 dc. Switch to green: 1 Bob. White: 4 dc, sk 1 dc. Rep 4 times. [48] When you make the bobble, keep it a bit loose so you can finish the stitch without fighting your tension.
Cut both colors.
Proceed to add sides for depth; cut yarn after Row 2 of sides
Strawberry Pocket Sides (for depth)
This section builds the depth for the strawberry pocket. You’ll work into the ch-3 corner from the previous round, then continue in rows from there.
Row 1: Row 1: Insert hook in ch-3 corner, ch 2, hdc in sp, 14 hdc, 2 hdc in corner, 13 hdc, 2 hdc in corner, 14 hdc. [] Place a marker in that starting corner if you tend to lose it after the first pass around.
Row 2: Row 2: 45 hdc. [45] This is a good spot to check you didn’t accidentally add or skip stitches at the corners in Row 1.
Cut yarn
Photo Card Holder Base (Beige)
With beige yarn. This piece starts as a small rectangle, then you’ll build two pillars and a top section to form the holder shape.
Row 1: ch 21. [21]
Row 2: Row 1: Starting in 2nd ch from hook, sc in each ch. [20]
Row 3: Row 2–Row 3: Ch 1, turn, 20 sc. [20]
Continue to First Pillar; fasten off where indicated
Photo Card Holder. First Pillar
This pillar grows directly from the base you just made. Keep your stitch count steady so the top section lines up later.
Row 1: Row 1: Ch 1, turn, 4 sc. [4]
Row 2: Row 2–Row 13: Ch 1, turn, 4 sc. [4]
Cut yarn
Photo Card Holder. Second Pillar
Insert hook at opposite end of Row 3. You’re building a matching pillar on the other side, so take a second to confirm you’re attaching at the correct end before you start stitching.
Row 1: Row 1: Insert hook at opposite end of Row 3. Ch 1, 4 sc. [4]
Row 2: Row 2–Row 13: Ch 1, turn, 4 sc. [4]
Cut yarn
Photo Card Holder. Top Section
Insert hook at outer edge of second pillar. This section bridges the two pillars, then shapes the top with decreases and the chained details in Row 7.
Row 1: Row 1: Insert hook at outer edge of second pillar. Ch 1, sc across pillar, ch 12, sc across first pillar. [] When you chain 12, keep the chain relaxed. A tight chain can pull the pillars inward.
Row 2: Row 2: Ch 1, turn, 4 sc, sc in each ch, 4 sc. [] Work into the back bumps of the chain if you like a cleaner edge, but don’t change the stitch count.
Row 3: Row 3–Row 4: Work 2 more rows even. []
Row 4: Row 5: 1 dec, 16 sc, 1 dec. [] Place the decreases the same way on both ends so the shaping stays balanced.
Row 5: Row 6: 1 dec, 14 sc, 1 dec. []
Row 6: Row 7: Ch 1, turn, 1 dec, 4 sc, (ch 6, starting in 2nd ch from hook: sc, hdc, 3 dc, sk 1 sc, sc) rep 2 times, 4 sc, 1 dec. [] Those repeated chain sections are easiest if you pause after each rep and make sure you’re skipping the correct sc before the final sc of the repeat.
Fasten off, weave in ends
Pouch. Panel 1 (Blue)
Panel 1 (blue). This is the larger pouch panel. Make it first so you can use it as the reference when you sew on Panel 2.
Row 1: Ch 21. [21]
Row 2: Row 1: 20 sc. [20]
Row 3: Row 2–Row 15: 20 sc. [20]
Fasten off, weave in ends
Pouch. Panel 2 (Narrow Side Strip)
This long narrow strip becomes the side and bottom depth of the pouch when you sew it around Panel 1. It’s repetitive work. Put on something to listen to, so there’s that.
Row 1: Ch 6. [6]
Row 2: Row 1: 5 sc. [5]
Row 3: Row 2–Row 50: 5 sc. [5] If your strip starts to ripple, it’s usually tension. A slightly larger hook can help, but don’t change anything unless you’ve checked your stitch count first.
Fasten off, weave in ends
Flap for Pouch
Attach blue yarn one row above pouch. This flap is worked directly onto the main pouch area, then shaped with decreases near the end.
Row 1: Row 1: 20 sc. [20]
Row 2: Row 2–Row 7: 20 sc. [20]
Row 3: Row 8: 1 dec, 16 sc, 1 dec. []
Row 4: Row 9: 1 dec, 14 sc, 1 dec. []
Row 5: Row 10: 1 dec, 12 sc, 1 dec. []
Proceed to Edge; fasten off after edging unless continuing to sew
Flap Edge (Single Continuous Pass)
This edging is worked as one continuous path around the flap. Ch 1, 10 sc down first side, 14 sc across bottom, 10 sc up second side. Keep your corner turns smooth. If you need to add a tiny pause stitch at a corner to prevent pulling, do it by spacing your stitches, not by adding extra stitches.
Attach snap button if desired. If you’re adding a snap, it’s easiest to position it now while the flap is flat and you can see where it naturally wants to close.
Fasten off, weave in ends
Vines (Green)
Green yarn. This is a continuous chain-and-leaf repeat that you’ll sew on at the end to create hanging loops and extra detail.
{ch 10, (in 3rd ch from hook: hdc, tr, hdc, ch 2, sl st)} rep 8 times. Work the repeats with the same chain tension each time. Uneven chains make sewing fiddly later, I think.
Fasten off, leave tails for sewing
Hanger Casing (Work Back on the Pink Panel)
Return to pink panel yarn. Switch to 4 mm hook. Lay hanger across top edge and encase it within stitches while working across. You’re basically crocheting a sleeve around the hanger as you stitch across the top edge.
Row 1: Lay hanger across top edge. Ch 1, turn, work sc across while encasing hanger within stitches. [] Keep the hanger centered as you go. If it shifts, stop and slide it back into place before you get too far.
Row 2: Ch 1, cut yarn. []
Fasten off, weave in ends
Final Touches
Sew Panel 2 around three edges of Panel 1. Match corners first, then ease the long strip along the edges as you go. Arrange pockets on main panel, marking placement with stitch markers. This is the moment to decide spacing before you commit to stitches. Sew three sides of each pocket, leaving top open. Use the long tails you left where you can, and keep your stitches small and consistent so the pocket edges don’t gap. Lay wire or wooden clothes hanger across top edge and encase it within stitches while working across. If you already did the casing section, you’re just confirming it’s secure and sitting where you want it. Sew vines along sides and center to create two hanging loops. Anchor the ends well since they’ll take the weight when it’s hung. Tie 50-ch ribbon bow on mesh pocket. Attach snap button if desired.
Frequently Asked Questions
Start with your stitch count and row count. I get about 12 in wide x 17 in tall when I work a 48-st main panel for 68 rows in sport weight yarn with a 4 mm hook, so if you changed any of those, the size will drift. Hook size matters too, so if you used the 3 mm hook for the main panel, expect it to tighten up and shrink.
I use the 4 mm hook for the main panel so it drapes nicely and I hit the finished size more easily. I grab the 3 mm hook when I want a firmer fabric on smaller bits or edges, or when my stitches feel too loose with the 4 mm. If you crochet tight, you might live on the 4 mm the whole time, by any means.
You can, but the finished dimensions will change, sometimes a lot. Sport weight with a 4 mm hook is what lands me at about 12 in wide x 17 in tall for the 48-st, 68-row panel, so thicker yarn will make a bigger wall hanger and thinner yarn will make a smaller one. If you swap yarn, pick the hook that gives you a fabric you like and then measure as you go so there are no surprises at the end.
To make it wider, add stitches to the main panel, keeping the edges tidy as you go. To make it taller, add more rows beyond the 68 rows I use for the sample size. I like to measure the width early because that part is harder to ‘fix later’, so there’s that.
It’s tagged Level 3 (Intermediate) because you’ll do better if you can keep consistent tension and count stitches without getting annoyed. If you’re newer, use the 48-st main panel and count every row, at least at the start, and don’t be shy about frogging when the edges start to wander. I think the project is still doable, it just asks for a little patience.
Now It’s Your Turn!
If you make this Home Decor Wall Hanger Crochet Pattern, I’d love to see how you finish yours and what size you land on. Save it to Pinterest so you can find it again when you’re in the mood for a quick home-decor win, and drop a comment telling me if you stuck with the 4 mm hook for the main panel or if you switched to the 3 mm anywhere because your tension had other plans. Tag me on social too if you share it, because I’m nosy and I want to see your color choices.