If you’ve been hunting for a cute little amigurumi cat to make, this Black Cat Crochet Pattern gives you a plush, wide-eyed kitty with a tiny scarf and a simple, cuddly shape you can finish without turning it into a whole weekend project.

Behind the Pattern
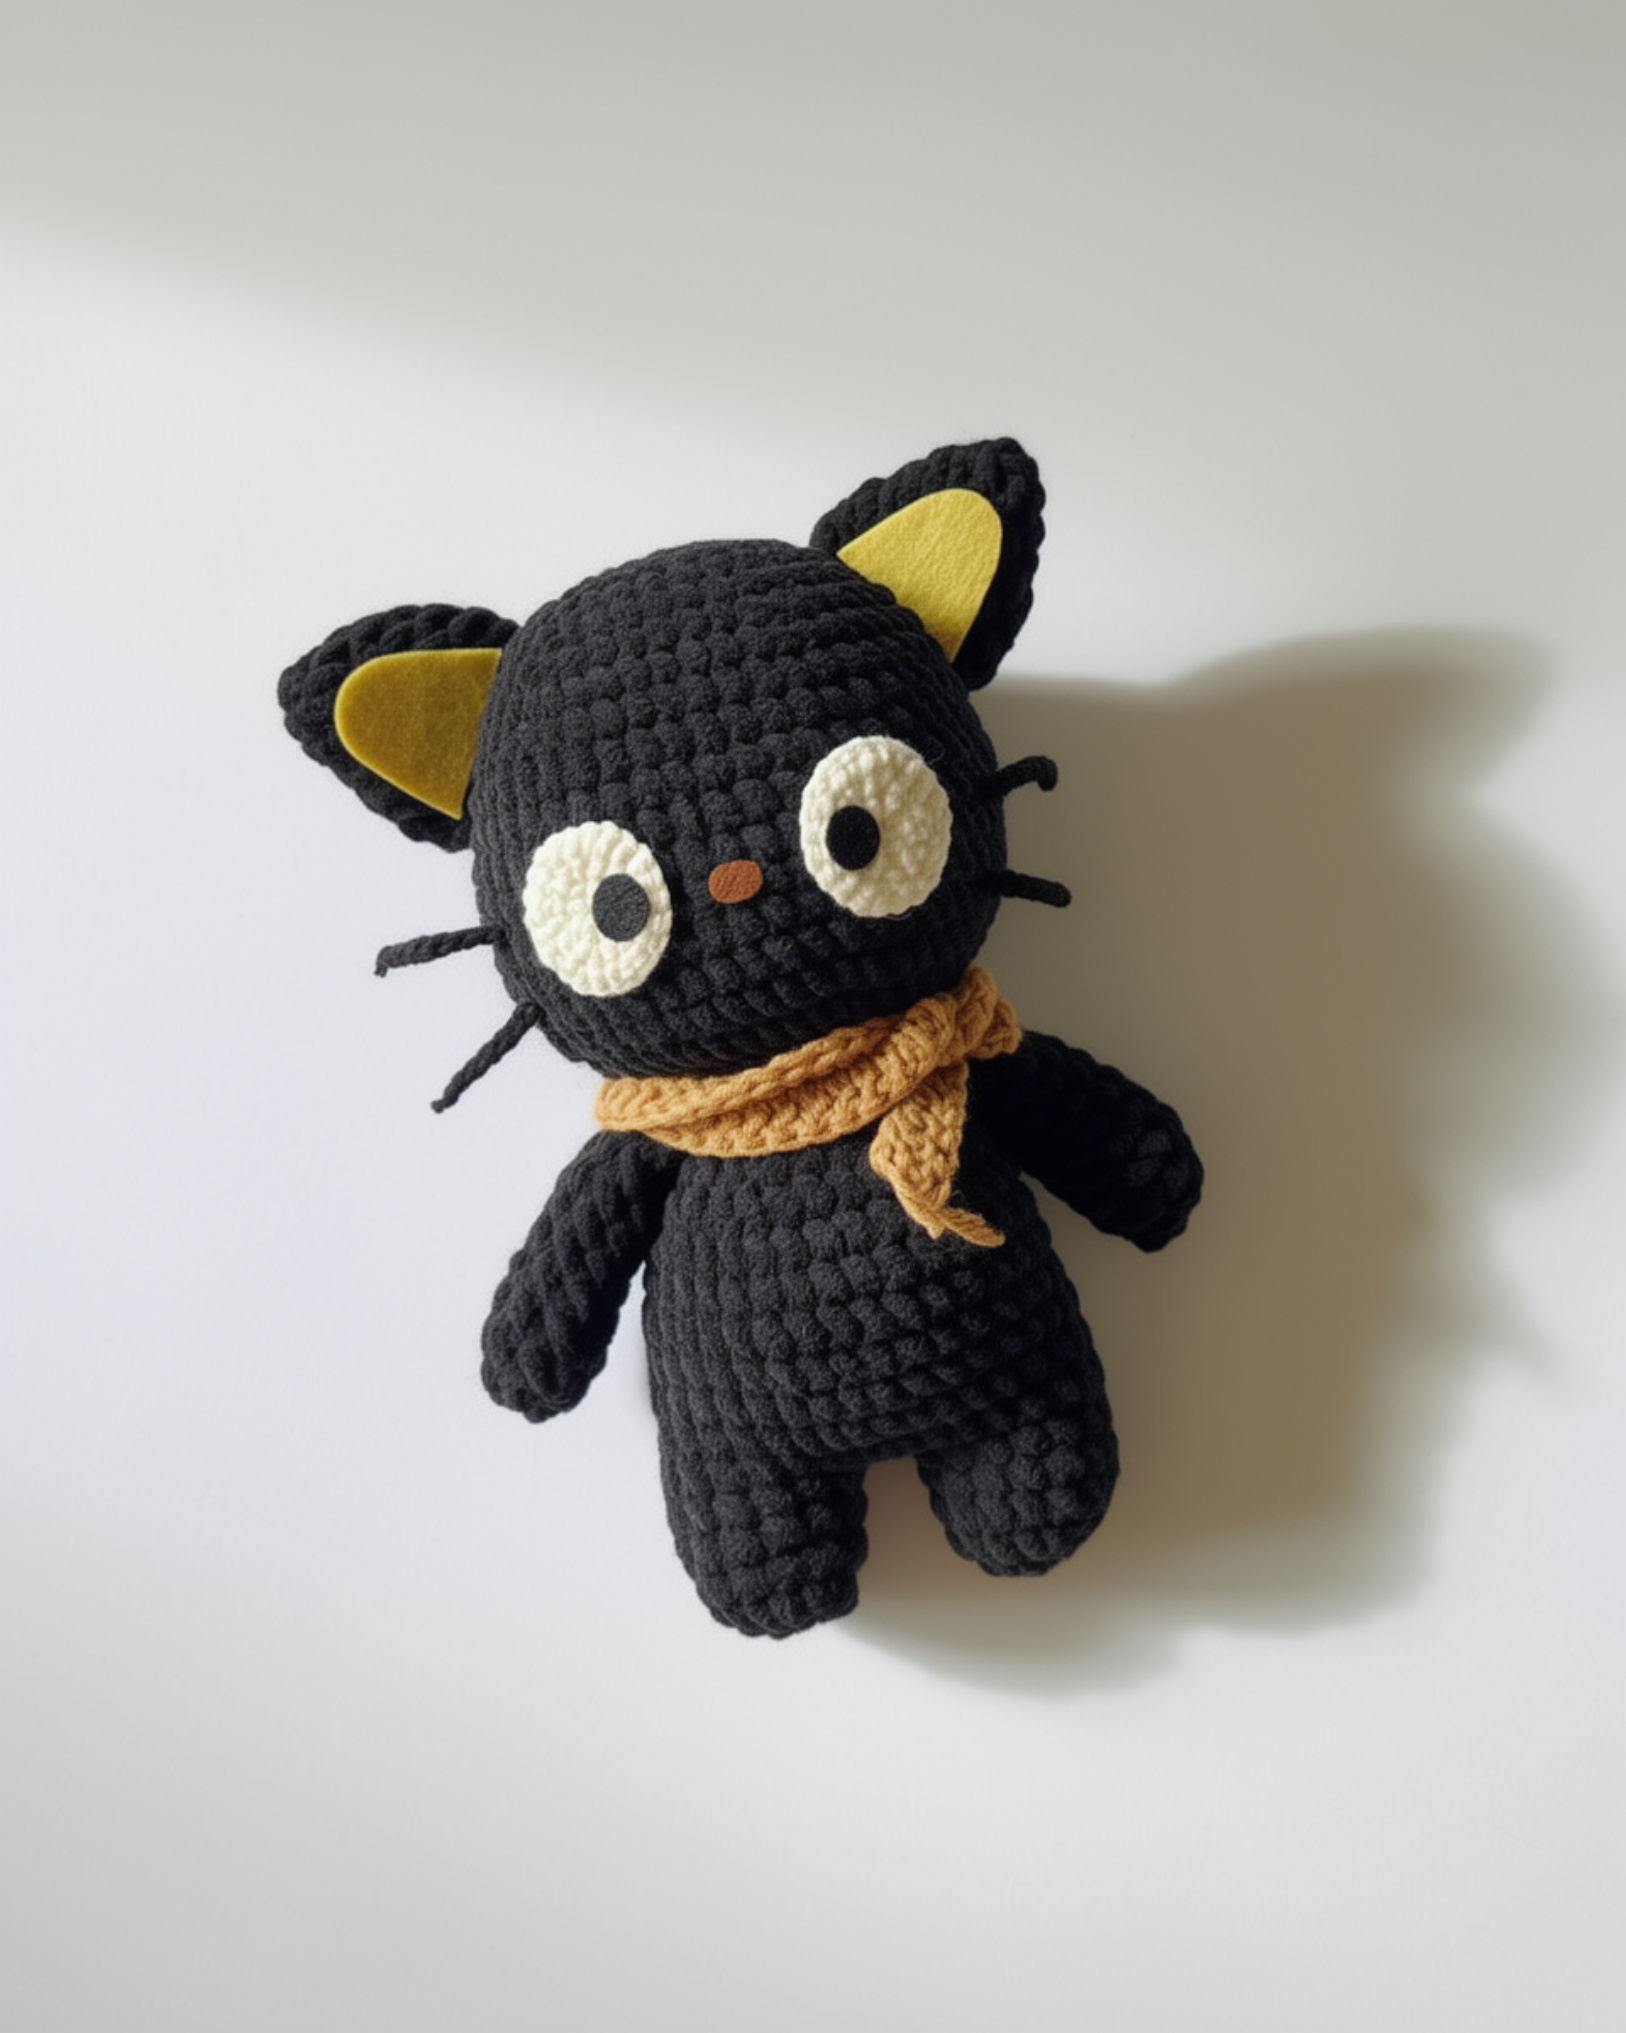
I wanted this cat to feel like a classic stuffed plush: round head, round body, and those simple little tube arms and legs that make it look like it’s ready to sit on a shelf and judge you quietly. It’s mostly black, with big white eyes and black pupils that give it that sweet, slightly goofy stare I can’t resist.
The face details are small but they really do the work: a tiny brown nose and thin black whiskers that stick out on both sides. I also added black ears with yellow inner pieces because it breaks up the dark yarn in a nice way, and then a tan scarf around the neck because, I mean, it needed something. This one sits comfortably in that Level 2 easy zone, so it’s relaxed but not boring, if you know what I mean.
What Makes This Pattern Special
It’s a fast, squishy cat with big eyes and a tiny scarf.
- Simple plush shape: The rounded body and basic limbs keep the whole project moving.
- High-contrast face: Those big white eyes and thin whiskers make the expression pop immediately.
- Easy add-ons: The yellow ear centers and tan scarf add personality without a lot of fuss.
Your Supply List
You will use one main chenille color plus tiny bits for the eyes and scarf, then felt does the rest.
- 6 Super Bulky chenille yarn (fiber not specified, check the yarn label): For this project I reach for super bulky chenille because it builds a plush shape fast and feels soft in your hands while you work. You want something thick with a smooth pile that does not shed like crazy when you tug on it. Plan on about 200 g of black for the main body, plus small amounts of white for the crocheted eyes and brown for the scarf.
- Cotton or acrylic (for details): I like a plain cotton or acrylic for the little detail bits because it holds stitch definition and does not get swallowed up by the fuzz. It is also easier to sew down neatly than chenille, so small shapes stay crisp. You only need a small amount.
- 4 mm hook; 3 mm hook: I use the 4 mm for the chenille so the fabric stays dense without fighting the yarn, and the 3 mm for the smaller detail yarn so it does not look loose or gappy.
- Felt in black, brown, and yellow: This is for the pupils, nose, and the yellow ear triangles, and it gives you clean shapes without trying to crochet tiny pieces in fuzzy yarn.
- Stuffing: Any basic stuffing works, and I add it in small handfuls as I go so the shape stays even before the opening gets too small.
- Fabric glue: Handy for attaching the felt pieces quickly, especially on chenille where stitching can disappear into the pile.
- Also needed: scissors, darning needle
Yarn Substitutes
If you cannot find super bulky chenille, you can still get a cute result with a different plush yarn. The main thing is keeping the stitches tight enough that stuffing does not show.
- Super bulky plush polyester: Weight 6, usually around 100 to 120 m per 100 g ball, and it gives a similar squishy look with less snagging than some chenilles.
- Jumbo blanket yarn: Weight 7, often around 25 to 35 m per 100 g ball, and it makes a bigger finished piece fast. You may need to bump up the hook a little to keep it comfortable to stitch.
Color Sequence & Yarn Changes
Black handles almost all of the crocheting, then you switch to white for the eyes and brown for the scarf at the end. For chenille, I cut and rejoin instead of carrying yarn since carried strands can show through the fluff.
Essential Info
Here’s the quick technical snapshot before you start stitching.
| Skill Level | Level 2 — Easy |
| Pattern Gauge | Gauge is not critical for this project. Use a hook size that creates a tight, firm fabric so stuffing does not show through. |
| Finished Size | Standing at a cozy, squishable size. |
| Yarn Weight | 6 Super Bulky |
| Fiber | Chenille (fiber not specified — check the yarn label); Cotton or acrylic (for details) |
| Terminology | US |
Abbreviations & Stitches Used
Keep this list close while you work.
- BLO = back loop only
- ch = chain
- dc = double crochet
- dec = decrease (sc2tog)
- inc = increase (2 sc in same st)
- MR = magic ring
- sc = single crochet
- sl st = slip stitch
- st(s) = stitch(es)
- tog = together
- × = repeat instructions following × the number of times stated
Helpful Tips
This is an amigurumi build. Arms, legs, body, head, and ears are worked in rounds. For the eyes, you’ll join rounds with a sl st, then start the next round with ch 1, and that ch 1 does not count as a stitch. Stuff as indicated as you go, and keep your fabric tight so the stuffing doesn’t peek through. The ears are not stuffed. Flatten them, close them up, and then sew them on.
The Black Cat Crochet Pattern Pattern Steps
Work each piece in order, then you’ll pull it all together in the Finishing section.
Arms (Make 2)
You’re making two small arms in rounds. With black chenille and 4 mm hook: keep your stitches snug so the stuffing stays put.
Round 1: 6 sc in MR. [6]
Round 2: (1 sc, inc) × 3. [9]
Round 3: 9 sc. [9]
Round 4: 9 sc. [9]
Round 5: 9 sc. [9]
Round 6: 9 sc. [9]
Round 7: 9 sc. [9]
Round 8: 9 sc. [9]
Round 9: 9 sc. [9]
Lightly stuff. Flatten and close with 4 sc through both sides.
Fasten off, weave in ends
Legs (Make 2)
Make two legs in rounds. One gets finished off right away, and the other stays on the hook so you can build straight into the body without a seam.
Round 1: 7 sc in MR. [7]
Round 2: 7 inc. [14]
Round 3: 14 sc. [14]
Round 4: 14 sc. [14]
Cut yarn after first leg. Do not cut after second.
Fasten off, weave in ends (first leg only); leave working yarn attached for second leg
Body
This section joins the legs, then works up the body in rounds. You’ll also attach the arms as you crochet, so have them ready and oriented the way you want before you hit that round.
Round 0: ch 2 and connect to first leg’s last st with 1 sc. [—] Keep the chain from twisting, and place that connecting sc cleanly so the join doesn’t gap.
Round 1: 14 sc on first leg, 2 sc on ch, 14 sc on second leg, 2 sc on ch. [32] Those 2 sc on each chain bridge are what turns the join into a full round, so don’t skip them.
Round 2: 14 sc, 2 inc, 15 sc, inc. [35] This is a good spot to double-check your stitch count before you settle into the plain rounds.
Round 3: 35 sc. [35]
Round 4: 35 sc. [35]
Round 5: 35 sc. [35]
Round 6: 35 sc. [35]
Round 7: 35 sc. [35]
Round 8: 35 sc. [35]
Round 9: (5 sc, dec) × 5. [30] Try to keep your decreases consistent (same style each time) so the fabric tension doesn’t wobble around the round.
Round 10: (4 sc, dec) × 5. [25]
Start stuffing.
Round 11: (3 sc, dec) × 5. [20] Add stuffing in small bits and push it into place as you go. It’s easier now than after the arms are joined in.
Round 12: 3 sc, 4 sc joining first arm, 6 sc, 4 sc joining second arm, 3 sc. [20] When you join an arm, you’re crocheting through the body stitch and the flattened arm stitches together. Line the arm up first, then commit.
Attach arms at Round 12.
Continue to head without fastening off
Head
Keep working in rounds right from the body. You’ll increase out, work even for several rounds, then decrease and close. Don’t wait too long to stuff.
Round 13: 20 sc. [20]
Round 14: 20 inc. [40] This is a big jump in stitch count, so it’s worth placing a marker and counting once you finish the round.
Round 15: (4 sc, inc) × 8. [48]
Round 16: 48 sc. [48]
Round 17: 48 sc. [48]
Round 18: 48 sc. [48]
Round 19: 48 sc. [48]
Round 20: 48 sc. [48]
Round 21: 48 sc. [48]
Round 22: 48 sc. [48]
Round 23: 48 sc. [48]
Round 24: 48 sc. [48]
Round 25: 48 sc. [48]
Round 26: (6 sc, dec) × 6. [42]
Round 27: (5 sc, dec) × 6. [36]
Round 28: (2 sc, dec, 2 sc) × 6. [30]
Stuff head.
Round 29: (3 sc, dec) × 6. [24] As the opening tightens, use a stuffing tool or the back of your hook to nudge stuffing into the edges.
Round 30: (sc, dec, sc) × 6. [18]
Round 31: (sc, dec) × 6. [12]
Round 32: 6 dec. [6]
Close opening securely.
Fasten off, weave in ends
Ears (Make 2)
These are worked in rounds and you won’t stuff them. Do not stuff. Make both, then leave a long tail so sewing is simple later.
Round 1: 6 sc in MR. [6]
Round 2: 6 inc. [12]
Round 3: 12 sc. [12]
Round 4: (2 sc, inc) × 4. [16]
Round 5: 16 sc. [16]
Round 6: 16 sc. [16]
Flatten and close with 7 sc.
Fasten off and leave a long tail for sewing
Eyes (Make 2)
Make two eyes in joined rounds for a clean circle. With white yarn and 3 mm hook. Join rounds with sl st; start new rounds with ch 1 (not counted).
Round 1: 7 sc in ring, sl st. [7]
Round 2: ch 1, 7 inc, sl st. [14] Keep your slip stitch join snug so you don’t get a loose gap at the edge.
Round 3: ch 1, (sc, inc) × 7. [21]
Cut yarn. Use needle to weave through first st of Round 3, then back through final st in BLO.
Fasten off, weave in ends
Whiskers
The whiskers are made directly on the face with chains, so you don’t have extra pieces to sew. With black yarn, insert hook 2 sts from each eye. ch 10 for upper whisker, ch 8 for lower whisker. Repeat on opposite side. After you chain, pull the tail through neatly and snug the base so the chains don’t drift.
Fasten off, weave in ends
Scarf
This scarf is worked in rows with brown yarn, then wrapped on at the end. With brown yarn. If you want a steadier edge, keep your starting chain relaxed so the dc row doesn’t pucker.
Row 1: ch approximately 16 inches. [—]
Row 2: Starting in 3rd ch from hook, work 1 dc in each ch. [—]
Row 3: ch 1 and fasten off. [—]
Wrap around neck
Finishing
Attach arms at Round 12 of the body: work 4 sc joining first arm, then later 4 sc joining second arm as written in Round 12. If you haven’t done this before, the trick is to keep the arm flattened and make sure you’re catching both layers of the arm plus the body stitch each time, so there’s that. Sew ears between Rounds 24–29, aligned with arms. Pin them first, then stitch through the ear edge and the head stitches, taking small bites so the seam doesn’t show much in chenille. Glue eyes between Rounds 18–22, 4 sts apart. Before you commit with glue, set them in place and check the spacing by counting stitches between them, because once they’re down, they’re down. Add black felt pupils and brown felt nose. Use a tiny amount of glue and press flat for a moment so the felt makes full contact. Attach yellow felt triangles inside ears. Center them where you like, then glue and hold until they grab. Whiskers: insert hook 2 sts from each eye; ch 10 for upper whisker and ch 8 for lower whisker; repeat on opposite side. If your chains want to twist, run your fingers down them after fastening off. Wrap scarf around neck.
Baby & Child Safety Notes
Glue-on eyes and felt pieces can come loose with rough play. If this is for a baby or toddler, skip the glue and embroider the eyes and facial features instead, then weave ends in securely and bury them inside the head. Check that all tails are woven in firmly, especially at the whiskers and scarf.
Frequently Asked Questions
Use the 4 mm hook if you want a softer, squishier fabric and you crochet on the tighter side already. I switch to the 3 mm hook when my stitches look a little too open with super bulky yarn, or when I want the cat to feel extra firm in the hand.
You can, but the size and feel will change a lot. I use 6 Super Bulky here because it gives that cozy, squishable standing cat vibe fast, so there’s that. If you go thinner, plan on a smaller cat and more time.
Mine stands at a cozy, squishable size. The exact height shifts depending on whether I grab the 4 mm or 3 mm hook and how tight I crochet, so I don’t overpromise a number.
Level 2, Easy is the right lane for this one. If you can keep your stitch count steady and you don’t mind slowing down for the first few rounds to get your tension right with super bulky yarn, you’ll be fine.
Go down to the 3 mm hook and see if the fabric tightens up enough. I also slow my hands down for a few minutes and focus on consistent tension because super bulky yarn can feel like wrestling a tiny rope at first.
Final Thoughts
That’s it for my Black Cat Crochet Pattern. I love how quickly an amigurumi comes together in 6 Super Bulky yarn, and this one ends up with that cozy, squishable standing shape that’s hard to stop squeezing. If you make one, tell me what hook you ended up liking better, 4 mm or 3 mm, because I bounce between them depending on my mood and my tension. Save it to Pinterest if you’re collecting spooky-cute makes for later, and if you share photos, tag me so I can see your cat’s vibe.