The Inspiration
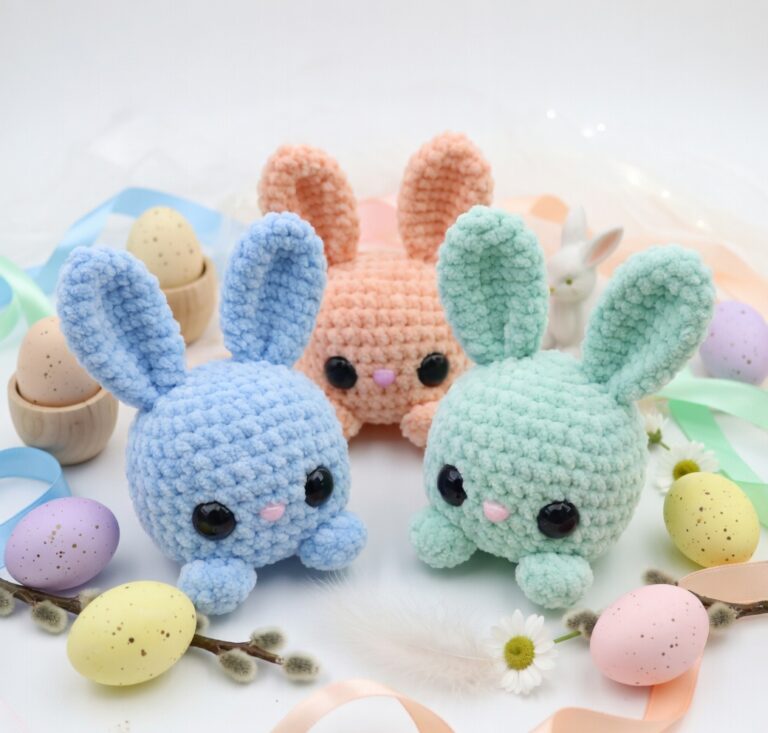
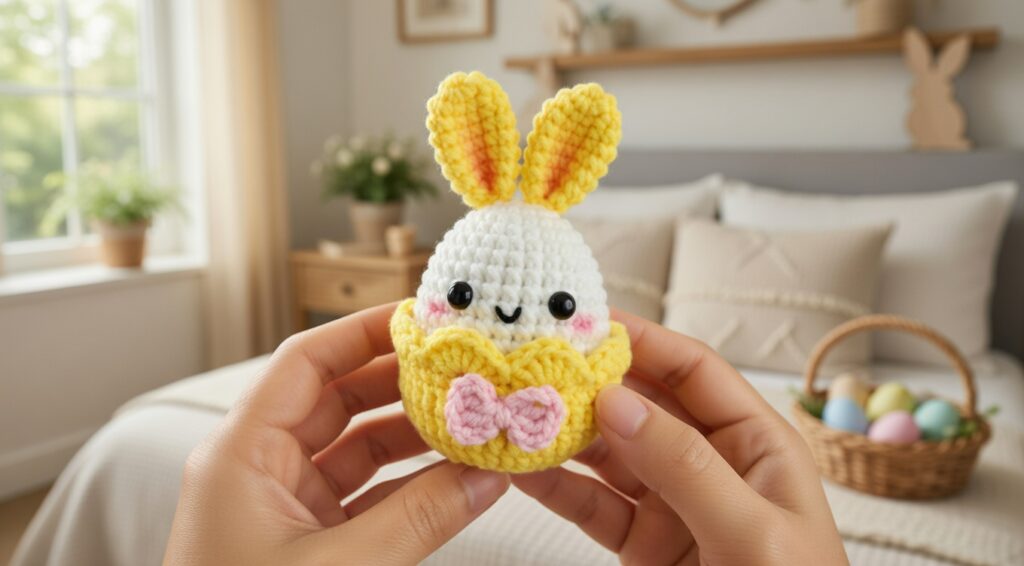
I wanted that classic Easter moment where you spot something tiny and adorable tucked inside an egg, so I went all in on the “peekaboo” idea. The finished piece is a white bunny sitting in a bright yellow eggshell cup with scalloped cracked edges, and there’s a pink bow right on the front because it felt a little plain without it.
The bunny has shiny black round eyes, a small stitched smile, and those pink blush cheeks that make it look like it’s trying not to be noticed (but it totally is). The ears are upright and yellow with a slightly darker center, so you get that pop of color without making the face too busy. It’s Level 2 easy, so it’s pretty simple, but it still has enough little details to keep it interesting, I think.
Why This Pattern Stands Out
You get a full character scene in one small, fast amigurumi project.
- Eggshell “reveal” look: The cracked scalloped edge makes the bunny pop instantly.
- Simple face, big personality: Black eyes, a tiny smile, and blush cheeks do all the work.
- Bold spring colors: The yellow shell and ears with a pink bow keep it bright.
What You’ll Need
You’ll use mostly your main color plus a couple tiny accents, so it’s a small-scraps kind of project.
- 2 Fine / Sport yarn in cotton or acrylic: Sport weight keeps stitches small and tidy, so the egg shape stays smooth and the details don’t look bulky. You’ll need your main color (white) plus small amounts of yellow and pink, with optional bits of blue or other accent colors.
- 2.75 mm crochet hook: A nice match for sport yarn when you want tight fabric for amigurumi, so stuffing doesn’t peek through.
- Black safety eyes (6 mm or 8 mm): Either size works — it just changes the expression a bit. Decide once the face is pinned in place.
- Stuffing (fiberfill): You don’t need a ton, but stuff as you go so you can shape the egg nicely before the opening gets small.
- Embroidery thread for mouth and cheeks: Keeps the face details neat and a little finer than yarn.
- Also needed: yarn needle, scissors, optional stitch markers
Quick Details
| Detail | Info |
|---|---|
| Skill Level | Level 2 — Easy |
| Gauge | Not critical; use a hook that creates tight, firm fabric |
| Finished Size | Approx. 5 in (12.5 cm) tall egg bunny (excluding eggshell holder) |
| Yarn Weight | 2 Fine / Sport |
| Fiber | Cotton or acrylic |
| Terminology | US |
Stitches & Abbreviations
Keep this list open while you work.
- ch = chain
- inc = increase (2 sc in same st)
- MR = magic ring
- sc = single crochet
- sl st = slip stitch
- st(s) = stitch(es)
Special Stitches
- Picot: ch 3, sl st in first ch made.
- Scallop: Work (sc, ch 2, sc) or (sc, hdc, dc, hdc, sc) into the same stitch to form a shell or scallop point along the edge.
Pattern Notes
This project is worked in continuous rounds (spiral) starting with a magic ring — don’t join rounds unless the instructions say to. Use a stitch marker and move it up each round. Stuff firmly but gently before closing. Add stuffing a little earlier than you think, because the opening gets tight fast.
How to Make the Easter Egg Crochet Pattern
Work each piece in order, then do the small details and assembly at the end.
Piece 1: Egg Body (White)
Work in continuous rounds with white yarn.
Round 1: MR, 6 sc into ring. (6 sts)
Round 2: Inc in each st around. (12 sts)
Round 3: Sc 1, inc repeat around. (18 sts)
Round 4: Sc 2, inc repeat around. (24 sts)
Round 5: Sc 3, inc repeat around. (30 sts)
Round 6: Sc 4, inc repeat around. (36 sts)
Round 7: Sc 5, inc repeat around. (42 sts)
Rounds 8–14: Sc in each st around. (42 sts) (7 rounds even)
Round 15: Sc 5, sc2tog repeat around. (36 sts)
Round 16: Sc in each st around. (36 sts)
Round 17: Sc 4, sc2tog repeat around. (30 sts)
Round 18: Sc in each st around. (30 sts)
— Insert safety eyes now if you haven’t already. Begin stuffing. —
Round 19: Sc 3, sc2tog repeat around. (24 sts)
Round 20: Sc 2, sc2tog repeat around. (18 sts)
Round 21: Sc 1, sc2tog repeat around. (12 sts)
Round 22: Sc2tog around. (6 sts)
Fasten off, leaving a tail. Finish stuffing, then sew the opening closed. Weave in end.
Piece 2: Bunny Ears (Make 2)
Each ear is made in two layers — an outer ear (yellow) and an inner ear (pink) — then joined.
Outer Ear (Yellow)
Round 1: MR, 4 sc into ring. (4 sts)
Round 2: Inc in each st around. (8 sts)
Round 3: Sc 1, inc repeat around. (12 sts)
Rounds 4–8: Sc in each st around. (12 sts) (5 rounds even)
Fasten off with a tail for seaming. Do not stuff.
Inner Ear (Pink)
Round 1: MR, 4 sc into ring. (4 sts)
Round 2: Inc in each st around. (8 sts)
Rounds 3–8: Sc in each st around. (8 sts) (6 rounds even)
Fasten off with a tail.
Joining the Ears
Place the pink inner ear on top of the yellow outer ear, centered. Sew the inner ear flat onto the outer ear using the pink tail, leaving the yellow border visible all around. Gently pinch the base of the ear and stitch a small fold to give it a slight curve forward.
Piece 3: Eggshell Holder (Yellow)
This is the cracked eggshell cup the bunny sits in. Worked from the base upward.
Round 1: MR, 6 sc into ring. (6 sts)
Round 2: Inc in each st around. (12 sts)
Round 3: Sc 1, inc repeat around. (18 sts)
Round 4: Sc 2, inc repeat around. (24 sts)
Round 5: Sc 3, inc repeat around. (30 sts)
Round 6: Sc 4, inc repeat around. (36 sts)
Rounds 7–10: Sc in each st around. (36 sts) (4 rounds even — forms the cup walls)
Round 11 (Scallop/Cracked Edge): Sc 1, then work a Scallop into the next st, sc 1, sl st 1 repeat around, adjusting as needed to space scallops evenly.
Fasten off and weave in ends. The scallop edge mimics the jagged look of a cracked eggshell.
Note: Do not stuff the eggshell holder — it should remain open and flat-bottomed so the egg bunny can sit inside.
Putting It All Together
- Fold each ear slightly and sew to the top of the egg body with the pink side facing forward. Use pins to hold placement while you stitch, and catch stitches on both the ear and the egg body so the seam doesn’t pop.
- Insert safety eyes just below where the ears attach, aiming for symmetry. If the egg isn’t fully closed yet, it’s easier to attach the washers from the inside now.
- Use pink yarn or blush embroidery thread to add cheek circles on either side of center.
- With black embroidery thread, stitch a small curved smile below the eyes.
- Finish stuffing the egg body firmly and sew the top closed.
- Place the completed egg bunny into the eggshell holder.
- Optional: Add a small bow at the front center of the eggshell holder for a finishing touch.
- Weave in every tail like you mean it — so there’s that.
Baby & Child Safety Notes
If this is for a baby or a child who still mouths toys, skip safety eyes and embroider the eyes instead. Stitch all facial details firmly, knot securely, and bury all thread tails inside the piece. Keep small add-ons like bows extra secure, or leave them off entirely.
Frequently Asked Questions
What size should my finished Easter egg bunny be? Mine comes out about 5 in (12.5 cm) tall for the egg bunny — not counting the eggshell holder — when using sport-weight (2 Fine) yarn with a 2.75 mm hook. If yours is taller or shorter, it usually comes down to yarn thickness and how tightly you crochet.
Can I use a different hook size than 2.75 mm? Use the hook that gives you a firm fabric you like for amigurumi, then expect the size to change. I start at 2.75 mm for this one, then bump up or down if the stitches look too loose or too tight — simple as that.
What yarn works best for this pattern? I use 2 Fine / Sport yarn for the look and the finished size listed. If you swap yarn weight, the egg bunny will still work, it just won’t match the 5 in (12.5 cm) height anymore, so there’s that.
Is this Easter Egg Crochet Pattern beginner-friendly? This one sits at Level 2, Easy, so it’s friendly if you’ve already made a small amigurumi or two. If you’re brand new, you can still do it, but you’ll probably pause and re-read parts — and that’s normal.
Does the 5 in (12.5 cm) measurement include the eggshell holder? Nope, I measure the egg bunny only. The eggshell holder dimensions can vary depending on how you set it up, so I leave it out of that number on purpose.
Now It’s Your Turn!
If you make this Easter Egg Crochet Pattern, I want to see your little egg bunny lineup — even the slightly lopsided ones. Save it to Pinterest so you can find it again next spring (or next weekend, no judgment), and tell me in the comments what colors you picked and what size yours ended up with, because the yarn and hook combo can change the vibe A LOT.