
If you’ve been hunting for a cute, giftable ocean plush, this Whale Shark Crochet Pattern walks you through making a chubby little whale shark toy with fins, spots, and that sweet sharky face.
The Inspiration
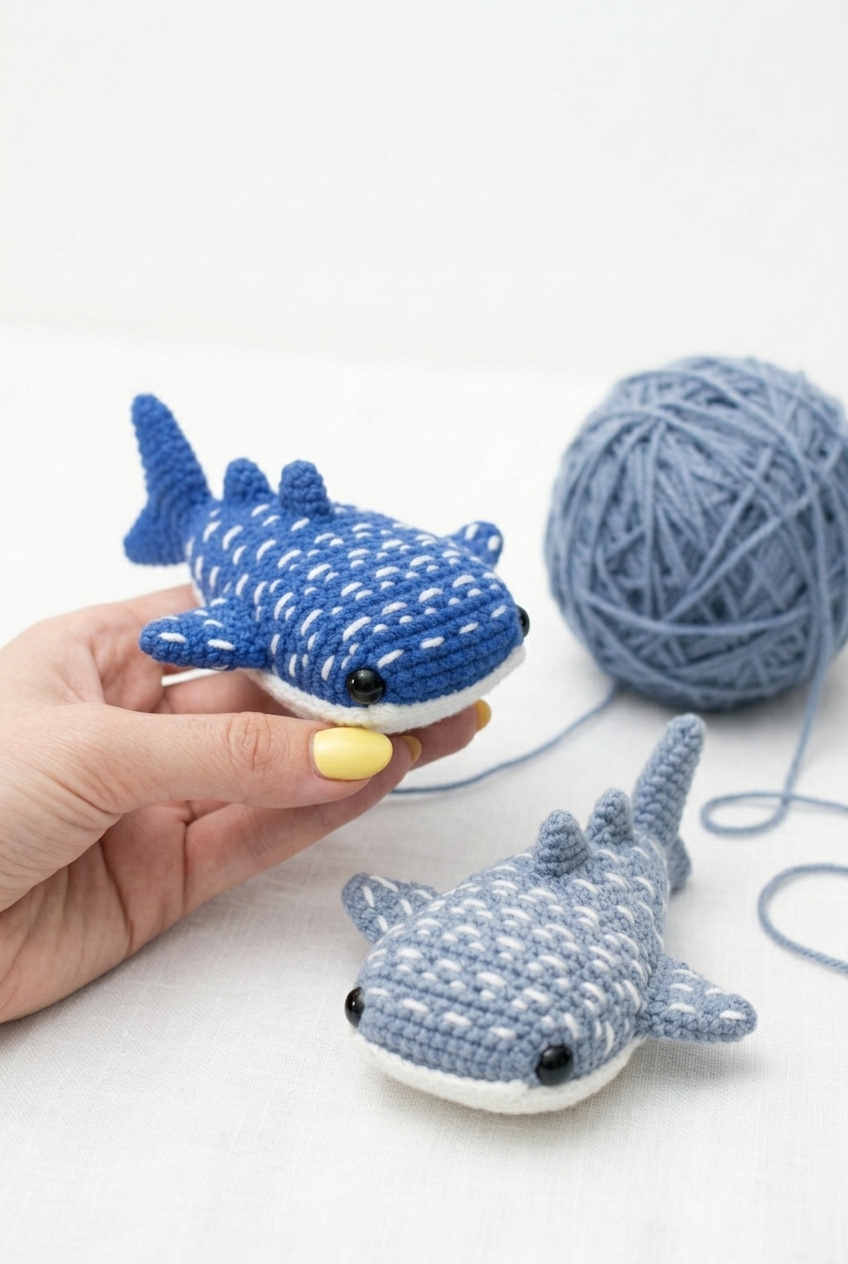
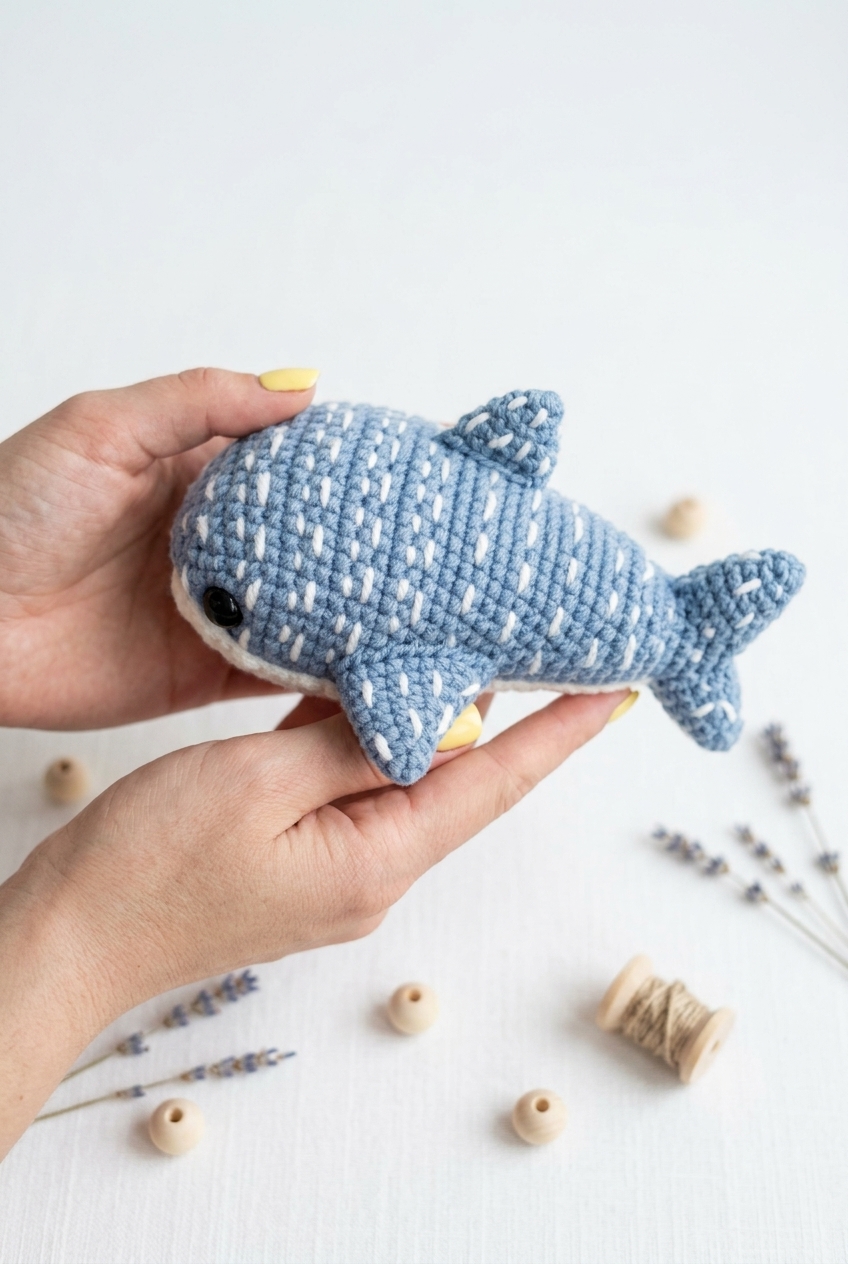
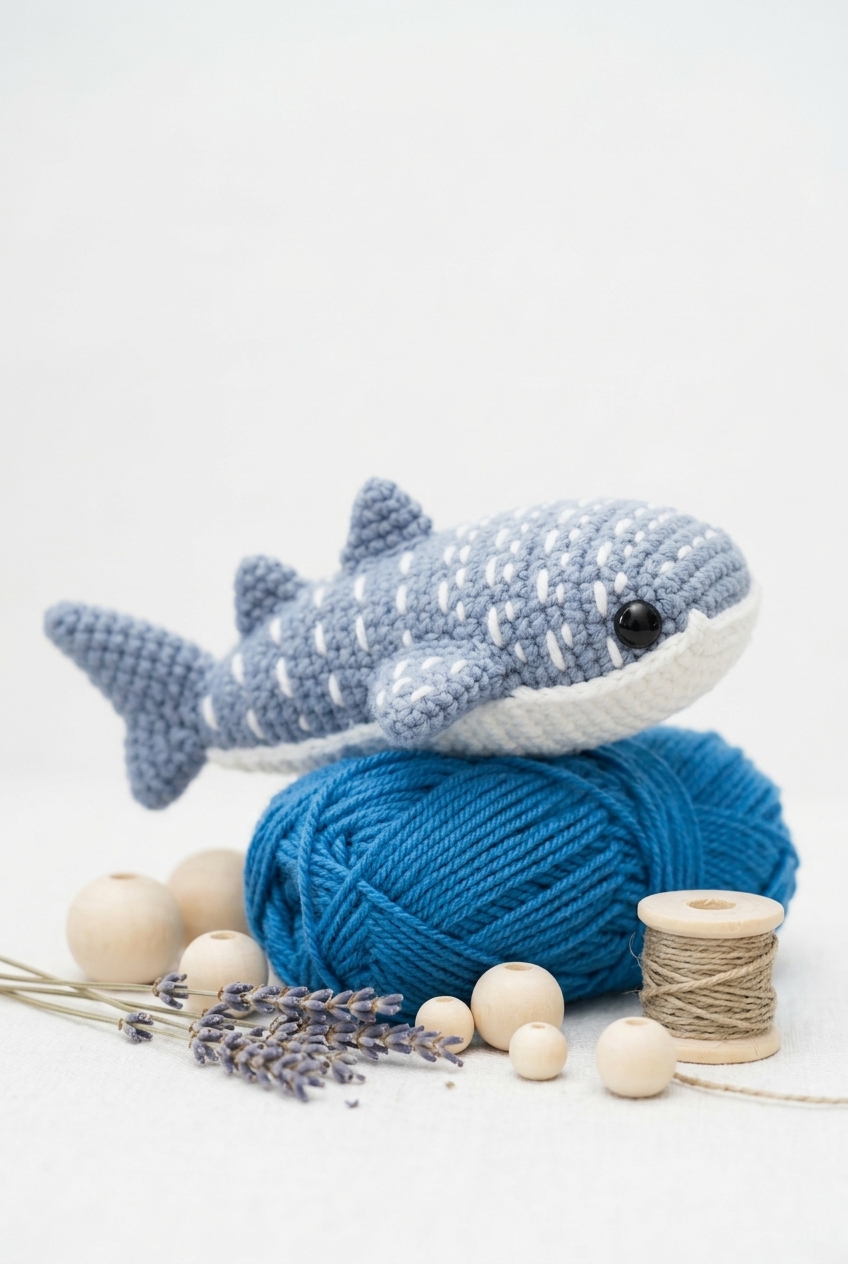
I wanted this whale shark to feel soft and friendly, not fierce. So I went with a rounded body, a slightly squared snout, tiny side fins, and a tail fin that reads “swimming” even when it’s just sitting on your desk. The row of raised dorsal fins along the top is my favorite part. It adds a little texture without making the whole thing fussy.
The look in the photo is two versions: one deep blue and one light blue, both with a white underside and white stitched spots across the back. Those spots are the whole whale shark vibe, and they’re also the part you can really make your own (more spots, fewer spots, messy spots, perfect spots, whatever). Add shiny black bead eyes and it turns into that “oh no, it’s adorable” moment pretty fast. This one sits firmly in easy territory, but it doesn’t feel boring, I think.
Why You Need This on Your Hook
You get a whale shark plush that’s cute, sturdy, and actually fun to finish.
- Instant personality: The squared snout, bead eyes, and little fins make it feel alive fast.
- Great texture without hassle: Those raised dorsal fins add detail, but they don’t drag the project out.
- Easy to customize: Change the blues, tweak the spot placement, and it still reads whale shark.
Gather Your Supplies
You’ll use three colors across the body, belly, and fins, but it’s all worsted acrylic so it stays simple.
- Worsted weight (4 Medium) 100% acrylic yarn: For this project I reach for worsted weight acrylic because it holds its shape once it’s stuffed and it doesn’t go limp over time. Acrylic also gives you clean, even stitches without feeling stiff, as long as you pick a strand that feels smooth and not fuzzy. You’ll want enough for a main body shade plus small contrast bits, about one full skein for the body color and small amounts of the other two colors.
- G (4 mm) crochet hook: A 4 mm hook is a nice middle ground for worsted acrylic here, tight enough for amigurumi fabric but not a fight to get the hook through.
- 12 mm black safety eyes: This size gives the face a clear, bold look, just make sure they’re snapped in before stuffing closes things up.
- Fiberfill: You don’t need a ton, but plan to stuff as you go so you can shape the body and fins before the openings get too small.
- Also needed: bent tip tapestry needle, scissors, stitch marker, straight pins
Color Sequence & Yarn Changes
Most of the piece stays in the body color, then you’ll switch to white for the belly and come back in for embroidery and fin detailing. For the fins, I like to leave longer tails than usual so sewing and those little stitched accents don’t turn into a yarn-joining party.
At a Glance
Here’s the quick reference stuff before you start stitching.
| Skill Level | Level 2 — Easy |
| Pattern Gauge | Gauge is not critical for this project. Use a hook size that creates a tight, firm fabric so stuffing does not show through. |
| Finished Size | approximately 7 in. (18 cm) long. |
| Yarn Weight | 4 Medium / Worsted |
| Fiber | 100% Acrylic |
| Terminology | US |
Abbreviations & Stitches Used
Keep this list close. It saves time.
- ch = chain
- sc = single crochet
- sl st = slip stitch
- st = stitch
- sts = stitches
- inc = increase (2 sc in next st)
- dec = decrease (sc2tog)
- rep = repeat
- * * = repeat the instructions between asterisks the number of times indicated
- sc2tog = insert hook in next st, yo, pull up a loop; insert hook in next st, yo, pull up a loop; yo, pull through all 3 loops on hook.
Special Stitches
- sc2tog (decrease): insert hook in next st, yo, pull up a loop; insert hook in next st, yo, pull up a loop; yo, pull through all 3 loops on hook.
The Critical Details
This toy is worked in continuous rounds, so don’t join rounds unless a step tells you to. The “ch 2 method” can be used instead of a magic ring for the starting round. Use either one. Work with the right side facing out as you go. The pattern maker uses yarn under, but you can yarn over if that’s your habit. Just know it may change the finished size. Sew pieces together using whipstitch unless otherwise specified. For color changes: insert hook into last st with old color, yo and pull through st. With new color, yo and pull through remaining 2 loops on hook.
The Whale Shark Crochet Pattern Pattern Steps
Work through each piece in order, then set everything aside for the Finishing section where it all gets sewn together.
Body (Worked in Continuous Rounds)
This is the main body piece. All rounds are worked continuously (not joined rounds). Work with the right side facing out. It helps to use a stitch marker in the first stitch of each round so you don’t lose your place.
Round 1: ch 13, starting in 2nd ch from hook, sc 12; rotate work 180 degrees and work in the front loops of the ch, starting in the first front loop, sc 12. [24] Take your time on the rotate. You’re building an oval start by working along the other side of the foundation chain.
Round 2: inc, sc 9, inc 3, sc 9, inc 2. [30]
Round 3: sc in all 30 sts. [30]
Round 4: sc 1, inc, sc 9, *sc 1, inc* rep 3 times, sc 9, *sc 1, inc* rep 2 times. [36] Keep an eye on where those repeat sections land. If you drift a stitch early or late, the increases won’t be spaced as intended.
Round 5: sc in all 36 sts. [36]
Round 6: sc 2, inc, sc 9, *sc 2, inc* rep 3 times, sc 9, *sc 2, inc* rep 2 times. [42]
Round 7: Rounds 7-14: sc in all 42 sts. [42] Since this is a multi-round instruction, keep moving your stitch marker each round so you can count up to Round 14 cleanly.
Insert 12 mm safety eyes between Rounds 3 and 4, 14 sts apart.
Round 15: dec, sc 19, dec, sc 19. [40]
Round 16: dec, sc 18, dec, sc 18. [38]
Round 17: sc in all 38 sts. [38]
Round 18: dec, sc 17, dec, sc 17. [36]
Round 19: sc in all 36 sts. [36]
Round 20: dec, sc 16, dec, sc 16. [34]
Round 21: sc in all 34 sts. [34]
Round 22: dec, sc 15, dec, sc 15. [32]
Round 23: dec, sc 14, dec, sc 14. [30]
Round 24: sc in all 30 sts. [30]
Round 25: dec, sc 13, dec, sc 13. [28]
Round 26: sc in all 28 sts. [28]
Round 27: dec, sc 12, dec, sc 12. [26]
Round 28: sc in all 26 sts. [26]
Begin stuffing body. Do not stuff too firmly; maintain a somewhat flat shape. Continue stuffing as you work.
Round 29: dec, sc 11, dec, sc 11. [24] After this round, pause and nudge stuffing into the ends and edges before the opening gets smaller.
Round 30: *sc 2, dec* rep 6 times. [18]
Round 31: sc in all 18 sts. [18]
Round 32: *sc 1, dec* rep 6 times. [12]
Round 33: sc in all 12 sts. [12]
Round 34: *dec* rep 6 times. [6] If you like a cleaner close, make your decreases snug and keep the last bit of stuffing pushed away from the stitches you’re working into.
Finish off leaving a tail for sewing. Sew hole closed.
Belly Panel (Worked in Rows)
Belly is worked in rows. You’ll be turning each row, so keep your edges neat and don’t skip that turning chain instruction since it’s built into the shaping.
Row 1: ch 13, starting in 2nd ch from hook, sc 12, ch 1, turn. [12]
Row 2: inc, sc 10, inc, ch 1, turn. [14]
Row 3: sc 1, inc, sc 10, inc, sc 1, ch 1, turn. [16]
Row 4: sc in all 16 sts, ch 1, turn. [16]
Row 5: inc, sc 14, inc, ch 1, turn. [18]
Row 6: Rows 6-8: sc in all 18 sts, ch 1, turn. [18] This is another multi-row instruction. Count Rows 6, 7, and 8 as you go so you don’t accidentally add an extra plain row.
Row 9: inc, sc 16, inc, ch 1, turn. [20]
Row 10: Rows 10-14: sc in all 20 sts, ch 1, turn. [20]
Row 15: dec, sc 16, dec, ch 1, turn. [18] Try to keep your decreases consistent on both sides. If you’re using an invisible decrease, use it throughout this belly piece.
Row 16: sc in all 18 sts, ch 1, turn. [18]
Row 17: dec, sc 14, dec, ch 1, turn. [16]
Row 18: Rows 18-19: sc in all 16 sts, ch 1, turn. [16]
Row 20: dec, sc 12, dec, ch 1, turn. [14]
Row 21: Rows 21-22: sc in all 14 sts, ch 1, turn. [14]
Row 23: dec, sc 10, dec, ch 1, turn. [12]
Row 24: Rows 24-25: sc in all 12 sts, ch 1, turn. [12]
Row 26: dec, sc 8, dec, ch 1, turn. [10]
Row 27: Rows 27-28: sc in all 10 sts, ch 1, turn. [10]
Row 29: dec, sc 6, dec, ch 1, turn. [8]
Row 30: sc in all 8 sts, ch 1, turn. [8]
Row 31: dec, sc 4, dec, ch 1, turn. [6]
Row 32: dec, sc 2, dec, ch 1, turn. [4]
Row 33: sc in all 4 sts, ch 1, turn. [4]
Row 34: *dec* rep 2 times. [2] Don’t worry if the last row feels fiddly. It’s only two decreases, then you’re done.
Finish off leaving a long yarn tail for sewing.
Embroidering the Body Details
This is the stitched detail work on the body. Embroider straight stitches horizontally across the back. Each white stitch is two single crochet stitches wide and spaced one stitch apart from each other. Each row of white stitches is three rows apart from each other. Embroider 11 rows of large white stitches down the body. Underneath the 2nd, 3rd, 4th, and 5th large white stitch rows, embroider smaller stitches between the rounds directly underneath the large white stitches. Smaller stitches are one stitch wide, spaced one stitch apart from each other.
Embroider straight stitches horizontally across the back. I like to lightly plan the first couple of rows with pins or a strand of scrap yarn so the spacing stays consistent as you go.
Fasten off, weave in ends
Side Fins (Make 2)
Make 2. Do not stuff. With white yarn, embroider stitches over the top of the side fins to match the ones on the back of the whale shark. These get sewn on later, so leave the yarn tail long enough to stitch through the fin and into the body securely.
Round 1: ch 2, starting in 2nd ch from hook, sc 4. [4] This is the same start used for the other fins, so once you’ve made one, the rest go fast.
Round 2: inc, sc 2, inc. [6]
Round 3: inc, sc 4, inc. [8]
Round 4: inc, sc 6, inc. [10]
Round 5: inc, sc 8, inc. [12]
Round 6: inc, sc 10, inc. [14]
Round 7: inc, sc 12, inc. [16]
Round 8: inc, sc 14, inc. [18]
Round 9: inc, sc 16, inc. [20]
Finish off leaving a long yarn tail for sewing.
Small Back Fin
Do not stuff. Set aside until large back fin is finished. You’ll sew both back fins on in Finishing, but it’s easier to have them both ready before you start pinning placement.
Round 1: ch 2, starting in 2nd ch from hook, sc 4. [4]
Round 2: inc, sc 2, inc. [6]
Round 3: inc, sc 4, inc. [8]
Round 4: inc, sc 6, inc. [10]
Finish off leaving a long yarn tail for sewing.
Large Back Fin
Do not stuff. This fin is worked the same way as the small back fin, just with one more increase round, so keep your stitch marker moving and your counts tidy.
Round 1: ch 2, starting in 2nd ch from hook, sc 4. [4]
Round 2: inc, sc 2, inc. [6]
Round 3: inc, sc 4, inc. [8]
Round 4: inc, sc 6, inc. [10]
Round 5: inc, sc 8, inc. [12]
Finish off leaving a long yarn tail for sewing.
Small Tail Fin Piece
Do not stuff. Set aside until large tail fin piece is made. You’ll attach these together during assembly, so keep the tail long and don’t weave it in yet.
Round 1: ch 2, starting in 2nd ch from hook, sc 4. [4]
Round 2: inc, sc 2, inc. [6]
Round 3: inc, sc 4, inc. [8]
Round 4: inc, sc 6, inc. [10]
Round 5: inc, sc 8, inc. [12]
Round 6: dec, sc 8, dec. [10] Make both decreases the same style so the edge stays even for sewing later.
Finish off leaving long tail for sewing.
Large Tail Fin Piece
Do not stuff. This is the larger tail fin piece, worked in rounds with a few plain rounds mixed in, so watch your round numbers as you go.
Round 1: ch 2, 4 sc in 2nd ch from hook. [4]
Round 2: inc, sc 2, inc. [6]
Round 3: sc in all 6 sts. [6]
Round 4: inc, sc 4, inc. [8]
Round 5: inc, sc 6, inc. [10]
Round 6: sc in all 10 sts. [10]
Round 7: inc, sc 8, inc. [12]
Round 8: inc, sc 10, inc. [14]
Round 9: dec, sc 10, dec. [12]
Round 10: dec, sc 8, dec. [10]
Round 11: dec, sc 6, dec. [8]
Finish off leaving a long yarn tail for sewing.
Finishing
Insert 12 mm safety eyes between Rounds 3 and 4, 14 sts apart. If you already placed them during the body rounds, just double-check the washers are fully snapped on before you go any further.
Begin stuffing body. Do not stuff too firmly; maintain a somewhat flat shape. Continue stuffing as you work. Add small amounts at a time and push it into place with the blunt end of your hook or a stuffing tool so you don’t stretch stitches.
Sew hole closed. Use the tail from the body and run it through the remaining front loops, then pull tight and stitch back and forth once or twice to lock it.
Place belly on bottom of body and pin in place. Take a minute here to center it the way you want, since the first pin placement decides everything after that.
Sew around the outer edge of the belly piece to the body. I sew with a whip stitch through the edge stitches of the belly and into the body stitches, catching consistent loops so the seam sits flat and doesn’t ripple.
Knot to secure and weave remaining tail into the body. Weave in a few direction changes so the tail doesn’t work loose with handling.
Place fins on either side of body over Rounds 12-22 approx., just above the white belly piece. Use pins or locking stitch markers so both sides match before you commit with stitches.
Sew bottom of fin to the outer edge of the white belly piece. This gives you a clear anchor line, so keep your stitches small and even along that edge.
Pin the fins to the sides of the body so that they don’t shift around while sewing them on. It’s worth adding an extra pin at the front and back corners of each fin, so there’s that.
Place large fin over Rounds 18-24 of back of body and pin in place. Make sure the fin is pinned securely along the base so you’re not fighting it while you stitch.
Place small fin over Rounds 26-31 of body and pin in place. Check alignment from above before sewing, then leave the pins in until the fin is fully attached.
Sew fins to body using yarn tails and tapestry needle. Stitch through the fin edge and into the body fabric, then back out through the fin, keeping your tension firm but not puckered.
Knot ends to secure and weave in all ends. Don’t trim right at the knot. Weave first, then trim so the cut end stays buried.
With white yarn, embroider stitches over the top of the side fins to match the ones on the back of the whale shark. Bring the needle up and down cleanly between stitches so the embroidery sits where you place it, not drifting into neighboring loops.
Embroider straight stitches horizontally across the back as described. If you haven’t done the back embroidery yet, do it now before you decide you’re “done” and then have to weave in one more tail later.
Baby & Child Safety Notes
Safety eyes aren’t recommended for babies and young children who may chew on toys. If this is for a child under 3, swap the safety eyes for embroidered eyes and stitch them in firmly. Knot securely, weave ends in with several direction changes, and trim tails so nothing can be pulled free.
Frequently Asked Questions
Mine comes out at about 7 in. (18 cm) long. If your stitches run tighter or looser than mine, you might land a little under or over that, so there’s that.
I use 4 Medium, worsted weight yarn with a G (4 mm) crochet hook. I stick with that combo when I want the same size and feel as my sample.
Changing yarn weight will change the size, pretty much every time. If you want it to land around 7 in. (18 cm), use worsted weight and a 4 mm hook like I did.
I call it Level 2, Easy. If you can keep your stitch count steady and you don’t mind slowing down to check your work once in a while, you’ll be fine, I think.
You can, but the toy will come out a different size and the fabric will feel different. I reach for the 4 mm here because it gives me the look I want with worsted yarn, and I don’t feel like fighting it.
Before You Go
If you make this Whale Shark Crochet Pattern, I want to see it. Save this page to Pinterest so you can find it again, then come back and tell me what colors you used and whether yours stayed close to that 7 in. (18 cm) length or went rogue. I love seeing the little differences that happen when two people use the same hook and worsted yarn and still end up with slightly different sharks. Mine looks calm. Some of yours are going to look a little mischievous, and I’m into it.