
If you’ve been looking for a sweet little amigurumi make, this Miffy in Overalls Crochet Pattern walks you through a simple bunny doll with that classic minimalist face and long upright ears, plus cute outfit details you can play with.
The Inspiration
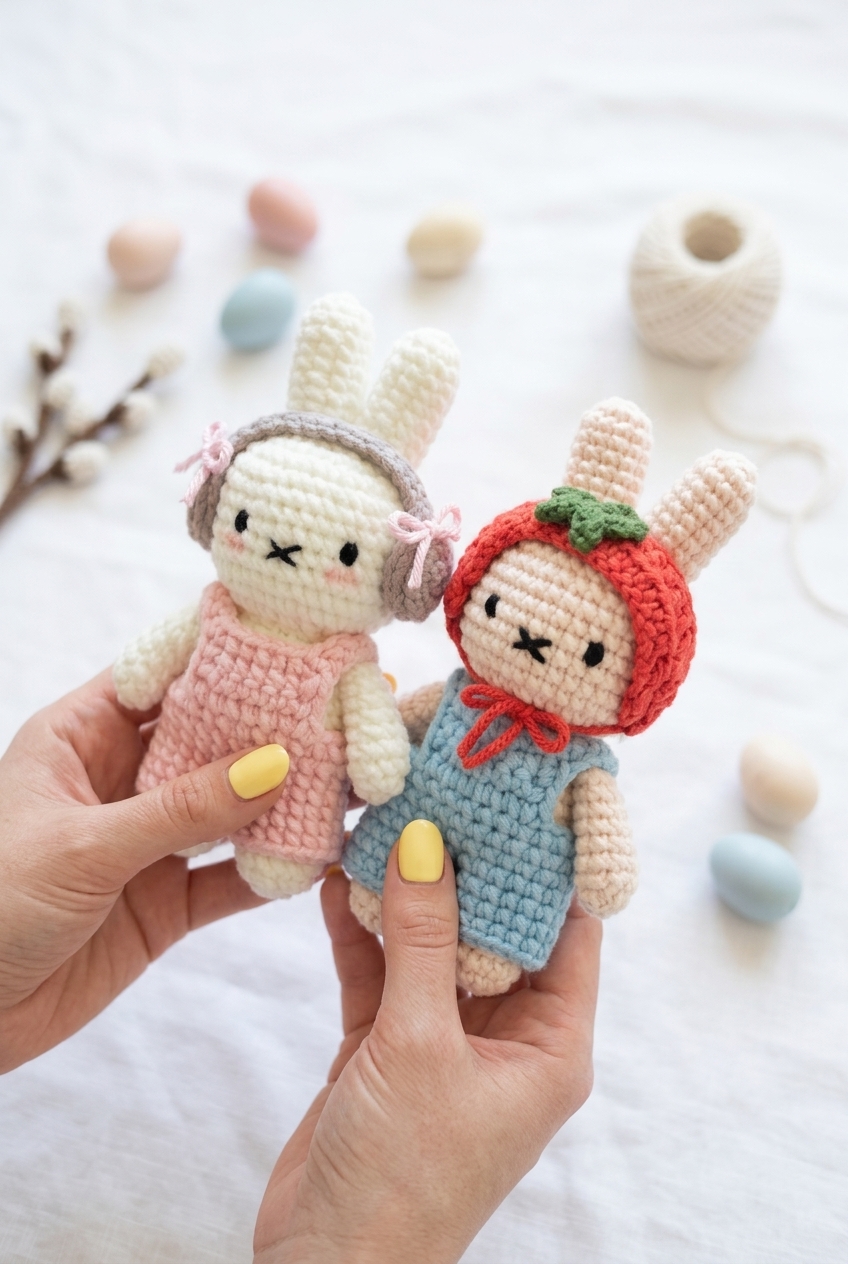
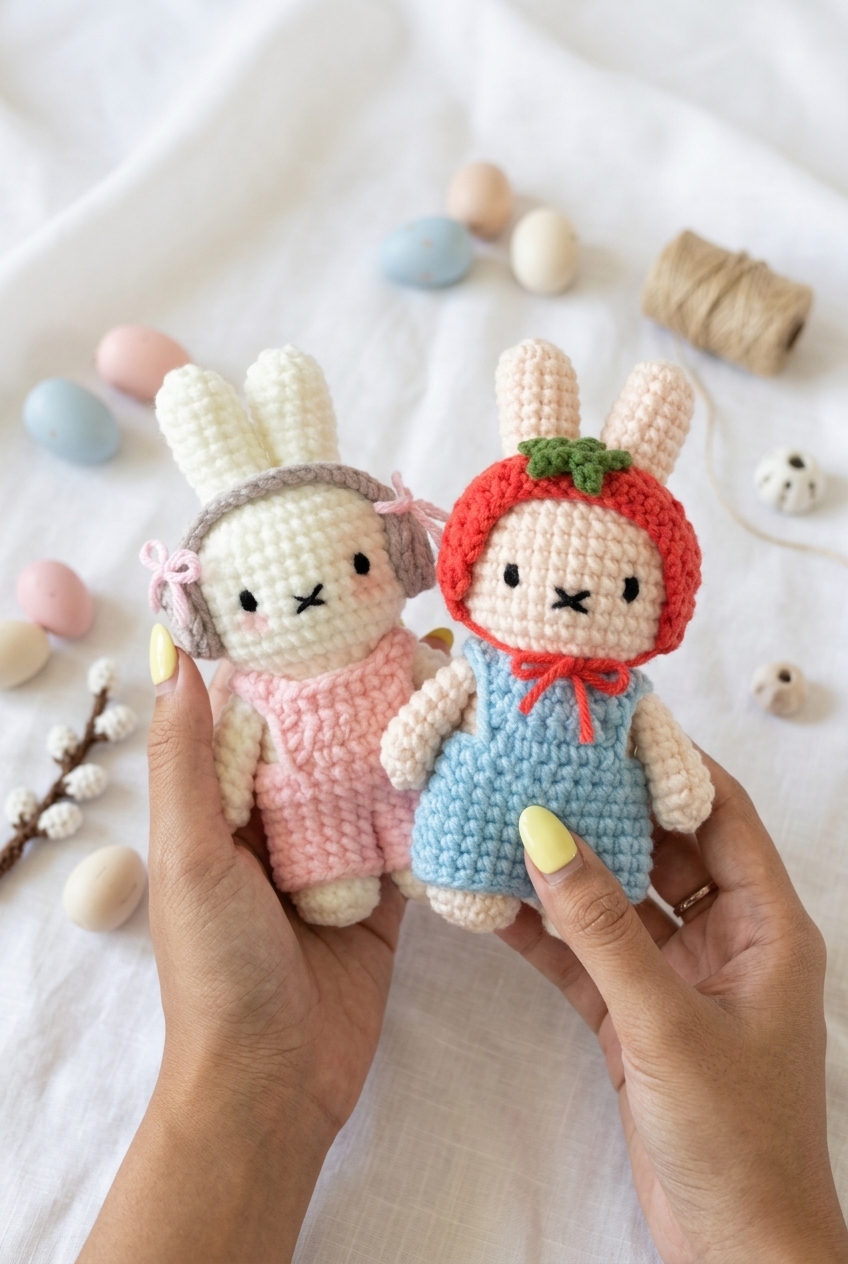
I wanted that clean, instantly recognizable bunny look: a round head, long ears that stand up, tiny black stitched eyes, and that little “X” mouth that says everything without doing much. In the photo, you can see two versions side by side, both with soft blush on the cheeks, and it’s the kind of simple face that feels calm to make (and kind of hard to stop staring at when you’re done).
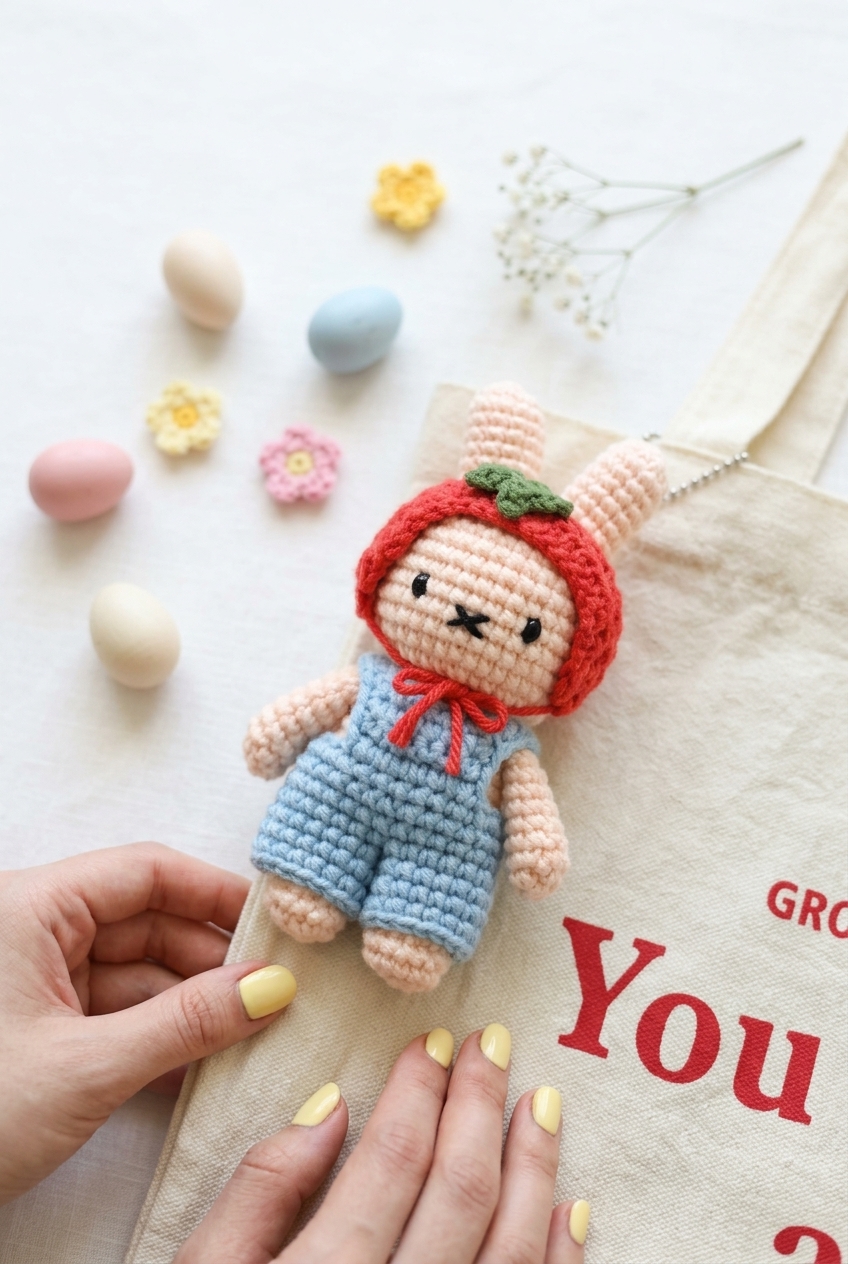
One bunny is cream and dressed in a pale pink dress with gray earmuffs and small pink bows, and the other is a warm beige with a light blue dress and a bright red bonnet with a green leaf detail on top, tied under the chin. That mix of neutral bodies and bold little accessories is basically my favorite thing. This is a Level 2 easy project, so you’re not signing up for anything fussy, but you still get those satisfying finishing touches, I think.
What Makes This Pattern Special
You get a classic Miffy-style bunny with outfit details that change the whole vibe.
- Simple face, big personality: The stitched eyes and “X” mouth stay clean and consistent, so the expression always reads.
- Accessories do the work: Earmuffs, bows, or a bonnet instantly make each bunny feel like its own character.
- Easy, not boring: It’s straightforward to crochet, but the color choices and little details keep it fun.
Your Supply List
This one uses several small color bits for details, so you can get a lot done with partial balls and scraps.
- 2 Fine / Sport yarn (fiber not specified, check the yarn label): For this project I reach for a smooth sport weight because it gives you neat stitches without feeling stiff in your hands. You want a yarn that holds shape when stuffed and does not get fuzzy fast, since the face details and tiny accessories show everything. Yardage is not specified for any color, but you will need light peach for the body parts, plus small amounts of blue, red, green, light grey (optional), black, and any color for the headphones.
- 3 mm crochet hook: This size keeps the fabric tight with sport weight yarn, so the stuffing stays put and the amigurumi looks clean.
- Stuffing material: You do not need a measured amount, just keep stuffing as you go before each opening gets too small.
- Also needed: stitch markers, darning needle, scissors
Color Sequence & Yarn Changes
I like to finish the light peach body and limbs first, then switch to blue for the overalls and circle back for the tomato headband in red and green. For the little color pops, cut and rejoin yarn instead of carrying it, since carried strands can show through at this scale.
Essential Info
Here are the basics you’ll want in front of you before you start.
| Skill Level | Level 2 — Easy |
| Pattern Gauge | Gauge is not critical for this project. Use a hook size that creates a tight, firm fabric so stuffing does not show through. |
| Finished Size | Approx. 20 cm (8 in) tall when made with sport (5ply) yarn and a 3 mm hook |
| Yarn Weight | 2 Fine / Sport |
| Terminology | US |
Stitch Guide & Abbreviations
Keep this list nearby while you crochet.
- BLO = back loop only
- ch = chain
- dec = decrease
- hdc = half double crochet
- inc = increase
- mr = magic ring
- R = round/row
- sc = single crochet
- sl st = slip stitch
- st = stitch
- * = repeat
- [ ] = total stitch count in each round/row
Before You Begin
Abbreviations are in US terminology. For the body, make the separate parts (arms and ears) first, then attach them as the pattern tells you. Arms are not stuffed. Ears are stuffed. The overalls are worked in joined rounds. Join with a sl st at the end of each round and start each new round with ch 1. Ch 1 and sl st are not included in stitch counts for the overalls, so the numbers in brackets only count the actual stitches.
The Pattern
Work through each piece in order, then bring everything together in the Finishing section.
Arms (make 2)
Make 2. Do not stuff. Close the arm by crocheting opposite stitches together; you will get 4 sc from this. Set them aside for now since they get attached while you’re crocheting the body.
Round 1: 8 sc in mr. [8]
Round 2: (3 sc, inc) *2. [10]
Round 3: 10 sc (6 rounds). [10]
Fasten off, weave in ends
Ears (make 2)
Make 2. Ears are stuffed. Don’t overthink the stuffing here. Just keep it even so sewing is easier later.
Round 1: 8 sc in mr. [8]
Round 2: (sc, inc) *4. [12]
Round 3: 12 sc (7 rounds). [12]
Stuff.
Cut yarn, leaving a long tail
Legs (make 2)
Make 2. After Round 6, make 3 more sc and cut yarn for the first leg. Make the second leg repeating all rounds including 3 more sc at the end, but do not cut yarn (joining legs). Those extra 3 sc shift your yarn to the right spot for the join, so don’t skip them.
Round 1: 8 sc in mr. [8]
Round 2: 8 inc. [16]
Round 3: 16 sc. [16]
Round 4: 4 sc, 4 dec, 4 sc. [12]
Round 5: 4 sc, 2 dec, 4 sc. [10]
Round 6: 10 sc. [10]
After Round 6, make 3 more sc and cut yarn (first leg). For the second leg, make 3 more sc at the end but do not cut yarn.
Fasten off, weave in ends
Joining the legs and continuing to body/head
Start counting again from Round 1 for the joining round. Mark the 6th sc on the 1st leg, counting backwards from where you cut the yarn. This mark matters because it sets where the join lands, and it keeps the legs aligned before you move up into the body.
Round 1: Ch 1 (on the 2nd leg). Starting from the sc marked on the 1st leg, sc in each st around the 1st leg, sc in the upper loop of the ch, sc in each st around the 2nd leg, sc in the lower loop of the ch. [22]
Round 2: (10 sc, inc) *2. [24]
Round 3: (5 sc, inc) *4. [28]
Round 4: 28 sc (5 rounds). [28]
Round 5: (5 sc, dec) *4. [24]
Round 6: 4 sc, 4 sc (together with arm), 8 sc, 4 sc (together with arm), 4 sc. [24]
This is where you attach the arms as you crochet. Line up the closed edge of an arm with the next 4 stitches on the body, then work each of those 4 sc through both the body stitch and the corresponding arm stitch so the arm is anchored in one pass.
Round 7: (2 sc, dec) *6. [18]
Fasten off, weave in ends
Head (worked from body)
Starting from Round 12 to the end, make the head. You’ll jump to Round 12 numbering here, so check your round counter or stitch marker before you keep going.
Round 12: 18 inc. [36]
Round 13: (8 sc, inc) *4. [40]
Round 14: 40 sc (8 rounds). [40]
Round 22: (3 sc, dec) *8. [32]
Round 23: (sc, dec, sc) *8. [24]
Round 24: (sc, dec) *8. [16]
Round 25: 8 dec. [8]
Fasten off, weave in ends
Facial embroidery
Using black yarn, embroider the eyes on Round 17 with 7 sc apart between the two eyes. Embroider the mouth one round below the eyes in the middle. Take a second to pin or mark the placements before you stitch. It saves you from ripping out embroidery later.
Fasten off, weave in ends
Overalls (joined rounds)
Use the same type of yarn used for the body. Overalls are worked in joined rounds: join with a sl st at the end of each round and start each new round with ch 1. Ch 1 and sl st are not included in stitch counts. Keep your joins consistent so the bib placement is easier to find later.
Round 1: Starting from the 2nd ch from the hook, sc in each ch, sl st to the 1st sc of Round 1. [28]
Round 2: Ch 1, 28 sc, sl st (2 rounds). [28]
Fasten off, weave in ends
1st trouser (overalls)
After Round 3 of the overalls, divide into two sections and work the 1st trouser, then the 2nd trouser. Start counting again from Round 1 for each trouser. You’re building one leg opening at a time, and the ch-4 bridge becomes part of the round on the next step.
Round 1: Continuing from Round 3, ch 1, 14 sc, ch 4, sl st into the 1st sc. [14]
Round 2: Ch 1, 14 sc, 4 sc in the upper loops of the ch, sl st. [18]
Work into the upper loops of the chain so the edge stays neat and you’ve got loops free on the other side, by any means.
Round 3: Ch 1, 18 sc, sl st (2 rounds). [18]
Cut yarn and weave in end
2nd trouser (overalls)
Start from the stitch next to the sl st of Round 3. This keeps the split symmetrical, so don’t start in the slip stitch itself.
Round 1: Ch 1, sc, 4 sc on ch, 13 sc, sl st. [18]
Round 2: Ch 1, 18 sc, sl st (3 rounds). [18]
Cut yarn and weave in end
Bib
Put the overalls onto the plushie to find the 6 middle stitches on the very first round started for the overalls. Crochet the bib directly onto that first round. It’s easier to do this with the overalls already on so you don’t guess the center.
Row 1: Ch 1, 6 sc. [6]
Row 2: Ch 1, turn, 6 sc (2 rows). [6]
Cut yarn
Edging and adding straps
Crochet along the three sides of the bib. This is one continuous path that also forms the straps, so read the whole line once before you start moving around the edges.
Starting from the bottom of Row 1 of the bib: 3 sc (on 1st side), ch 17, 16 sc, 6 sc (on the last row of the bib), ch 17, 16 sc, 3 sc (on the last side).
Cut yarn and weave in ends
Headphones (make 2 pieces)
Start with a magic ring, using any color. Cut yarn after the first piece. Make another piece and do not cut yarn. On the 2nd piece: ch 15, make 2 sl st onto the 1st piece, sl st in each ch back to the 2nd piece. When you reach back to the 2nd piece, sl st and cut yarn. Sew the headphones onto the head. Keep the first piece nearby so you can slip stitch into it without twisting the chain.
Round 1: 7 sc in mr, sl st. [7]
Round 2: Ch 1, 7 inc, sl st. [14]
Round 3: BLO, ch 1, 14 sc, sl st. [14]
Fasten off, weave in ends
Tomato headband
Start with a slip knot using red yarn. Ch 18. Continue making 2 sc on the side of each row, for a total of 4 sc. Ch 1, turn, 2 dec. Ch 1, turn, dec. Cut yarn, leaving a long tail. Repeat the same steps on the other side. The long tail is for sewing, so leave yourself enough to work with.
Row 1: Starting from the 3rd ch from the hook, 16 hdc. [16]
Row 2: Ch 2, turn, 16 hdc. [16]
Cut yarn, leaving a long tail
Tomato leaf
This is a small add-on worked in the round, and you’ll sew it to the top after the headband is in place. Keep the tail long so you can stitch through multiple layers securely.
Round 1: Into mr, (ch 3, sl st, sc, sl st into mr) *5. [null]
Cut yarn, leaving a long tail
Finishing & Assembly
Close each arm by crocheting opposite stitches together (you will get 4 sc from this). Join legs as instructed in the joining round and continue to body/head. Attach arms in Body Round 10 by crocheting 4 sc together with each arm as indicated. When you’re attaching the arms, make sure you’re catching the arm stitches cleanly so you don’t leave a loose loop at the join.
Embroider eyes on Round 17 with 7 sc apart; embroider mouth one round below the eyes in the middle. Put the overalls onto the plushie to position the bib; crochet bib directly onto the first round of the overalls. Sew the headphones onto the head. Sew the headband onto the head, then sew the tomato leaf at the top. For sewing, use the long tails you left and take small stitches that go through the fabric of the crochet, not just a single strand, so the pieces don’t wobble around later, I think.
Baby & Child Safety Notes
If this is for a baby or young child, skip any small add-ons that could be pulled off, and embroider all facial features instead of using plastic eyes. Pull tight on every fastened-off end, weave it in multiple directions, and trim only after you’re sure it won’t work loose.
Frequently Asked Questions
Mine comes out about 20 cm (8 in) tall when I use sport (5ply) yarn and a 3 mm hook. If you change yarn weight or hook size, the height shifts too, so don’t treat that number like a law.
You can, but it won’t stay at the same size. I’d stick with 2 Fine / Sport if you want the approx. 20 cm (8 in) result and the same overall look.
A 3 mm hook is what I use for this toy with sport yarn. If you swap hooks, you’re basically choosing a different finished size, so there’s that.
I rate it Level 2, Easy. It’s a toy, so you’ll do better if you’re already comfortable keeping your stitches consistent for small parts.
This one’s a toy. I designed it to be a small character piece, not a flat applique or a wearable.
Happy Crocheting
If you make my Miffy in Overalls, I’d love to see how yours turns out. Save this pattern to Pinterest so you can find it again when you’re in a toy-making mood, and if you tweak the yarn or hook size, tell me what finished height you ended up with. I’m always curious what other people get, and I think it helps everyone reading the comments.