
You’re getting my Easter Egg Bunny Crochet Pattern, a sweet little amigurumi bunny popping out of a cracked eggshell cup, complete with a bow and all the cute face details. It’s an easy Level 2 project that fits right into Easter baskets, spring shelves, and that whole “I want something cheerful on my desk” vibe.

Behind the Pattern
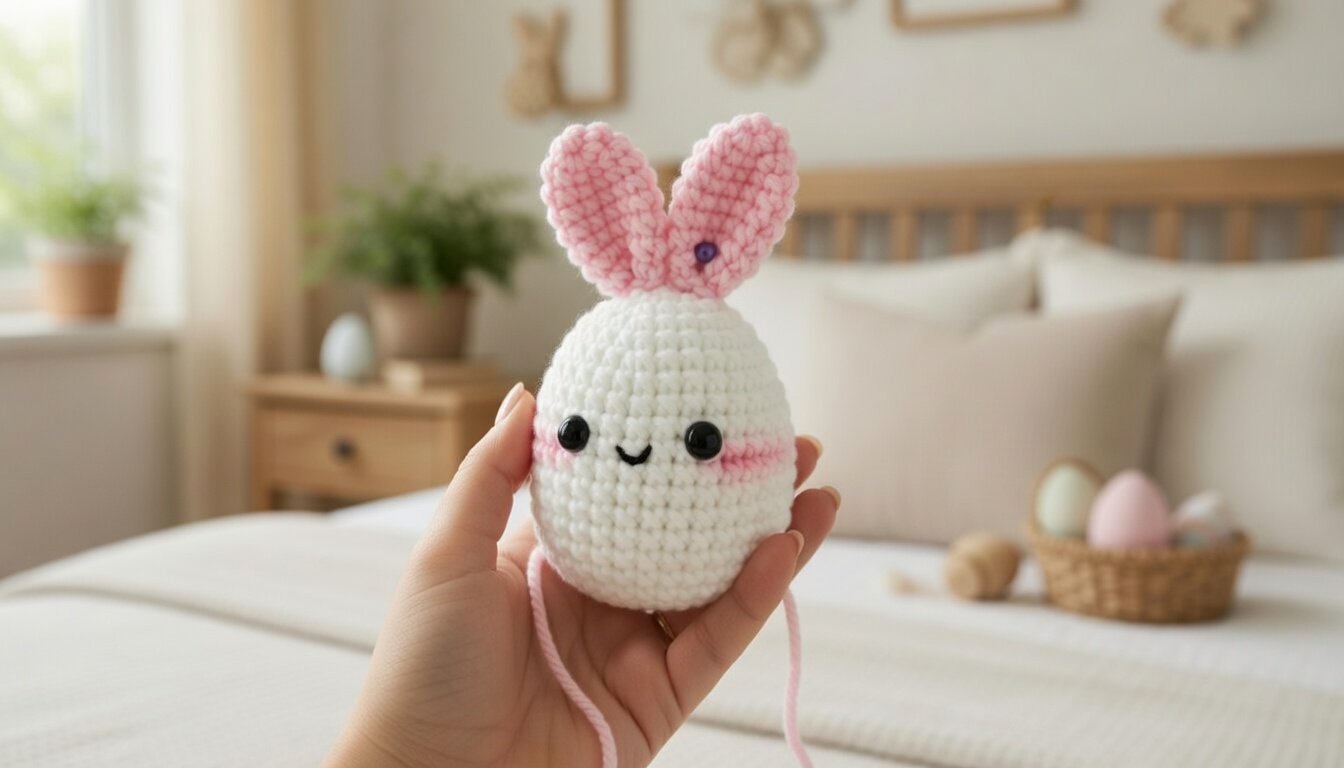
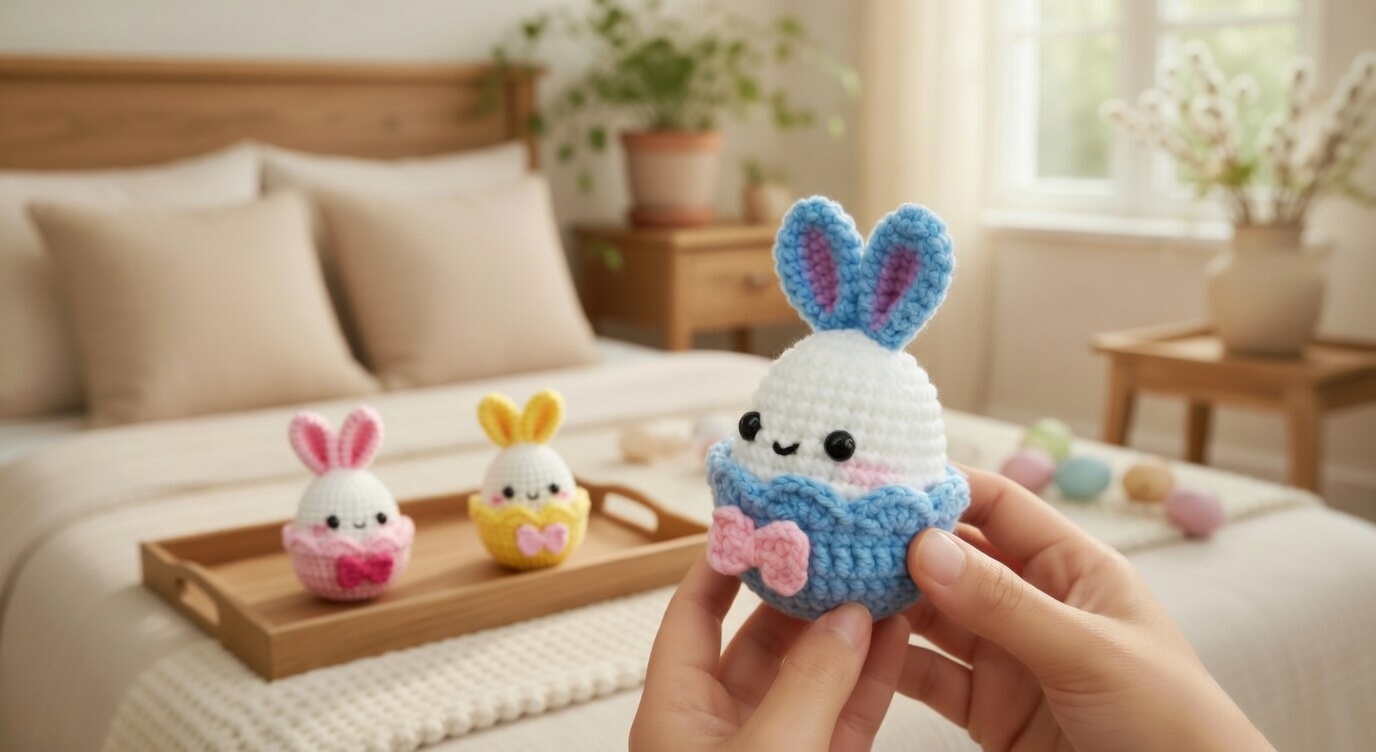
I wanted this one to feel like a tiny surprise, like you’re peeking into an egg and there’s a bunny in there just hanging out. The finished look is a white bunny with shiny black round eyes, a small stitched smile, and those pink blush cheeks that make it look a little bashful. The ears stand straight up and they’re yellow with a slightly darker center, so the whole thing feels bright without being loud.
The eggshell is a rounded cup shape in a bold yellow, with scalloped cracked edges so it actually reads like a broken shell instead of just a bowl. And then there’s the pink bow on the front, because of course there is. It’s pretty simple overall, but it still has that “wait, that’s adorable” factor when you set it down, I think.
Why You’ll Love This Pattern
It’s a fast, cute make with big personality and clean, simple shaping.
- Instant Easter vibes: The cracked egg cup and bow make the theme obvious at a glance.
- Face details that matter: The eyes, blush, and tiny smile do most of the heavy lifting.
- Display-friendly shape: The bunny-in-a-cup design sits neatly on a shelf without fuss.
Materials You’ll Need
You’ll use mostly white with tiny bits of pink and a couple optional accents, so it’s a nice small-scrap project.
- 2 Fine / Sport weight yarn in cotton or acrylic: For this project I reach for a sport weight because it keeps the stitches small and neat, so the egg shape stays smooth and the details don’t get bulky. Cotton gives you crisp stitch definition and a firmer little plush, while acrylic feels a bit softer and still holds up well with tight tension. Yardage isn’t specified here, but you’ll want a main white plus small amounts of pink, and optional bits of blue, yellow, and any other accent colors, with black for the mouth embroidery.
- 2.75 mm crochet hook (depending on yarn weight): This size is great for amigurumi-style fabric because it helps you crochet tight enough that stuffing won’t peek through.
- Black safety eyes (6 mm or 8 mm): Either size works, just pick the look you like, with 6 mm reading a little sweeter and 8 mm a little bolder.
- Stuffing (fiberfill): You only need a small handful, and I stuff as I go so I’m not trying to cram it in at the very end.
- Embroidery thread for mouth and cheeks: Thread gives you cleaner little lines than yarn for the mouth, and it’s easier to keep the cheeks subtle.
- Also needed: yarn needle, scissors, Optional stitch markers
Color Sequence & Yarn Changes
White does almost all the work, then you add pink for the inner ears and any blush or bow details, with blue and yellow only if you want extra accents. For the cleanest look, fasten off and rejoin for small details instead of carrying yarn across the surface.
Project Info
This is the quick card I check before I even grab a hook.
| Skill Level | Level 2 — Easy |
| Pattern Gauge | Gauge is not critical for this project. Use a hook size that creates a tight, firm fabric so stuffing does not show through |
| Finished Size | Approx. 5 in (12.5 cm) tall egg bunny (excluding eggshell holder), assuming sport-weight yarn and 2.75 mm hook |
| Yarn Weight | 2 Fine / Sport |
| Fiber | Cotton or acrylic |
| Terminology | US |
Stitch Guide & Abbreviations
Keep this list open. It saves time.
- ch = chain
- inc = increase (2 sc in same st)
- MR = magic ring
- sc = single crochet
- sl st = slip stitch
- st(s) = stitch(es)
Special Stitches
- Picot: ch 3, sl st in first ch made (or as directed by pattern placement).
- Scallop: work multiple stitches into the same stitch to form a shell edge (exact stitch sequence not provided in original text).
Helpful Tips
This amigurumi is worked in continuous rounds (spiral) starting with a magic ring, so don’t join rounds unless the pattern tells you to. Stuff firmly but gently before closing. It’s easier to add stuffing in small bits as you go than to fight it at the end. No sizing information provided, so there’s that.
Easter Egg Bunny Crochet Pattern Instructions
Work through each piece in order, then bring everything together in the finishing steps at the end.
Egg Body (Main Bunny Egg)
This is the main body you’ll build everything onto. Worked in continuous rounds (spiral) starting with a magic ring. Use a stitch marker and move it up each round so you don’t lose your place.
Round 1: Start with a MR and work in continuous rounds. [stitch count not provided] If you like to close your MR extra tight, do it now. It’s easier before the fabric firms up.
Round 2: Increase steadily to shape the egg. [stitch count not provided] Keep your increases consistent. If you tend to drift, count stitches at the end of the round anyway, so there’s that.
Round 3: Increase steadily to shape the egg. [stitch count not provided]
Round 4: Increase steadily to shape the egg. [stitch count not provided]
Round 5: Increase steadily to shape the egg. [stitch count not provided]
Round 6: Increase steadily to shape the egg. [stitch count not provided]
Round 7: Sc evenly to build the bulk of the egg. [stitch count not provided] This is where your tension shows. If your stitches are getting tight, relax your grip before it turns into a wrestling match.
Round 8: Sc evenly. [stitch count not provided]
Round 9: Sc evenly. [stitch count not provided]
Round 10: Sc evenly. [stitch count not provided]
Round 11: Sc evenly. [stitch count not provided]
Round 12: Sc evenly. [stitch count not provided]
Round 13: Sc evenly. [stitch count not provided]
Round 14: Sc evenly. [stitch count not provided]
Round 15: Sc evenly. [stitch count not provided]
Round 16: Begin decreasing to close the top, leaving a small opening for stuffing. [stitch count not provided] If you use an invisible decrease, keep doing it here for a cleaner finish.
Stuff the egg before closing.
Round 17: Continue decreasing as needed. [stitch count not provided] Start adding stuffing if you haven’t already. Small bits packed in gradually are easier to control than one big wad.
Round 18: Continue decreasing as needed. [stitch count not provided] Pause and shape with your fingers between rounds if you need to. It’s normal to do a little adjusting as you go.
Round 19: Continue decreasing as needed. [stitch count not provided]
Round 20: Continue decreasing as needed. [stitch count not provided] Leave yourself a tail for sewing closed if your method needs it.
Stuff the egg. Sew the top closed.
Bunny Ears (Make 2)
Make 2. These are worked in rounds, then you’ll fold and sew them onto the egg later. If you’re using two colors for the ear, keep your color placement consistent across both ears so they match.
Round 1: Start with a MR. [stitch count not provided] Close the ring firmly so you don’t leave a gap at the tip.
Round 2: Work gentle increases. [stitch count not provided] Place a marker at the start of the round if you’re prone to losing the beginning.
Round 3: Continue gentle increases. [stitch count not provided]
Round 4: Work evenly for a few rounds to maintain stitch count. [stitch count not provided] Keep your tension steady here so the ear fabric stays consistent from tip to base.
Round 5: Work evenly. [stitch count not provided]
Round 6: Work slight decreases at the top to taper. [stitch count not provided] Don’t yank your decreases tight. Just snug enough to keep the stitches neat.
Fold each ear slightly and sew to the top of the egg with the pink side facing forward.
Face Details (Eyes, Cheeks, Mouth)
This section is all placement and a little embroidery. Eyes: Insert safety eyes just below where the ears attach, aiming for symmetry. Cheeks: Use pink yarn or blush embroidery to add cheeks. Mouth: With black embroidery thread, stitch a small curved smile. If you’re embroidering, take a moment to pin or lightly mark placement before you commit, because pulling out tiny stitches is annoying.
Fasten off, weave in ends
Eggshell Holder (Shallow Cup)
This piece is a separate holder the egg bunny sits in. You’ll work it in rounds, building a shallow cup, then finish with an edge round meant to mimic cracked edges.
Round 1: Start with a MR and increase in rounds to form a shallow cup. [stitch count not provided] Use a marker if you’re staying in a spiral. If you prefer joined rounds, keep your join consistent so the edge treatment sits evenly.
Round 2: Increase to widen the cup. [stitch count not provided]
Round 3: Increase to widen the cup. [stitch count not provided]
Round 4: Continue as needed to form a shallow cup. [stitch count not provided] Check fit as you go by setting the egg body into the cup. Don’t stretch it. Just rest it in there and see what you’ve got.
Round 5: Edge Round: Add a row of scallops or picot stitches to mimic cracked edges. [stitch count not provided] Keep your spacing consistent around the edge so the trim doesn’t bunch.
Round 6: Optional: Add a bow at the front center. [stitch count not provided] If you add the bow, attach it after you’ve woven in the holder’s main tail so you’re not fighting extra ends.
Fasten off, weave in ends
Final Touches
Fold each ear slightly and sew to the top of the egg with the pink side facing forward. Use pins or a couple of basting stitches to hold placement before you sew for real. Insert safety eyes just below where the ears attach, aiming for symmetry. If your eyes have washers, make sure they’re fully seated before you continue, because they don’t like coming back off. Use pink yarn or blush embroidery to add cheeks. With blush, build color slowly. It’s easy to add more and a pain to remove. With black embroidery thread, stitch a small curved smile. Take small stitches and keep your thread tension even so the mouth doesn’t pucker. Stuff the egg. Sew the top closed. Add stuffing in small amounts and push it into place before the opening gets too tight. Place egg bunny into the eggshell holder (implied by holder purpose). Optional: Add a bow at the front center of the eggshell holder. If you’re giving this to a kid, skip extra bits that can get pulled off, by any means.
Baby & Child Safety Notes
Safety eyes and small bows are not safe for children under 3 or for anyone who mouths toys. For little ones, embroider the eyes instead of using safety eyes, and stitch any add-ons down very firmly. Weave in ends with a long path and split yarn plies if you can, then trim close so nothing works loose over time.
Frequently Asked Questions
Use whatever gets you a tight fabric for amigurumi. I start at 2.75 mm with sport weight yarn, but if you see gaps, go down a hook size. If your stitches feel like you are wrestling the yarn, go up a bit and see if the stuffing stays hidden.
My finished egg bunny comes out around 5 in (12.5 cm) tall when I use sport weight yarn and a 2.75 mm hook, and that is not counting the eggshell holder. If you go thicker or thinner on yarn, the height shifts with it. I treat the 5 in size as a reference point, not a promise.
It sits at Level 2, Easy. If you have made one small amigurumi before, you will be fine. If this is your first ever stuffed project, you can still do it, but expect to slow down a little and count more than you think you need to.
No. The approx. 5 in (12.5 cm) measurement is for the egg bunny itself, and it excludes the eggshell holder. I mention it because it is an easy detail to miss when you are planning display space.
Check your yarn weight and your hook first. Sport weight yarn plus a 2.75 mm hook is what I used for that 5 in size, so if either of those changed, the whole scale changes. Also, stitch tightness matters a lot with amigurumi, so there is that.
Final Thoughts
That is my Easter Egg Bunny Crochet Pattern in a nutshell. I love how quick this little amigurumi works up in sport weight yarn, and the 5 inch size feels just right for tucking into a basket or setting on a shelf. If you make one, I want to know what colors you chose for the bunny and the egg vibe, because people get weirdly creative with it. Save it to Pinterest if you are in seasonal-making mode, and drop a comment with your finished height if you used a different hook than 2.75 mm. I am nosy like that, I think.