
In this Bunny Basket Crochet Pattern, you’ll make a chunky little bunny-shaped basket with tall ears and a cute tail, the kind you can set out and actually use. It’s an easy, springy make that looks right at home for Easter baskets, egg hunts, and all that seasonal decorating.
About This Project
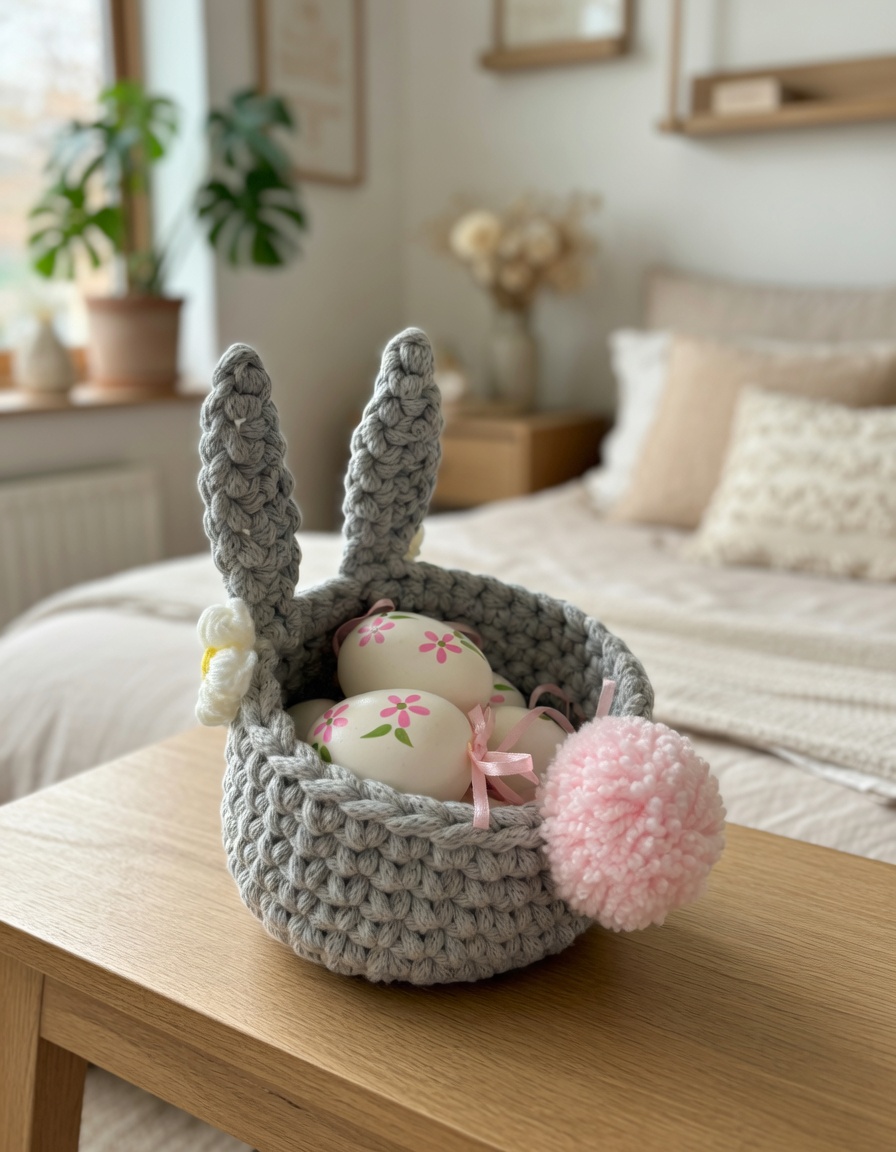
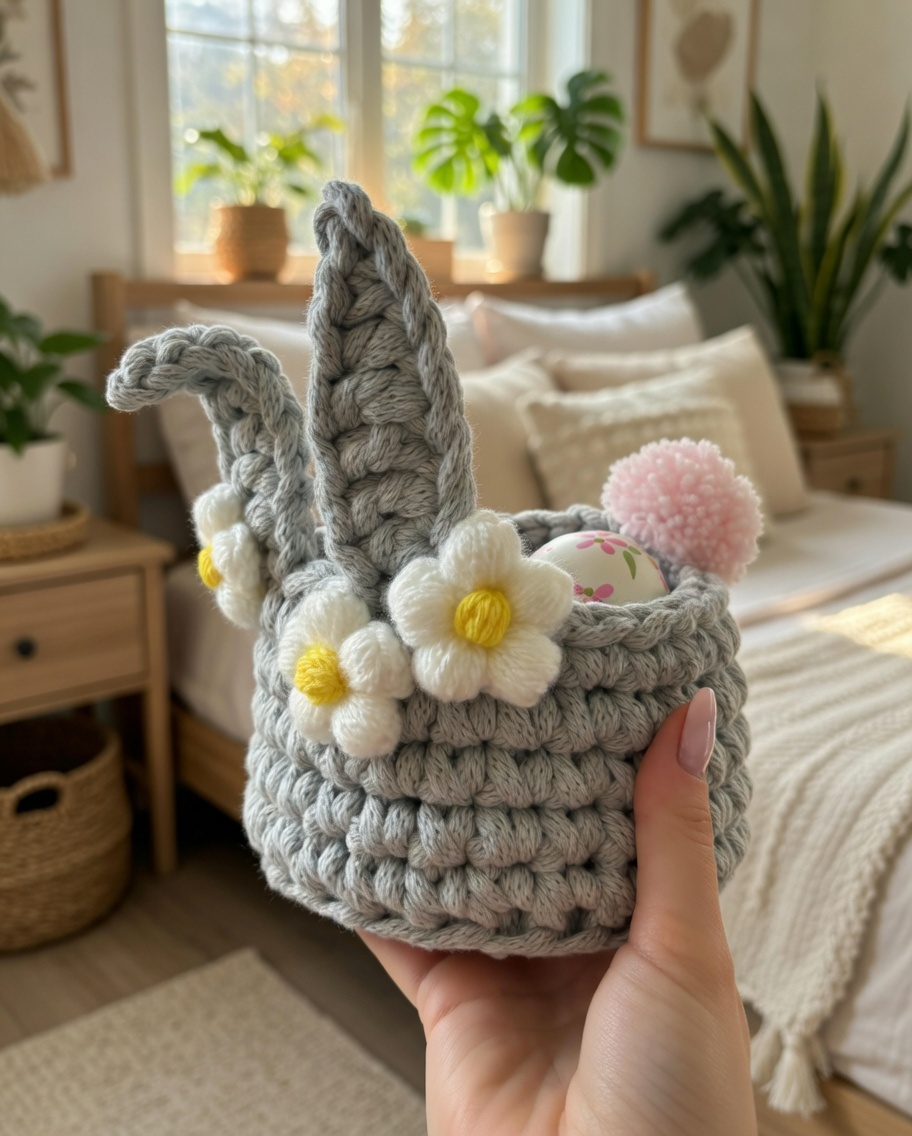
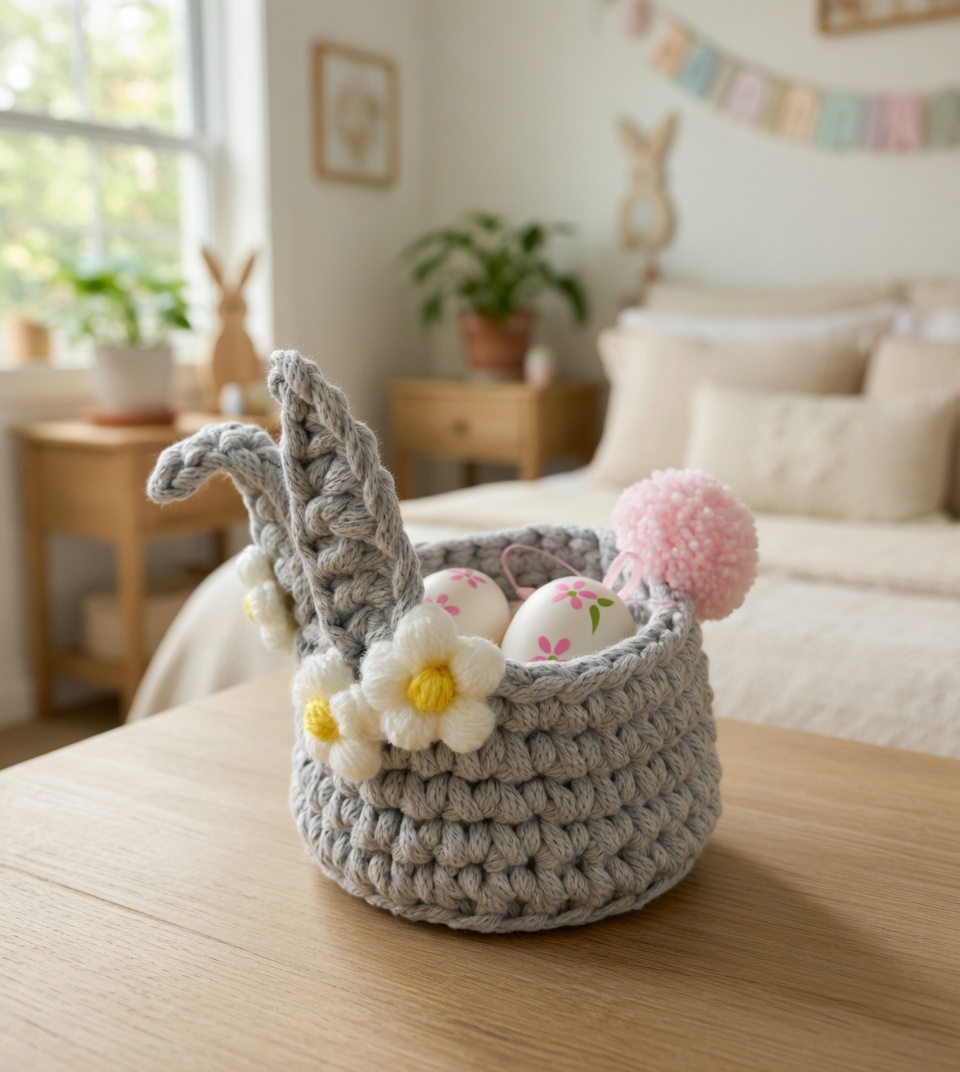
I wanted this basket to feel simple and cozy, not fussy, so I went with a chunky, textured look in light gray. The finished basket is oval and open at the top, with two tall upright ears that make it instantly read as “bunny” even from across the room.
There’s a small white flower accent on the side, and the tail is a fluffy pink pom-pom attached up near the rim (it’s a tiny detail but it really does make the whole thing). I’ve been using mine as a little catch-all, and it also looks great filled with decorative eggs and ribbon bows, so there’s that. Skill-wise, this is Level 2 easy, the kind of project you can pick up and put down without losing your place.
Why You’ll Love This Pattern
It’s a fast, sturdy basket that looks like a bunny without extra fuss.
- Chunky texture: The thick stitch gives you a basket that feels substantial and holds its shape.
- Instant character: The tall ears, flower, and pom-pom tail do all the heavy lifting.
- Actually useful: It works as decor and as a real little basket for small goodies.
What You’ll Need
This one mixes super bulky for the basket with tiny bits of super fine yarn for the flowers, so you’ll juggle a few sizes.
- 6 Super Bulky yarn (fiber not specified, check the yarn label): For the basket and ears I reach for a true super bulky that feels thick, sturdy, and a little rope-like so the shape holds up. You want something that doesn’t split easily because you’ll be working big stitches and you’ll notice any fuzz or fraying fast. Plan on enough grey for the basket and ears, plus small amounts of super fine yarn in white, yellow, and light pink for the flowers.
- 8 mm, 3.5 mm, 3 mm: The 8 mm hook matches the super bulky so the basket works up quickly without turning stiff. The 3.5 mm and 3 mm hooks keep the super fine flower pieces neat and controlled, and I like having both because some super fine yarns run a little thicker or thinner.
- Pom pom making set: This is for the pom poms, and it’s nice for getting them even, but you can wrap yarn around your fingers or a bit of cardboard too.
- Also needed: tapestry needle, scissors, stitch markers
Alternative Yarn Suggestions
That rope-style super bulky look is a little specific, so here are a couple swaps that still give you a firm basket.
- Super bulky chenille: Weight 6, usually around 100 g per ball. It works up fast and feels soft, but the basket will be squishier, so it’s better if you don’t need it to stand very tall.
- Two strands of worsted weight held together: Held double it behaves like a bulky to super bulky, and a typical 100 g worsted ball goes a long way. It gives you more color options and a firmer fabric than some single-strand super bulky, so there’s that.
Color Sequence & Yarn Changes
Grey is your main color for the basket and ears, then the flowers are worked separately in white with yellow centers. Light pink is listed as an optional alternate flower color, so you can swap it in for white whenever you feel like it.
The Quick Stats
Here’s the info you’ll want before you grab your hook.
| Skill Level | Level 2 — Easy |
| Pattern Gauge | Gauge is not critical for this project. Use a hook size that creates a firm fabric so the basket holds its shape and (if used) stuffing/contents do not show through. |
| Finished Size | HEIGHT: 16 cm / 6.3″; DIAMETER: 14 cm / 5.51″ |
| Yarn Weight | 6 Super Bulky |
| Terminology | US |
Stitch Guide & Abbreviations
Keep this list close while you crochet.
- st(s) = stitch(es)
- ch = chain
- rnd = round
- sl st = slip stitch
- sc = single crochet
- hdc = half double crochet
- dc = double crochet
- MR = magic ring
- inc = increase (work 2 sc in same st)
- yo = yarn over
- BLO = back loop only
- sc BLO = single crochet in back loop only
Special Stitches
- Puff Stitch: (yo, insert hook into indicated st, pull up a loop) 7x, yo, pull through all loops except last loop, yo, pull through last 2 loops.
Helpful Tips
This is a beginner-friendly crochet pattern using US terms. The basket is worked in the round, building a flat bottom first, then working upward for the walls. If you want a bigger basket, add extra rounds to the bottom to widen it, then add more rounds to the walls to make it taller. Use your own colors if you feel like it. It changes the whole vibe, by any means.
The Pattern
Follow the sections in order, and you’ll have all the parts ready to assemble your Bunny Basket Crochet Pattern.
Basket Base and Sides
This section builds the basket itself in rounds. Using grey yarn and 8 mm hook. Keep an eye on your round starts, since you’ll be adding slip stitches at the end of later rounds.
Round 1: 6 sc in MR. [6] If you like, tighten the ring right away so the center stays neat.
Round 2: inc 6. [12]
Round 3: (sc, inc) 6x. [18]
Round 4: (sc 2, inc) 6x. [24]
Round 5: (sc 3, inc) 6x. [30]
Round 6: sc BLO 30. [30] This back-loop-only round is the hinge that changes direction for the basket sides, so try not to accidentally catch both loops.
Round 7: sc 30, sl st. [30] The slip stitch is part of the round ending here. Keep it consistent in the next rounds so your seam line stays predictable.
Round 8: sc 30, sl st. [30]
Round 9: sc 30, sl st. [30]
Round 10: sc 30, sl st. [30]
Fasten off and weave in the end (this is the back of our basket).
Ears (Make 2)
These are worked in rows directly onto the basket edge. MAKE 2. Using grey yarn and 8 mm hook. You’ll attach, chain out, then work back down the chain and anchor back into the basket.
Row 1: Attach the yarn by working 1 sc on the front of the basket. [ ] Pick the exact stitch on the front edge where you want the first ear to sit, since that placement sets the spacing for the second ear.
Row 2: ch 9. [ ]
Row 3: Starting in 2nd ch from hook: sl st, sc, hdc, dc 3, hdc, sl st into the basket edge st (next to the st where you started). [ ] When you make that final slip stitch into the basket edge stitch, aim for a clean insertion point so the ear feels secure.
Cut yarn; tie with the starting piece and weave in ends. Skip 2 sts and repeat to make the 2nd ear.
Flowers (1 Big, 2 Small)
These are small add-ons made separately, then sewn on later. Hook: 3.5 mm, 3 mm. Make 1 big and 2 small flower. Keep your yarn ends a bit longer than usual since you’ll use them for sewing.
Round 1: Using white yarn: 5 hdc in MR, sl st. [5] That slip stitch closes the round, so place it carefully into the first hdc.
Round 2: ch 3, [puff st in same hdc st, ch 3, sl st in same hdc st] 5x. [ ] You’re building each petal cluster into the same hdc stitch each time, so don’t drift into the next stitch by accident.
Round 3: Using yellow yarn: Attach yarn anywhere in the center, ch 4, puff st in 3rd ch from hook. [ ] When you attach in the center, catch enough strands so the yellow center doesn’t pull loose later.
Fasten off, tie ends together, leaving a longer piece for sewing later. Fasten off, and weave in the end on the opposite side where you joined. Tie the ends together.
Finishing & Assembly
Attach the pompom on the back of the basket. You can choose the place; place it at the edge if desired. Use a yarn needle and the pompom ties (or a length of matching yarn) and stitch through the basket fabric several times, then knot on the inside and bury the ends between stitches so they don’t pop back out.
Sew the flowers between the 2 ears. Place them as you prefer. I like to pin them first (or hold them with a couple of long basting stitches), then sew through the flower center and a few petal bases, catching the basket stitches underneath. Weave the sewing yarn through the inside of the basket to hide it, then knot and trim.
Baby & Child Safety Notes
If this Bunny Basket Crochet Pattern is going to be handled by a baby or toddler, sew every attachment down firmly and weave in ends with extra care. Pompoms and small sewn pieces can come loose if they’re only lightly tacked, so stitch them on with multiple passes and secure knots, then bury the tails.
Frequently Asked Questions
Mine comes out about 16 cm tall and 14 cm across, so roughly 6.3 inches tall and 5.51 inches in diameter. If you crochet tighter or looser, you can land a little off that, so don’t stress over a millimeter here.
I grab the 8 mm hook for the main basket since I’m working with super bulky yarn there. The 3.5 mm and 3 mm hooks are for the smaller details, and I swap between them depending on how firm I want those pieces to feel. It’s a small thing, but it changes the look.
You can, but the basket won’t land at 16 cm by 14 cm anymore, and it won’t feel as sturdy. I stick with 6 super bulky because it gives that chunky, basket-y shape without me fighting it the whole time.
Hook size is the first knob I turn. If it’s too big, I go down a hook size for the main basket, and if it’s too small, I go up. Also check your tension, because super bulky yarn shows every little mood swing in your hands, so there’s that.
I’d call it Easy, Level 2. If you’ve already made a couple simple projects and you’re comfortable holding consistent tension, you’ll be fine. The only part that slows people down is switching hooks for the small bits, but it’s not hard, just a little fussy.
Final Thoughts
That’s it for my Bunny Basket Crochet Pattern. I love how fast this one works up in super bulky yarn, and the finished basket ends up being the kind of cute you can actually leave out on a shelf without feeling cheesy, you know. If you make one, tell me what you’re using it for, candy, keys, little toys, whatever. And if you’re the type who forgets patterns the second you close the tab, save it to Pinterest now, because I do that all the time.