
If you’ve been hunting for a cute, wearable spring make, this Easter Jewelry Crochet Pattern walks you through crocheting dangle earrings with tiny flowers and light, lacy motifs. They fit right into Easter season without being loud about it, just soft colors and little floral details you can wear to brunch, church, or wherever you end up.
About This Project
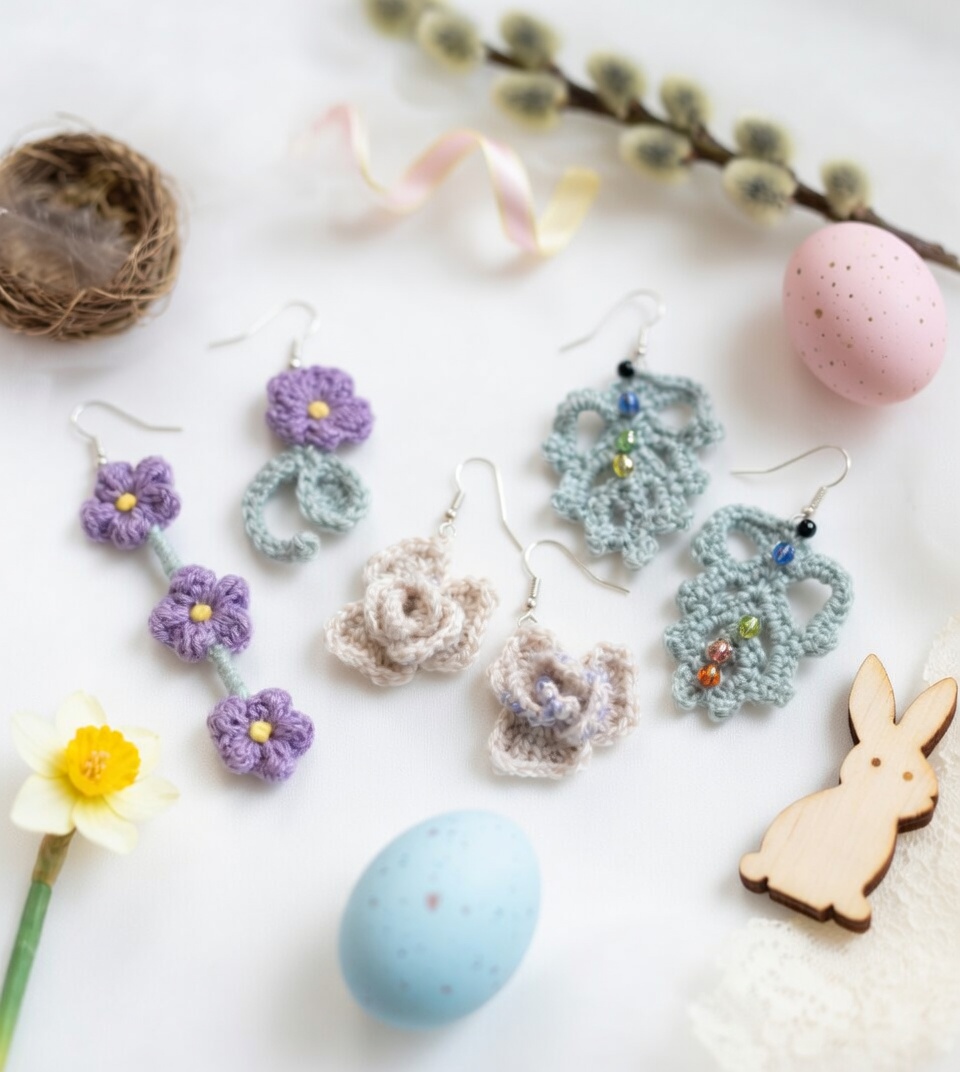
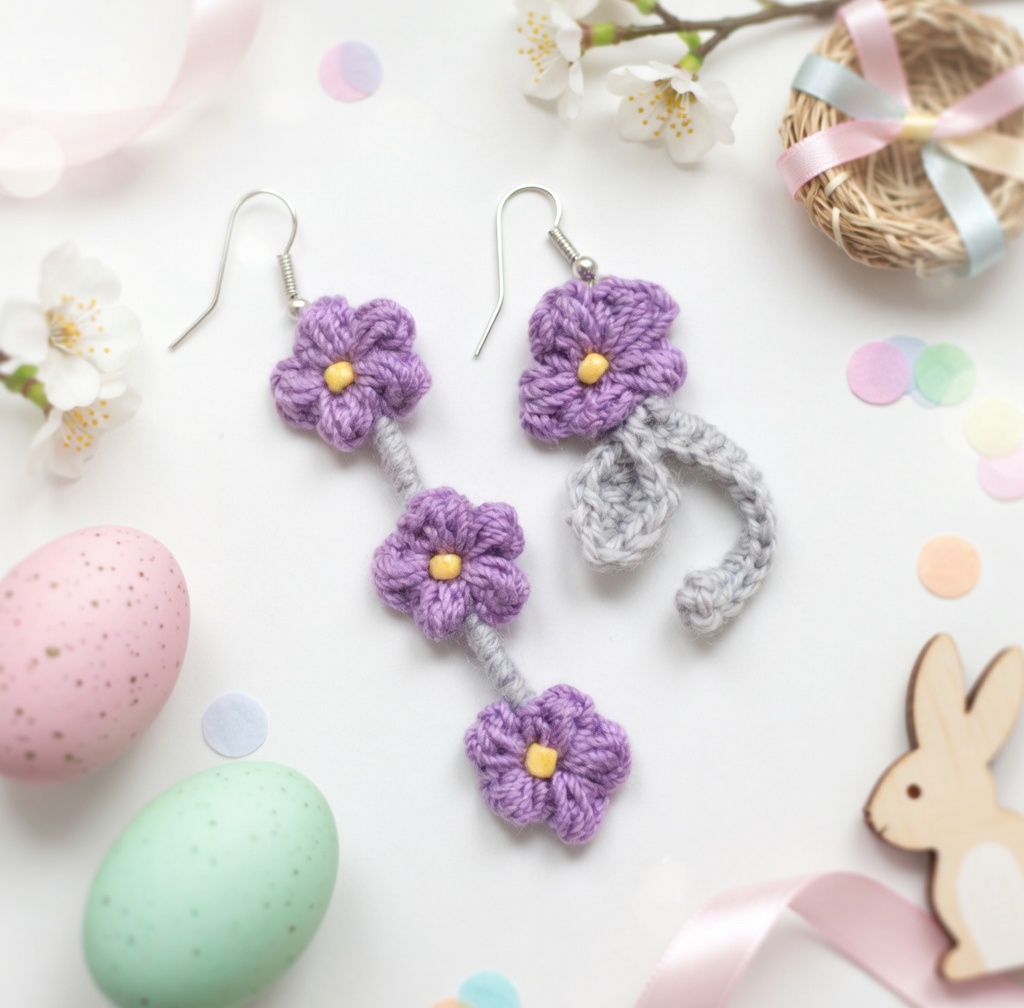
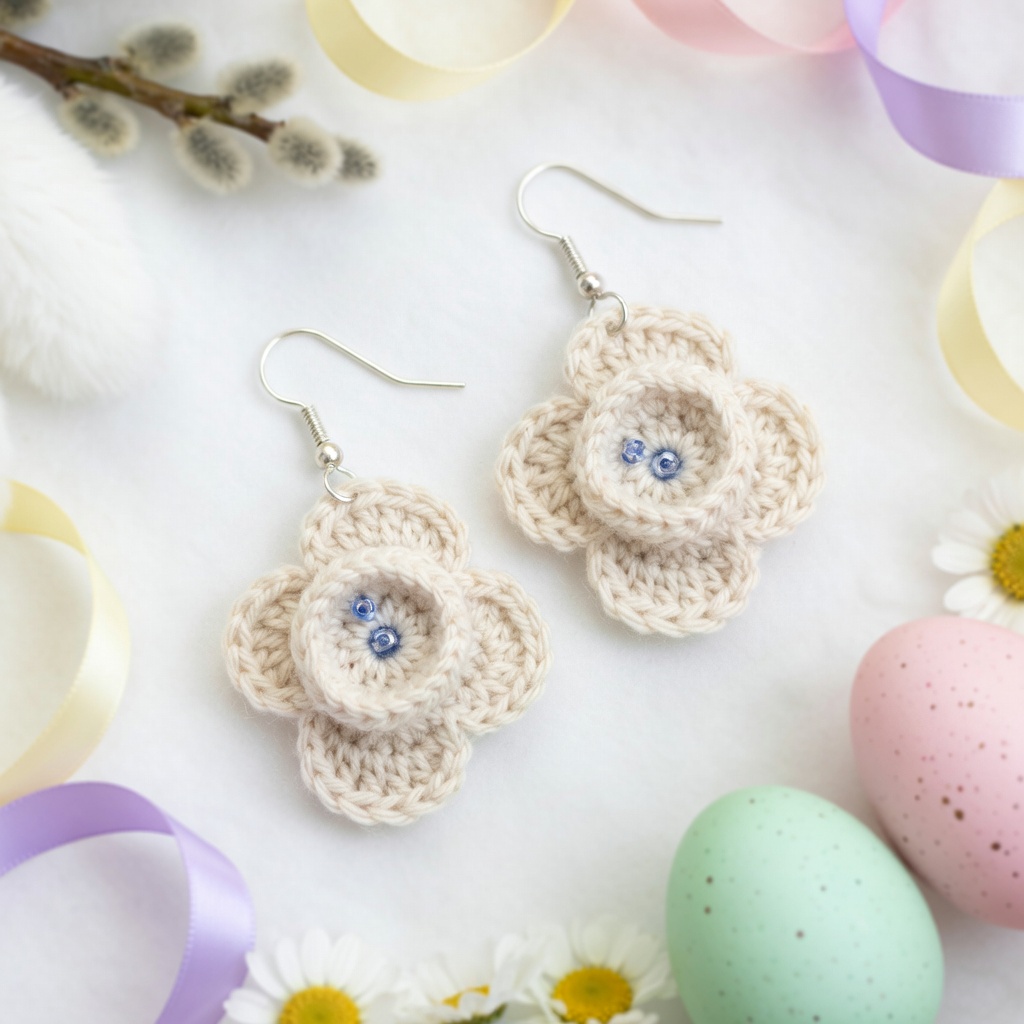
This project is all about small, pretty details. The sample pairs include a vertical chain of three tiny purple five-petal flowers with yellow centers connected by a pale green stem, plus another style with one purple flower sitting above a curled pale green tendril. There are also layered rosette-style flowers in off-white, and pale blue lacy floral shapes dressed up with little multicolored beads.
I wanted a mix-and-match feel, like you could make a few pairs and they’d all still look like they belong together. It’s a Level 3 intermediate kind of project, mostly because you’re working small and you’ll want your stitches to look neat. But it’s not fussy for the sake of being fussy, if that makes sense (and yes, they’re as fun to make as they look).
Why This Pattern Stands Out
You can crochet a whole set of earrings fast without them looking basic.
- Mix-and-match designs: You get florals, rosettes, and lacy motifs so every pair feels a little different.
- Big impact, tiny pieces: Small flowers and curls read as detailed jewelry without a huge time commitment.
- Easy to personalize: Color swaps and optional beads change the vibe immediately.
What You’ll Need
This is tiny crochet plus basic jewelry findings, and you will only use small scraps of two colors for the stems and flowers.
- 0 Lace weight yarn (fiber not specified, check the yarn label): For this project I reach for a smooth lace weight that holds a crisp little curve and does not fuzz up when you tug on tight stitches. You want something that feels firm and a bit wiry in the strand, not lofty or stretchy, since these pieces need to look clean at a small scale. Yardage is not stated for green (stems) or flower-colored (flowers), but it is just small amounts of each.
- 2.10 mm hook: This size keeps the stitches tight and neat in lace weight yarn, so the petals and stems look defined instead of floppy.
- Earring hooks: Use whatever style you like, but make sure the loop is fully closed once the crochet is attached so nothing can slip off.
- Jewelry wire: This gives the long stem its shape and helps the earrings hang the way you want, especially if your yarn is on the softer side.
- Pliers: You will need these to open and close jump rings and to bend the wire cleanly without kinking it.
- Seed beads: These add a little weight and a finished look at the flower center, and they help the daisy read as a daisy even in tiny stitches.
- Also needed: scissors, tapestry needle, stitch markers
Alternative Yarn Suggestions
Lace weight is a little niche, so if you do not have it, you can swap in other fine yarns and just adjust the hook to keep stitches snug.
- Fingering weight cotton: 1 Fingering, about 400 m per 100 g. It gives a crisp flower edge and behaves nicely with wire, just go down a hook size if your stitches start looking loose.
- Size 10 crochet thread (cotton): Thread, about 250 to 300 m per 50 g. It makes very tidy petals and a smooth stem, and it is easy to find in lots of colors for tiny florals.
Color Sequence & Yarn Changes
I make the green stems first, then switch to the flower-colored yarn for the daisies. For clean changes, cut the yarn and rejoin rather than carrying it, since everything is so small.
Quick Details
Here’s the quick stuff so you can get moving.
| Skill Level | Level 3 — Intermediate |
| Pattern Gauge | Gauge is not critical for this project. Use a hook size that creates a firm fabric appropriate for jewelry and able to support beads without gaps. |
| Finished Size | Approximately 3–5 cm in length (varies by yarn and hook choice). |
| Yarn Weight | 0 Lace |
| Terminology | US |
Stitches & Abbreviations
Keep this list close while you crochet.
- ch = chain
- dc = double crochet
- hdc = half double crochet
- mc = magic circle
- rep = repeat
- sc = single crochet
- sk = skip
- sl st = slip stitch
- st(s) = stitch(es)
- tr = treble crochet
- yo = yarn over
Special Stitches
- puff (3 yo): Yo, insert hook in indicated st/sp, yo and pull up a loop (3 loops on hook). (Yo, insert hook in same st/sp, yo and pull up a loop) 2 more times (7 loops on hook). Yo and pull through all loops on hook. Ch 1 to close puff if instructed by the pattern.
Important Notes
Beading is optional. When you see instructions in curly brackets { }, use those instead of the standard steps in square brackets [ ]. For the Daisy Chain puff stitches, use only 3 yarn overs (yo) so the puff stays small and tidy. One more thing that can feel backwards at first: the front of the flower will be the back of the piece while you’re working.
Easter Jewelry Crochet Pattern Instructions
Pick the motif you want to make first, then follow that section straight through before moving on to assembly.
Corylus Colurna (Hazel Leaf) Motif
This section walks you through the hazel leaf from the foundation chain up to the top loop for hanging. If using beads, string 6 beads onto the yarn before starting. Don’t worry if the “work in the round” moment feels abrupt. It’s just turning the edge and continuing along the other side.
Row 1: Row 1: Slip knot, ch 6, turn. []
Row 2: Row 2: Work in back loops: sk first ch, [1 sc in next 5 ch]. {Alternative with beads: 1 sc in next 2 ch, pull bead up, yo, insert hook into next st, yo, pull through all 3 loops, sc in next 3 ch, add second bead same way}. [] If you’re doing the beaded option, that “pull through all 3 loops” moment is the bead sitting at the front of the stitch. Keep the bead snug to the hook before you yarn over.
Row 3: Row 3: Work in the round: ch 1, 1 sc into other side of first sc of Row 2, ch 3, sk 2, 1 sc, ch 3, turn. [] You’re pivoting to work into the unused side of the stitches from Row 2. Find the “other side” of that first sc and place the sc cleanly so the edge doesn’t twist.
Row 4: Row 4: 1 sc into last sc made, 3 sc into ch sp, 1 sc. In ch-1 sp: (1 sc, pull bead up, ch 1, 1 sc), ch 3, sk 2, 1 sc, ch 3, turn. [] When you hit the ch-1 space, pause and make sure you’re in the correct gap before adding the bead. It’s easy to drift into the neighboring chain space once the edging starts building.
Row 5: Row 5: 1 sc in sc, 3 sc in ch sp, 1 sc. In ch-1 sp: (1 sc, ch 1, 1 sc), ch 4, sk 3, 1 sc, ch 3, turn. [] Keep your chain-4 relaxed. If you yank it tight, the next “sk 3” can get hard to read because the fabric bunches.
Row 6: Row 6: 1 sc in sc, 4 sc in ch sp, 1 sc. In ch-1 sp: (1 sc, pull bead up, ch 1, 1 sc), ch 4, sk 3, 1 sc, ch 3, turn. [] If your bead wants to slide to the back, bring it forward with your non-hook hand right before the yarn over.
Row 7: Row 7: 1 sc in sc, 4 sc in ch sp, 1 sc. In ch-1 sp: (1 sc, ch 1, 1 sc), ch 5, sk 3, 1 sc, ch 3, turn. [] On the longer chain sections, count the skipped stitches carefully. The “sk 3” stays the same even as the chains change.
Row 8: Row 8: 1 sc in sc, 6 sc in ch sp, 1 sc. In ch-1 sp: (1 sc, pull bead up, ch 1, 1 sc), ch 5, sk 3, 1 sc, ch 3, turn. [] The 6 sc into the chain space can crowd the space if your tension is tight. If needed, pinch the chain space open with your fingers while you place those stitches.
Row 9: Row 9: 1 sc in sc, 6 sc in ch sp, 1 sc. In ch-1 sp: (1 sc, ch 1, pull bead up, ch 1, 1 sc), sl st to next sc and bind off. [] That last bead placement is inside the ch-1 space sequence. Do the bead exactly where written, then use the slip stitch to anchor before binding off so the top loop stays secure.
Push the last bead to the front and attach earring hooks to the top loop.
Daisy Chain, Long Earring
You’ll crochet three small flower units in a chain, then add wire support and a crocheted stem along the back. Thread 3 beads onto your flower-colored yarn before starting. Keep the beads parked a few inches away until you need to pull one up.
Row 1: Row 1: Slip knot, pull bead up, ch 1. Rep *ch 1, puff, ch 1, sl st* 3 times in one side of ch 1, and 2 times in the other side. [] Work both sides of that ch-1 loop like you would an oval start. If your puff stitches vary in height, check that you’re wrapping and pulling up loops consistently before the final pull-through.
Row 2: Row 2: Ch 5, pull up bead, ch 1. Rep *ch 1, puff, ch 1, sl st* 2 times in one side. Move ch 5 and previous flower to the front of the hook, then rep 3 times in the other side. [] The “move to the front” part matters. It keeps the chain and earlier flower out of your way so you don’t accidentally stitch through them while you build the next set of puffs.
Row 3: Row 3: Ch 5, pull up bead, ch 1. Rep *ch 1, puff, ch 1, sl st* 3 times in one side. Move previous flowers to the front, rep 2 times in other side. Do not bind off. [] Leaving the yarn attached is what lets you go straight into the wire and stem steps without a weak join. Set your hook down carefully so you don’t pull the working loop out.
Row 4: Adding wire: Thread a wire (1–2 cm longer than the earring) through the beads along the back. Bend one end around a bead (bottom) and make a loop at the other end (top). [] Use a wire that holds its shape but still bends cleanly. When you form the top loop, make it large enough for your jump ring or hook hardware to pass through.
Row 5: Stem (Row 4): Attach green yarn to the Row 3 loop. Ch along the back of flowers, sc around both the wire and the ch-5 spaces. [] When you single crochet around the wire, keep your stitches snug so the wire doesn’t rattle inside the stem. Try not to split the wire with your hook. It happens.
Fasten off, weave in ends
Daisy Chain, Short Earring
This version makes one flower and a separate stem piece, then you join at the flower. Thread 1 bead onto flower yarn before starting. Since you bind off after the flower, leave yourself a tail you can actually weave in without swearing.
Row 1: Flower (Row 1): Slip knot, pull bead up, ch 1. Rep *ch 1, puff, ch 1, sl st* 3 times in one side of ch 1, and 2 times in the other side. Bind off. [] Place the bead right at the start as written. If it wants to slip away, pinch it in place while you make the first chain.
Row 2: Stem Row 1: Slip knot, ch 6, turn. []
Row 3: Stem Row 2–3: Sk 1, 1 sc, 1 hdc, 1 dc, 1 hdc, 1 sc, ch 2. Rep on the other side of the base chain. [] You’re working down one side of the foundation chain, then coming back along the other side. The ch 2 acts as the turning point, so don’t skip it or the second side won’t line up.
Row 4: Stem Row 4: Sl st into back of flower, ch 11, sc into 2nd loop from hook, sc around ch ~13 times to create a curl. Sl st into the first sl st of the row. [] When you’re single crocheting around the chain to make the curl, aim your hook into the open space around the chain rather than trying to pick up specific loops. Keep the stitches packed enough to hold the curl, but don’t fight it.
Fasten off, weave in ends
Rose Motif
This rose is built from a small base circle, then petals are added one at a time by slip stitching into the base and working short rows for each petal. Beads are optional; thread 31 seed beads onto yarn before starting for a beaded look. If you do use beads, slide them up only when you’re ready so they don’t clutter your working area.
Row 1: Row 1: Mc, 6 sc, sl st closed. [6] Mark the first sc if you like. It makes it easier to see where you’re skipping stitches for the early petals.
Row 2: Petal #1: Ch 3, sk 1, sl st, ch 1, turn. (Row 3) 5 sc into ch-3 sp, sl st, ch 1, turn. (Row 4) 1 sc, 2 sc, 1 sc, 2 sc, 1 sc, sl st into ch-3 sp. [] Keep your slip stitch join into the ch-3 space firm. That join is the hinge point for the petal and it’s doing a lot of work.
Row 3: Petal #2: Ch 3, sk 2 on base circle, sl st, ch 1, turn. Rep Rows 3–4. [] The “sk 2 on base circle” is counted on the original 6 sc ring. Count carefully so you don’t run out of base stitches too early.
Row 4: Petal #3: Ch 3, sl st into stitch skipped in Row 2 behind Petal #1. Rep Rows 3–4. [] You’re reaching behind Petal #1 to use that earlier skipped stitch. If it’s hard to find, fold the petal forward and look at the ring stitches underneath.
Row 5: Petal #4: Ch 4, sk 2 on base circle, sl st, ch 1, turn. (Row 12) 6 sc into ch-4 sp, sl st, ch 1, turn. (Row 13) 1 sc, 2 dc, 1 sc, 2 dc, 1 dc, 1 sc, sl st into ch-4 sp. [] This is the first ch-4 petal. Don’t accidentally make it ch 3 out of habit. The stitch pattern that follows depends on that space.
Row 6: Petal #5: Ch 4, sl st to base of Petal #1 (working through the gap of Petal #3). Rep Row 12 instructions. (Row 16) 1 sc, (1 dc, 2 tr), 1 dc, 1 hdc, (2 tr, 1 hdc), 1 sc, sl st into ch-4 sp. [] When you slip stitch to the base of Petal #1 through the gap of Petal #3, take a second to confirm you’re catching the base and not a petal edge stitch. It’s a common place to mis-anchor.
Row 7: Petal #6: Ch 4, sl st to other side of Petal #1 base. Rep Row 12 instructions. (Row 19) (1 sc, 1 hdc), (2 tr, 1 dc), 1 hdc, 1 hdc, (1 dc, 2 tr), (1 hdc, 1 sc), sl st into ch-4 sp. [] Those grouped stitches are easy to misread mid-row. I count them out loud as I go, so there’s that.
Row 8: Petal #7: Ch 4, sl st to base of Petal #5. Rep Row 12 instructions. (Row 22) (1 sc, 1 hdc), (1 tr, 1 dc), 1 hdc, 1 hdc, (1 dc, 2 tr), (1 hdc, 1 sc), sl st into ch-4 sp. [] Make sure you’re slip stitching to the base of Petal #5, not into the ch-4 space itself. The anchor point changes how the petal sits on the base.
Bind off and attach hooks to your preferred top position.
Putting It All Together
Corylus Colurna (Hazel Leaf): Push the last bead to the front and attach earring hooks to the top loop. Use pliers if your jump rings are stiff, and open rings side-to-side instead of pulling them apart.
Daisy Chain (Long Earring): Thread a wire (1–2 cm longer than the earring) through the beads along the back. Bend one end around a bead (bottom) and make a loop at the other end (top). The bottom bend keeps the wire from sliding out, and the top loop is your hardware connection point, so make it neat.
Daisy Chain (Long Earring): Attach green yarn to the Row 3 loop. Ch along the back of flowers, sc around both the wire and the ch-5 spaces. Work the single crochets tightly enough to grip the wire, but don’t compress the chain spaces so much that the stem becomes hard to stitch through later.
Rose: Attach hooks to your preferred top position. If you’re deciding where that is, hold the rose up by a scrap loop of yarn first and see where it hangs before committing with a jump ring.
Frequently Asked Questions
Mine land around 3 to 5 cm long. If you swap yarn or change hook size, that number moves fast, so don’t get too attached to an exact measurement.
I use a 2.10 mm hook because it keeps the stitches crisp at this tiny scale. If you go up a size, you’ll get a slightly bigger, softer-looking piece, and if you go down, everything tightens up and shrinks.
I make these with lace weight yarn, weight 0. Thicker yarn can work, but the whole vibe changes and you’ll end up closer to a mini ornament than delicate jewelry, so there’s that.
This is Level 3 intermediate, mostly because small hooks and lace yarn don’t forgive much. If you’re newer, you can still try it, but expect to slow down and redo a few bits until your tension settles in.
Tension is the big one, especially with lace weight. Hook size and yarn choice do the rest, and even a tiny change can bump you out of that 3 to 5 cm range pretty quickly.
Now It’s Your Turn!
If you make this Easter Jewelry Crochet Pattern, I want to see what you chose for yarn and how your finished size turned out, because it always surprises me a little. Save it to Pinterest so you can find it again when you’re in the mood for a quick accessory project, and drop a comment with your hook size and your final length. I read them all, even the ones that are basically just, ‘Mine came out tiny,’ because SAME.